This article will discuss some best practices around troubleshooting and debugging your Oracle EPM environment.

Oracle EPM (Hyperion) is a complex system that is composed many modules that work together to perform different functions. Typically, in design, creating a modular approach is a best practice. However, the Oracle EPM modules were created with disparate architectures because they acquired over time through purchasing technology from many smaller companies. As a result, the modules interact only at a high level, through network APIs. The result is a complex system with many breaking points, and error messages that can be less than informative. Consequently, troubleshooting and debugging Hyperion is an art form.

The fastest way to debug a critical problem is to have a good understanding of what components represent a known, “good” state.  Only by identifying the abnormal element in the system can one start to resolve a critical issue.

Below Are Best Practices to Follow to Document a Known, Good State

What Should Be Running?

The first question you should ask is, “is everything up?” Typically you would start by checking the URLs you use for each product – ensuring you can login. These URLs would typically include the load balancing name.

Example of End User/Administrative URLs

Shared Services http://hyperion.svr.com/interop
Hyperion Planning http://hyperion.svr.com/HyperionPlanning
Essbase Admin Services  http://hyperion.svr.com/easconsole/console.html
Workspace http://hyperion.svr.com/workspace
Web Analysis http://hyperion.svr.com/WebAnalysis
FDM http://hyperion.svr.com/HyperionFDM

Set Up Port Monitoring Software

You can also get a ton of info in a quick glance by setting up port monitoring software. Remember to include the relational database in your monitoring. Sometimes the DBA will take the database down unexpectedly, or the database user IDs will expire. Additionally, it is easy to have 20-30 Hyperion related services or processes running per environment distributed among multiple hosts. It’s too time consuming and error prone to check manually.

An Example of a Custom Java Based Port Monitor

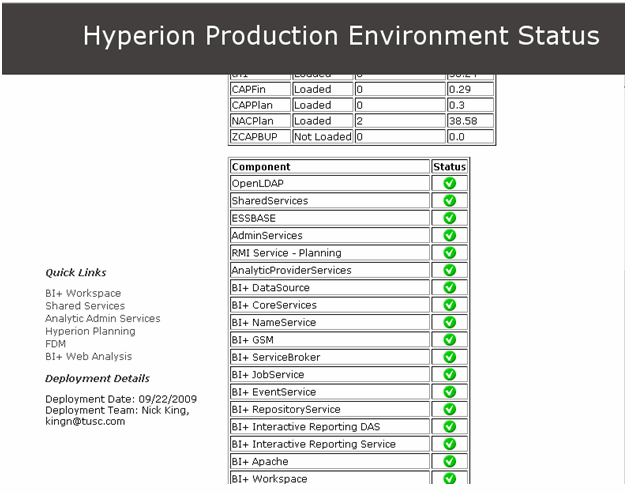
To gather a list of ports within the environment there are a few aids to use for reference. Oracle EPM Version 11 includes a diagnostics web form that will show the status of some of the products. This can be found under the Windows Start Menu, under Programs -> Foundation. This might be a good place to get started.

Also, refer to the Oracle EPM Documentation, Install Start Here Document for typical port reference.

http://download.oracle.com/docs/cd/E17236_01/epm.1112/epm_install_start_here.pdf

An Example of Some Common JVM Ports

Application Server Cluster/Node(s) Port
Workspace svr01 45000
Web Analysis svr01 16000
Financial Reports svr01 8200
Shared Services svr01 58080
Analytic Provider Services svr04 13080
Hyperion Planning svr02 8300
Strategic Finance svr04 7750
Essbase Admin Services svr04 10080
EPMA svr02 19091

Stopping and Starting the Environment

Operational procedures are important too. This means having a reliable start and stop procedure for the environment. Given the complexity of the Hyperion environment, there is no excuse for problems occurring while bringing an environment back up after routine maintenance. One common issue that comes up is a service did not start completely, which can be found by using the port monitoring method above. Also, sometimes the services do not fully stop – causing residual processes to mess up the restart procedure. This might include extra ESSVR processes indicating the Essbase application did not stop properly, or a JVM process which is hung. As a precaution, check the port monitoring software after stopping the environment to ensure all the components are indeed down. It is time consuming when this type of issue is encountered. In a Windows environment you might take the environment down through your normal process, then kill any remaining “Java” and “Hyperion” related processes using task manager. In a Unix environment, after stopping the environment, “kill -9 -1” can be used as a last resort. A reboot will always solve this type of issue, though not often actually needed; it might be faster as a last resort for the unskilled admin needing to fix unexplainable issues.

Functional Validation Script

Functional validation is a set of very simple actions that can be performed within a few minutes to validate the functionality of the environment. This is absolutely necessary to perform before handing the system back over to end users after a routine maintenance.  This task can be either performed by the Hyperion Admin or handed over to the Help Desk. It should, at a minimum, include running a few types reports (HFM, FR, WA), log into Essbase, Planning, HFM, etc… As you discover other reoccurring issues you may want to include more specific checks to ensure common “gotchas” are ironed out before handing over to the end users.

Knowledge of the Architecture

The Hyperion administrator has to be technologically savvy. However, many times Hyperion will tell you exactly what the problem is. The first place to look when encountering an issue is the logs! Take time to find and document the log files for every product in your environment.  Most administrators are a bit intimidated by the number of logs generated by the system, but this is the first place to look. Familiarize yourself with the various logs in the environment. This includes WebLogic logs, JVM logs, Hyperion logs, and operating system logs. If you are lost, a good place to start is search for *.log, sort by date, and look at the directory for the product name. You might even keep a record of each log after starting the service successfully so that you can compare to a good state if there is a problem.
Additionally, it is necessary to have context around how the environment works. This can be achieved by reading the product manuals, looking at architecture diagrams, and attending training sessions. Get involved in the environment. Try to understand both the technical details (ports, logs, different components…etc) and the functional basics (create a planning form, edit an outline, load data into Essbase, run a consolidation) of each Oracle Module.

A Good State: Create a Knowledge Base

Hyperion issues commonly come up more than once. Create a shared, searchable, knowledgebase to track issues and their resolutions. This will help you train your team as it expands and changes over time.

Final Comments

The focus of this article was to provide the Oracle EPM Administrator with best practices on how to document the current state of the Oracle EPM System. This is the most important part of being able to understand complex issues as they come up. More technical detail will be provided in the Oracle EPM Troubleshooting and Debugging Guide (Part 2 of 2).


If you have recently upgraded your web browser to IE8 and attempted to use Hyperion Workspace, you’ve likely encountered difficulty in navigating the interface. When a user clicks on the wheel in the upper left hand corner, selects “Applications,” they can’t see the menu as it apearrs to be condensed. 


This issue can be quickly resolved by making a browser modification to the IE security. It is best to run this settings change past your IT department to ensure it will not open holes in your company’s security profile.


To correct this issue, 


1.       Open IE8


2.       select “Tools”->”Internet Options”


3.       Select the “Security” tab and “Custom Level”.


4.       You will have 4 zones where security changes can be performed (Internet, Local Internet, Trusted sites, Restricted sites). The change can be made to each of these 4 zones if necessary, but it’s possible only one zone needs modified. Test the combination that works for your environment and fits your companies IT/security profile.


5.       Select the “Internet” zone and scroll down the menu of options to find “Allow script-initiated windows without size or position constraints”. This will likely be set to “Disable”… select “Enable” and click “OK”. (If prompted, accept the change just made to the zone security).


6.       Select “OK” from the security tab to finalize the modification.


7.       Test the modification to verify the change worked as intended. As noted above, you might need to enable this setting on multiple zones in order for the setting to take effect.


Introduction

Many companies have in depth working knowledge of Hyperion Essbase and are looking to enhance their enterprise reporting capabilities to the next level. Companies typically have specific processes and calculations that set them apart in their industry. However, they are often limited to basic reporting capabilities provided by the standard functions in Essbase. Additionally, complex operations can quickly become arduous using Calculation Scripts and Business Rules. This post will demonstrate the how to easily build Custom Java Routines to extend Essbase and dramatically reduce development time.

Complete details will be provided on how to implement a simple customized logging function for use in Calculation Scripts and Business Rules. Essbase’s streamlined, parallel nature makes it difficult for application developers to trace line by line. By using Java to implement a custom logging routine, one may use personalized log entries within their Essbase scripts. Consequently, developers can add tracing to their scripts and quickly determine how Essbase is approaching each calculation. Accordingly, application developers are able to see exactly how the script is being executed – providing quick debugging and faster development time. One powerful feature is to help determine block creation  within FIX statements.

The first step to integrating a custom Java routine into Essbase is to write some simple Java code. It is very easy – the code does not have to include any special APIs for Essbase.  During development, a few issues were encountered where Essbase was a bit picky about how the code is written.  Here are a few tips to help in getting started. These tips were gathered while doing real development, and it is best to follow at first, though you may revisit the items and find out what will work for you.

  • Do not include the code in a package such as “com.company.product_name” – remove the “package” declarative at the top of the code
  • Do not use the keyword “this” to refer to variables
  • Do not overload methods
  • Set all methods and variables to static

With these provisions in mind, the following code can be written to implement a custom logging routine.

CustomLoggerV2.java

import java.io.FileWriter;
import java.io.Writer;
import java.io.PrintWriter;
import java.io.StringWriter;
import java.util.Calendar;
import java.util.ArrayList;

public class CustomLoggerV2
{

    private static String logFile;
   
    public static int logFilterLevel;
   
    public static void setLogFilterLevel(int logFilterLevel2)
    {
        logFilterLevel = logFilterLevel2;
    }
   
    public static void setLogFilename(String logFilename)
    {
        logFilterLevel = 0;
        logFile = logFilename ;
    }

    public static synchronized void customLog (int logLevel, String message)
    {
        log(logLevel, message);
    }

    private static synchronized void log (int logLevel, String message)
    {
       
       
        // do not log
        if (logLevel < logFilterLevel)
            {
                return ;
            }
       
        try {
       
            Calendar c = Calendar.getInstance();
           
            FileWriter fw = new FileWriter(logFile, true);
               
            fw.write(c.getTime()   ": "   message   "\n");
            fw.close();
             
        } catch (Exception e)
            {
                System.out.println("Error, cannot open , "   logFile);
                e.printStackTrace();
            }
        }

 
}

The code implements three public methods:

  • setLogFilterLevel(int logFilterLevel) – sets the minimum message level to log (think about ERROR=100, WARN=90, INFO=70, DEBUG=0) – so you can easily change the verbosity of the output.
  • setLogFilename(String filename) – The full path to the log file you wish to use
  • customLog(logLevel, String message) – The log message, with its indicated priority

The next step is to package up the code above. It is important to use the same version of Java which is running your Essbase instance. To find the version, look for the JRE being used within the environment, for instance, Hyperion\common\JRE\Sun\1.5.0\bin. To obtain the specific revision, open a cmd prompt, cd to the bin directory, and run “java –version”.

E:\Hyperion\common\JRE\Sun\1.5.0\bin>java -versi
java version "1.5.0_11"

Java(TM) 2 Runtime Environment, Standard Edition (build 1.5.0_11-b03)

Java HotSpot(TM) Client VM (build 1.5.0_11-b03, mixed mode

To compile the code a JDK is required, which will contain the javac command. Hyperion only packages the JRE, meaning you will have to download the correct JDK in order to compile the code. You can find older versions of Java JDK from Oracle(Sun)’s web site. Once you have obtained the correct version of the JDK, compile and package up the code:

javac CustomLoggerV2.java

jar -cf CustomLoggerV2.jar CustomLoggerV2.class

Next, copy the CustomLoggerV2.jar file into the Essbase file structure:

Copy CustomLoggerV2.jar into the E:\Hyperion\products\Essbase\EssbaseServer\java\udf folder. If the udf folder does not already exist, create it.

Now it is time to start including the Java class within Essbase. Essbase runs within its own JVM and therefore has its own Java security. In the example above, we are writing to a local log file, which will violate the default security policy setup in the udf.policy file. The file is usually found in Hyperion\products\Essbase\EssbaseServer\java . The simplest way to get around the security concerns for development purposes is to remove the comment from the last line in the file, which effectively includes the directive “permission java.security.AllPermission”

permission java.util.PropertyPermission “java.vm.version”, “read”;

permission java.util.PropertyPermission “java.vm.vendor”, “read”;

permission java.util.PropertyPermission “java.vm.name”, “read”;

// Uncomment the following line if you want to remove all restrictions

permission java.security.AllPermission;

};

Now that the Essbase security and jar file have been put in, a restart of the Essbase process is required to register the changes. Please restart Essbase now.

The final step is to run some maxl statements to register the public java methods with Essbase.

CustomLoggerV2.mxl

create or replace function '@JCustomLoggerV2_setLogFilename'

as 'CustomLoggerV2.setLogFilename(String)'

spec '@JCustomLoggerV2.setLogFilename(absolute file name)'

comment 'Nicholas King'

with property runtime;

create or replace function '@JCustomLoggerV2_customLog'

as 'CustomLoggerV2.customLog(int, String)'

spec '@JCustomLoggerV2.customLog(log level, log message)'

comment 'Nicholas King'

with property runtime;


create or replace function '@JCustomLoggerV2_setLogFilterLevel'

as 'CustomLoggerV2.setLogFilterLevel(int)'

spec '@JCustomLoggerV2.setLogFilterLevel(filter level)'

comment 'Nicholas King'

with property runtime;

One final thing… In order to run a custom java function, the value of the result has to be stored in an Essbase member. This is true even if there is not any use for the return value, such as this case where there is no value returned from the Java methods. To get around this, create a new Essbase member called “No Measure” somewhere within your Essbase outline. This will act as a dummy member intended only to direct the return value, if any, of the Java methods. An example is shown below.

Sample Calc Script or Business Rule to Invoke the Logger

//ESS_LOCALE English_UnitedStates.Latin1@Binary

/* SETUP The Logger */

/* Fix on something so it runs only once */

FIX (Actual, Texas, "100-10")

"No Measure" = @JCustomLoggerV2_setLogFilename("E:\CustomEssbaseLog.log");

"No Measure" = @JCustomLoggerV2_setLogFilterLevel(50);

ENDFIX;

/* In your script, do some actual logging */

FIX (Actual, Texas, "100-10")

/* Won’t be displayed */

"No Measure" = @JCustomLoggerV2_customLog(0, "This is a debug message");

/* Will be displayed */

"No Measure" = @JCustomLoggerV2_customLog(50, "This is a normal message");

"No Measure" = @JCustomLoggerV2_customLog(100, "This is an important message");

ENDFIX;

The result of running the script is the log entries will be added to the log file E:\CustomEssbaseLog.log,

Mon Feb 21 01:30:25 EST 2011: This is a normal message

Mon Feb 21 01:30:25 EST 2011: This is an important message

Troubleshooting Tips

A very common error you may receive is,

Error: 1200324 Error compiling formula for [No Measure] (line 8): operator expected after [@JCustomLogger_customLog]

This error is a generic error that indicates something in your custom function is not registered properly.  Unfortunately, there is not a lot of detailed log information at this point to help discover the problem. If you receive this message a few things might help:

  • Retrace your steps – carefully review all instructions above
  • Check that the correct version of Java was used to compile the class file and package the jar
  • Check the jar is in the correct “udf” folder in Essbase
  • Check the syntax of the MAXL to register the functions is correct
  • Simplify your script as much as possible to reduce the possibility of syntax errors

Conclusion

This example shows how to create a custom Java based logger integrated into Essbase. The possibilities are endless – anything that can be done in Java can be added to Essbase. You can create development aids, or even read/modify the values within the cube. For instance, this model has successfully been used to perform complex financial calculations within Hyperion Planning Forms using Business Rules.  It could also be used for integrating Web Services with your cube by reading or writing cube data and interacting with an enterprise Web Service.


As Hyperion applications have become more integrated, the need for multiple servers to support the environment is now required.  Although the recent releases of version 11 are less dependent on the order in which the services start, Hyperion still recommends a specific order to start the services so they perform correctly.  As these services are typically on multiple servers, it is time consuming to perform this operation and it is prone to error.  Many organizations lack the ability to automate this task when services are interrupted, or operating systems are updated, and there is no automated way to start and stop the services.

In2Hyperion is now making available HypServicesManager.  HypServicesManager is an application that will start or stop the services in a predefined order.  An XML file holds the server/service order so the services to be included, and the order in which they start/stop, is completely customizable.  It will impersonate a domain account that has permissions to the respective servers, so the starting or stopping of the services on multiple servers can be performed quickly and remotely.  With command line parameters, it can even be automated.

Keep in mind, HypServicesManager is completely independent of Hyperion services.  Although it was developed to fill the need to manage Hyperion services, it can be used for any windows service as it uses the windows APIs.

I have used this application in multiple organizations and it is often used in a production environment.  With that said, this has not been tested on thousands of environments in every Windows OS.  If it doesn’t work for you, we certainly welcome feedback and will make every effort to fix any bugs that are discovered.

Details on the use of the application are available here.


As an Essbase user, you have more power to improve performance than you think.  How many times do you lock and send data through Excel, SmartView, or web forms, that include zeros?  How many times do you allocate data to a finite level out of convenience?  Understanding what this does to Essbase is critical to understanding how a user can negatively impact performance without adding any value to the analysis or the results the database produces.

I analyzed a planning database used in one of the largest financial institutions in the world.  Over 60% of the values entered were zero.  Another 20% of the values were less than 1 dollar.  By eliminating the zeros, the total calculation time of the planning application was under 20 minutes.  With the zeros, it was nearly 2 hours.

There are two reasons for this.  First, there is a different between empty and zero.  Empty consumes no space to store whereas a zero consumes the same space as 1 billion.  Think of this as a grocery bag.  If you fill a grocery bag with nothing, it takes up no space.  If you fill it with empty cans (a zero), it consumes the same amount of space as if those cans were full (1 billion).

The example below is very common.  Assume that a forecast needs to be done for the last 3 months of the year.  Frequently, a spreadsheet would hold zeros for the first 9 months.  18 cells have zero and 6 cells have a positive value.  That means that 75% of your data could be eliminated by not loading zeros.

The same load with #Missing is more effective.

I highly recommend reading the article explaining dense and sparse to understand what a block is and what it represents before you continue this article.

There is also another very significant factor in loading zeros.  Loading a zero that creates a block just to hold a value of zero can explode the size of the database, as well as the time it takes to consolidate and execute business rules.  The more blocks that have to be loaded and consolidated, the longer it takes to finish.  If each block was a spreadsheet and you had to do this manually, you would have to open each spreadsheet and enter the number into a calculator to consolidate.  If 75% of the blocks you opened were zero, it wouldn’t change your total, but it would drastically increase the time it takes because you still have to open each spreadsheet.   If an Essbase database has 1,000 blocks, and 75% of them only hold zeros, it will likely take 2 or 3 times longer to calc the zeros because it still has to open the block and add the zero.  Remember, a zero acts no differently than a value of 100.

As an example to the above, the following example would create a block for South and West, inflating the database size.


Users can significantly reduce this unnecessary explosion in size by loading a blank as apposed to a zero.  If zeros are already in the database, leaving the cell blank will NOT overwrite the zeros.  If zeros are loaded inadvertently, a #Missing has to be used to remove them.

For all you users loading data, it can be a hassle removing the zeros.  Being responsible can significantly improve your experience with Essbase.  To make it easier, take a look at the function in the In2Hyperion Excel Ribbon that replaces all zeros with #Missing.


Many processes need to write large volumes of data in Excel.  The typical method is to loop through each cell and perform the action.

   Dim CellsDown As Long
   CellsAcross As Long

   Dim CurrRow As Long
   CurrCol As Long
   Dim CurrVal As Long

   '  This can be replaced with the selected range and is just used to illustrate this example.
   CellsDown = 1000
   CellsAcross = 36

   '   Loop through cells and insert values
   CurrVal = 1
   Application.ScreenUpdating = False
   For CurrRow = 1 To CellsDown
       For CurrCol = 1 To CellsAcross
           Range("A1").Offset(CurrRow - 1, CurrCol - 1).Value = CurrVal
           CurrVal = CurrVal   1
       Next CurrCol
   Next CurrRow

Rather than writing the values out cell by cell, it is quicker to store the value in an array and write the array to a range of cells at one time.

   Dim CellsDown As Long
   CellsAcross As Long

   Dim CurrRow As Long
   CurrCol As Long
   Dim CurrVal As Long

   Dim TempArray() As Double

   '  This can be replaced with the selected range and is just used to illustrate this example.
   CellsDown = 1000
   CellsAcross = 36

   '   Update the array
   ReDim TempArray(1 To CellsDown, 1 To CellsAcross)
   Set TheRange = Range(Cells(1, 1), Cells(CellsDown, CellsAcross))

   '   Fill the temporary array
   CurrVal = 0
   Application.ScreenUpdating = False
   For i = 1 To CellsDown
       For j = 1 To CellsAcross
           TempArray(i, j) = CurrVal
           CurrVal = CurrVal   1
       Next j
   Next i

   '   Transfer temporary array to worksheet
   TheRange.Value = TempArray

This same method can be used when altering data.  By changing the following line

            TempArray(i, j) = CurrVal

To this

            TempArray(i, j) = TheRange(i, j) * 3

By using TheRange(i, j), the existing value can be altered


The process of writing values cell by cell took 3.16 seconds.  Using the array method, it took .08 seconds, nearly 40 times faster


When using Workspace to view reports, some users have seen excessively large numbers that don’t belong. If you are having this issue, it could very well be because the default Essbase query engine in 11.1.1.x is the MDX query engine, which can cause documented bug 9062413. Essentially, this bug will cause users to see the same astronomical number in every cell that sits on an intersection to which the user does not have security access. Understandably, this can cause some concern. This issue is expected to be fixed in a future release, but until then, the query engine will need to be manually changed.
The first option is to fix the issue at a report level. This is a relatively quick process and is a good idea if you only have a handful of reports.  To change the query engine setting for a particular report, follow the steps below:

1. Open the report.
2. For each grid, select the entire grid.
3. Right-click and select Data Query Optimization Settings.
4. Deselect the option “Essbase Queries Use MDX.”
5. Save the report.

Repeat the above process for each report.

For users that have a larger number of reports, a better option may be to change the query engine in the properties file on the server.  The benefit to fixing the issue in the properties file is that changes only need to be made once, and all reports will reflect this change.
The file that needs to be edited is located on the Financial Reporting (app) server, typically on the path D:\<Hyperion Home>\products\biplus\lib where <Hyperion Home> represents the root location of the Hyperion install. The file that needs adjusted is the fr_global.properties file.
Open the properties file and add these lines:

# MDX Query Engine has been set as the default in Essbase 11.1.1.x. This can cause bug 9062413 
# which may cause unauthorized users to see a long series of numbers in each cell when running  
# reports. To solve this issue, the below line was added, which switches the query engine.
EssbaseUseMDX=false

Any line preceded by “#” is commented out. Therefore, these can say whatever you prefer, but should give anyone that views this file a good indication why this text is in the file.

Once the properties file has been updated, the following services must all be stopped in the following order, then started in the same order for the changes to take effect.

1. Hyperion Financial Reporting – Print Server
2. Hyperion Financial Reporting – Report Server
3. Hyperion Financial Reporting – Scheduler Server
4. Hyperion Financial Reporting – Web Application (Note – This service may be on the FR (Web) server, not the FR(App) server like the other three services.)

Note – This modification will apply to everyone using the server on which they are made, so be careful when making changes to a shared server.


Many processes need to write large volumes of data in Excel.  The typical method is to loop through each cell and perform the action.

   Dim CellsDown As Long
   CellsAcross As Long

   Dim CurrRow As Long
   CurrCol As Long
   Dim CurrVal As Long

   '  This can be replaced with the selected range and is just used to illustrate this example.
   CellsDown = 1000
   CellsAcross = 36

   '   Loop through cells and insert values
   CurrVal = 1
   Application.ScreenUpdating = False
   For CurrRow = 1 To CellsDown
       For CurrCol = 1 To CellsAcross
           Range("A1").Offset(CurrRow - 1, CurrCol - 1).Value = CurrVal
           CurrVal = CurrVal   1
       Next CurrCol
   Next CurrRow

Rather than writing the values out cell by cell, it is quicker to store the value in an array and write the array to a range of cells at one time.

   Dim CellsDown As Long
   CellsAcross As Long

   Dim CurrRow As Long
   CurrCol As Long
   Dim CurrVal As Long

   Dim TempArray() As Double

   '  This can be replaced with the selected range and is just used to illustrate this example.
   CellsDown = 1000
   CellsAcross = 36

   '   Update the array
   ReDim TempArray(1 To CellsDown, 1 To CellsAcross)
   Set TheRange = Range(Cells(1, 1), Cells(CellsDown, CellsAcross))

   '   Fill the temporary array
   CurrVal = 0
   Application.ScreenUpdating = False
   For i = 1 To CellsDown
       For j = 1 To CellsAcross
           TempArray(i, j) = CurrVal
           CurrVal = CurrVal   1
       Next j
   Next i

   '   Transfer temporary array to worksheet
   TheRange.Value = TempArray

This same method can be used when altering data.  By changing the following line

            TempArray(i, j) = CurrVal

To this

            TempArray(i, j) = TheRange(i, j) * 3

By using TheRange(i, j), the existing value can be altered


The process of writing values cell by cell took 3.16 seconds.  Using the array method, it took .08 seconds, nearly 40 times faster


If you have users that rely on SmartView to pull data from your Essbase and/or Planning application, many of them may have large spreadsheets.  One way to improve the perception of the performance of Essbase is the method in which SmartView (client side) communicates with the server.

APS, Planning, and HFM have the ability to take advantage of compression during the communication process.  When large queries, retrieving and submitting data, are initiated, the performance can be significant.

The default compression settings for APS and Planning are not turned on.  The good news is that turning this on is relatively simple.

Find the essbase.properties file on the APS server and change it to false.  The path to this file is different in versions 9 and 11.  In 11, the path is \Products\Essbase\aps\bin.

smartview.webservice.gzip.compression.disable=false

Open the Hyperion Planning application in question and change the SMARTVIEW_COMPRESSION_THRESHOLD in the System Properties (Administration/Manage Properties – System Properties tab) to a value no less than 1.  This threshold is the minimum size of the query in which compression will be used.  So, a value of 1000 would mean compression would be used for anything greater than 1,000 bytes.

For smaller queries, compression may not be necessary.  It may even decrease performance because of the overhead to compress and uncompress the data.  Every environment is different so there is no “right” answer as to what this value should be.

If you have used compression, please share your experiences.


It is possible for a database in Essbase to become corrupt.  This can be caused by server hangs, software glitches, and a variety of other reasons.  Although infrequent, if a database cannot be loaded for any reason, and it needs to be restored, the following actions can be a quick resolution.  Keep in mind that this will remove the data and it will need to be imported from a backup export.

Before performing this, verify that the database is not attempting to recover.  To determine if this is occuring, open the application log file.  If it states that it is recovering free space, be patient as it may correct itself.

File Structure

Essbase has a simple file structure that it follows.  It can vary with each application depending on the options used.  The area to focus on for this process is below.  The application and database that is being restored would take the place of appname and dbname.

Hyperion\Products\Essbase\EssbaseServer\App\AppName\DbName

Restoring To A Usable State

In this directory, files with the following extensions will need to be removed.  This will delete all of the data  and temporary settings that are causing the application to function improperly.  It will NOT delete the database outline, calc scripts, load rules, or business rules.

  • .ind (index files)
  • .pag (data files)
  • .esm (Essbase kernel file that manages pointers to data blocks, and contains control information that is used for database recovery)
  • .tct (Essbase database transaction control file that manages all commits of data and follows and maintains all transactions)

After these files are removed, verify that the application and database is functioning.  This can be done in Essbase Administration Services by starting the application.  If the application doesn’t start, more research will have to be performed. If the application loads, import the most recent data backup and run an aggregation.

There are a number of other possible file types in this directory.  Below is some information that may be helpful.

Audit Logs

  • .alg:  Spreadsheet audit historical information
  • .atx:  Spreadsheet audit transaction

Temporary Files

  • .ddm:  Temporary partitioning file
  • .ddn:  Temporary partitioning file
  • .esn:  Temporary Essbase kernel file
  • .esr:  Temporary database root file
  • .inn:  Temporary Essbase index file
  • .otm:  Temporary Essbase outline file
  • .otn:  Temporary Essbase outline file
  • .oto:  Temporary Essbase outline file
  • .pan:  Temporary Essbase database data (page) file
  • .tcu:  Temporary database transaction control file

Objects

  • .csc:  Essbase calculation script
  • .mxl:  MaxL script file (saved in Administration Services)
  • .otl:  Essbase outline file
  • .rep:  Essbase report script
  • .rul:  Essbase rules file
  • .scr:  Essbase ESSCMD script

Other

  • .apb:  Backup of application file
  • .app:  Application file, defining the name and location of the application and other application settings
  • .arc:  Archive file
  • .chg:  Outline synchronization change file
  • .db:  Database file, defining the name, location, and other database settings
  • .dbb:  Backup of database file
  • .ddb:  Partitioning definition file
  • .log:  Server or application log
  • .lro:  LRO file that is linked to a data cell
  • .lst:  Cascade table of contents or list of files to back up
  • .ocl:  Database change log
  • .ocn:  Incremental restructuring file
  • .oco:  Incremental restructuring file
  • .olb:  Backup of outline change log
  • .olg:  Outline change log
  • .sel:  Saved member select file
  • .trg:  Trigger definition file.XML (Extensible Markup Language) format
  • .txt:  Text file, such as a data file to load or a text document to link as a LRO used for database recovery
  • .xcp:  Exception error log
  • .xls:  Microsoft Excel file