PBCS Pro Tip: Manage Multiple Test Accounts with One Gmail Address

Working with Jake Turrell always benefits me in many ways.  Jake found a fantastic way to minimize the effort it takes to create test accounts for testing and training Planning users.  You no longer have to create new multiple accounts.

“During the testing phase of most Planning implementations, developers need to create test user accounts.  I typically create at least one test user for each security group so I can verify that the correct access has been assigned.  With an on-premises Hyperion Planning implementation, this is easy – simply create user ID’s in the Shared Services native directory.  With PBCS, creating bulk test ID’s can be difficult, as each user ID requires a unique e-mail address.  If you need 50 test users, should you create 50 fake/temporary e-mail accounts?  Luckily the answer is no.”

Check out how here.

About Jake

Jake Turrell is a Hyperion Architect and Oracle Ace Associate with over 20 years of experience implementing Enterprise Performance Management solutions. Jake’s technology career began in the early 90’s as a Financial Systems intern at Dell in Austin, Texas, administering IMRS Micro Control (the DOS-based predecessor to Hyperion Enterprise). After working at Dell, Jake joined Ernst & Young’s Management Consulting practice where he worked with a variety of technologies. He later returned to the Hyperion world and joined a boutique Hyperion consulting firm in Dallas, Texas.
Jake has spent the last 17 years implementing Hyperion Planning and Essbase solutions for a variety of clients across multiple industries. Certified in both Hyperion Planning and Essbase, Jake holds a BBA from the University of Texas at Austin.


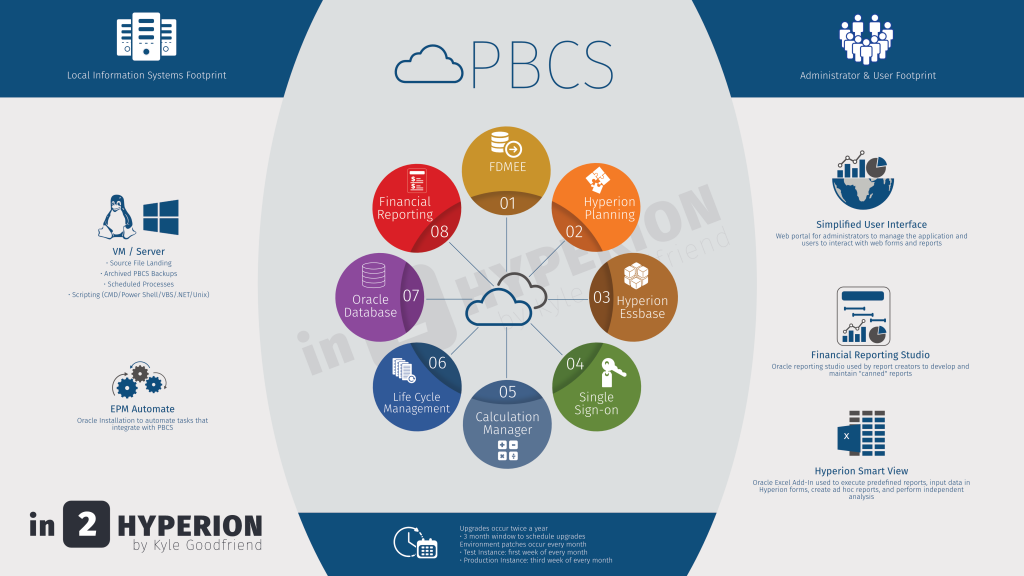
PBCS Architecture

For those of you that know me, I have a little graphic designer in me.  I frequently develop things that may be useful to others in the industry and like to share.  Below are 2 images that you may use with the understanding that the logo has to remain and can’t be re-branded.  If you would like to have this customized and your logo added, contact me and we can discuss the options.

PBCS Architecture

I was asked to summarize the PBCS Architecture.  Since this isn’t proprietary, here you go.

PBCS Architecture


Pizza As A Service

I won’t take credit for this concept.  You can find this all over the internet.  I was a little bored and wanted to present the concept to a client so I decided to recreate it a little more professionally.  This compares software as a service (SASS) to pizza.  Hope you can benefit from it and maybe get a few laughs.

Pizza As A Service


PBCS Release 16.06 Overview

PBCS is about to release a major upgrade (1 of 2 every year scheduled). Oracle released a 29 page document laying out everything that should be expected. Want the abbreviated version?


  • Want your users to see the simplified user interface? You will be able to make it the default.
  • Welcome to EPBCS. This enhanced version will include modules for Financials, Workforce, Projects, and Capital.
  • Users can now create dashboards that include editable forms and ad hoc grids, and include new chart types.
  • Forms, task lists, and reports can be viewed in either list view or hierarchical view.
  • You can now use an attribute dimension as a dimension, as a filter in forms and reports, and within ad hoc grids. Using attribute dimensions enables administrators and end users to perform tasks such as:
    1. Filtering data using attribute members, such as by products with a certain color
    2. Performing cross-dimensional rollups across attribute members
    3. Reporting and analysis with attribute dimension members using Smart View, or financial reports
    4. Using attribute dimensions in dynamic user variables 
Attribute dimensions are optional and are listed separately on the Layout tab of the Form Designer. Drag the Attribute dimension to a Point of View or to a row or column to add it to the form grid.
  • Administrators can create aliases for artifacts similar to alias tables where things like forms can be viewed in native languages.
  • For new applications, administrators can optionally choose a simplified multicurrency option during application creation. Using simplified currency avoids the use of the Hsp_Rates dimension and adds a Currency dimension with exchange rates stored in the Account dimension
  • You can now create smart lists based on dimension hierarchies. This dynamically updates smart list values based on member updates.
  • Form grid display can be tied to the start and end period for the respective scenarios on display
  • A new action menu in the console allows customers to clear specific areas within both input and reporting cubes
  • Users can now drill on shared members to get to the children of the base member.
  • Form designers can now prevent the form save confirmation message from being displayed to users by specifying an option in form design.
  • The usability and readability of forms is increased with duplicate aliases. Aliases can now contain the same name within an alias table and across alias tables.
  • Import Metadata functionality is extended to Microsoft Word.
  • You can now quickly add attribute dimensions to an ad hoc grid at any time during the ad hoc session.
  • In the Planning Admin Extension, you can now work with attribute dimensions and the Time Period dimension. Just as with regular dimensions, you can use the Planning Admin Extension in the Smart View application to quickly import and edit attribute and time dimension application metadata.
  • System Templates are now displayed under New Objects.
  • You can now add a warning or an error to a step using validation conditions. Errors prevent the next step. Warnings allow the next step after you click OK on the warning message. You can use a design- time prompt or function on the validation condition. This allows you to use functions on design-time prompts without having to create non-promptable design-time prompts.
  • When you are debugging business rules, a Condition Builder is now available to help you build conditions.
  • You can use the Member Selector dialog box to create MDX syntax and validation before running a partial clear.
  • The following new design-time prompt types are available:
    1. Percent
    2. Integer
    3. StringAsNumber
    4. DateAsNumber
    5. Smart List
    6. UDA

New Design-Time Prompt Functions

  • @AVAILDIMCOUNT – Returns the number of available dimensions.
  • @DEPENDENCY – “Inclusive” returns member(s) from Input 1 for which Input 2 has member(s) specified from the same dimensions. “Exclusive” returns members from Input 1 for which Input 2 has no specified members in the same dimensions.
  • @DIMATTRIBUTE – Returns the attribute name if the specified attribute is associated with a dimension.
  • @DIMNAME – Returns the name of a dimension if it is valid for the database.
  • @DIMUDA – Returns the UDA name if the specified UDA is valid for the dimension.
  • @EVALUATE – Returns the result of an expression.
  • @FINDFIRST – Finds the first substring of a string that matches the given regular expression.
  • @FINDLAST – Finds the last substring of a string that matches the given regular expression.
  • @GETDATA – Returns the value of the slice.
  • @INTEGER – Returns an integer.
  • @ISDATAMISSING – Returns true if the value of the slice is missing.
  • @ISANDBOXED – Determines if the current application is sandboxed.
  • @ISVARIABLE – Determines if the argument is a variable.
  • @MATCHES – Returns “true” if the first substring of a string matches the given regular expression.
  • @MEMBERGENERATION – Returns the generation number of a member.
  • @MEMBERLEVEL – Returns the level number of a member.
  • @MSGFORMAT – Takes a set of objects, formats them, and then inserts the formatted strings into the pattern at the appropriate places.
  • @OPENDIMCOUNT – Returns the number of dimensions for which a member was not specified.
  • @VALUEDIMCOUNT – Returns the number of dimensions for which a member was specified.
  • @TOMDX – Returns an MDX expression.

New Design Time Prompt Types

  1. Percent
  2. Integer
  3. StringAsNumber
  4. DateAsNumber
  5. Smart List
  6. UDA

New Custom Defined Functions

  • @CalcMgrBitAnd – Performs a bitwise AND operation, which compares each bit of the first operand to the corresponding bit of the second operand. If both bits are 1, the corresponding result bit is set to 1; otherwise, the corresponding result bit is set to 0.
  • @CalcMgrBitOR – Performs a bitwise OR operation, which compares each bit of the first operand to the corresponding bit of the second operand. If either bit is 1, the corresponding result bit is set to 1; otherwise, the corresponding result bit is set to 0.
  • @CalcMgrBitExOR – Performs an exclusive bitwise OR operation, which compares each bit of the first operand to the corresponding bit of the second operand. If either bit is 1, the corresponding result bit is set to 1; otherwise, the corresponding result bit is set to 0.
  • @CalcMgrBitExBoolOR – Performs an exclusive boolean bitwise OR operation.
  • @CalcMgrBitCompliment – Performs a unary bitwise complement, which reverses each bit.
  • @CalcMgrBitShiftLeft – Performs a signed left shift.
  • @CalcMgrBitShiftRight – Performs a signed right shift.
  • @CalcMgrBitUnsignedShiftRight – Performs an unsigned right shift.
  • @CalcMgrCounterClearAll – Removes all keys and values from the counter
  • @CalcMgrCounterClearKey – Removes the value from the counter associated with the key
  • @CalcMgrCounterDecrement – Decrements the value in the counter based on the key. If the key is not found, a value of zero is set for the key
  • @CalcMgrCounterDecrementKey – Decrements the value in the counter based on the key. If the key is not found, a value of zero is set for the key
  • @CalcMgrCounterGetKeyNumber – Returns the text found in the counter based on the key. If the key is not found, missing value is returned.
  • @CalcMgrCounterGetKeyText – Returns the text found in the counter based on the key. If the key is not found, missing value is returned.
  • @CalcMgrCounterGetNumber – Returns the number from the counter specified by the key. If the key is not found or the value is not a number, missing value is returned.
  • @CalcMgrCounterGetText – Returns the text found in the counter based on the key. If the key is not found, missing value is returned.
  • @CalcMgrCounterIncrement – Increment the value in the counter specified by the key
  • @CalcMgrCounterIncrementKey – Increments the value in the counter based on the key. If the key is not found, a value of zero is set for the key.
  • @CalcMgrExcelToDate – Converts an Excel date to YYYYMMDD format.
  • @CalcMgrExcelToDateTime – Converts an Excel date to YYYYMMDDHHMMSS format.
  • @CalcMgrGetStringFormattedDateTime – Converts the date defined by format to date in the YYYYMMddHHmmss format.
  • @CalcMgrDateToExcel – Converts a date in YYYYMMDD format to an Excel date
  • @CalcMgrDateTimeToExcel – Converts a date in YYYYMMDDHHMMSS format to an Excel date
  • @CalcMgrRollDay – Roll the day up or down to the date which is in the YYYYMMDD format
  • @CalcMgrRollDate – Adds or subtracts (up or down) a single unit of time on the given date field without changing larger fields.
  • Possible values of date_part are: day, month, week and year.
  • @CalcMgrRollMonth – Roll the month up or down to the date which is in the YYYYMMDD format.
  • @CalcMgrRollYear – Roll the year up or down to the date which is in the YYYYMMDD format.
  • @CalcMgrExcelACCRINT – Returns the accrued interest for a security that pays periodic interest
  • @CalcMgrExcelACCRINTM – Returns the accrued interest for a security that pays interest at maturity
  • @CalcMgrExcelAMORDEGRC – Returns the depreciation for each accounting period by using a depreciation coefficient
  • @CalcMgrExcelAMORLINC – Returns the depreciation for each accounting period
  • @CalcMgrExcelCOUPDAYBS – Returns the number of days from the beginning of the coupon period to the settlement date
@CalcMgrExcelCOUPDAYS – Returns the number of days in the coupon period that contains the settlement date
  • @CalcMgrExcelCOUPDAYSNC – Returns the number of days from the settlement date to the next coupon date
  • @CalcMgrExcelCOUPNCD – Returns a number that represents the next coupon date after the settlement date
  • @CalcMgrExcelCOUPNUM – Returns the number of coupons payable between the settlement date and maturity date, rounded up to the nearest whole coupon
  • @CalcMgrExcelCOUPPCD – Returns a number that represents the previous coupon date before the settlement date
  • @CalcMgrExcelCUMIPMT – Returns the cumulative interest paid on a loan between start_period and end_period
@CalcMgrExcelCUMPRINC – Returns the cumulative principal paid on a loan between the start period and the end period
  • @CalcMgrExcelDB – Returns the depreciation of an asset for a specified period using the fixed-declining balance method
  • @CalcMgrExcelDDB – Returns the depreciation of an asset for a specified period using the double- declining balance method or some other method you specify
  • @CalcMgrExcelDISC – Returns the discount rate for a security
  • @CalcMgrExcelDOLLARDE – Converts a dollar price expressed as an integer part and a fraction part, such as 1.02, into a dollar price expressed as a decimal number. Fractional dollar numbers are sometimes used for security prices.
  • @CalcMgrExcelDOLLARFR – Converts a dollar price, expressed as a decimal number, into a dollar price, expressed as a fraction
@CalcMgrExcelDURATION – Returns the annual duration of a security with periodic interest payments
  • @CalcMgrExcelEFFECT – Returns the effective annual interest rate
  • @CalcMgrExcelFV – Returns the future value of an investment
  • @CalcMgrExcelFVSCHEDULE – Returns the future value of an initial principal after applying a series of compound interest rates
  • @CalcMgrExcelINTRATE – Returns the interest rate for a fully invested security @CalcMgrExcelIPMT – Returns the interest payment for a given period for an investment based on periodic, constant payments and a constant interest rate
  • @CalcMgrExcelIRR – Returns the internal rate of return for a series of cash flows
  • @CalcMgrExcelISPMT – Calculates the interest paid during a specific period of an investment
  • @CalcMgrExcelMDURATION – Returns the Macauley modified duration for a security with an assumed par value of $100
  • @CalcMgrExcelMIRR – Returns the internal rate of return where positive and negative cash flows are financed at different rates
  • @CalcMgrExcelNOMINAL – Returns the annual nominal interest rate
  • @CalcMgrExcelNPER – Returns the number of periods for an investment
  • @CalcMgrExcelNPV – Returns the net present value of an investment based on a series of periodic cash flows and a discount rate
  • @CalcMgrExcelPMT – Returns the periodic payment for an annuity
  • @CalcMgrExcelPPMT – Returns the payment on the principal for a given period for an investment based on periodic, constant payments and a constant interest rate
  • @CalcMgrExcelPRICE – Returns the price per $100 face value of a security that pays periodic interest
  • @CalcMgrExcelPRICEDISC – Returns the price per $100 face value of a discounted security
  • @CalcMgrExcelPRICEMAT – Returns the price per $100 face value of a security that pays interest at maturity
  • @CalcMgrExcelPV – Returns the present value of an investment
@CalcMgrExcelRATE – Returns the interest rate per period of an annuity
  • @CalcMgrExcelRECEIVED – Returns the amount received at maturity for a fully invested security
  • @CalcMgrExcelSLN – Returns the straight-line depreciation of an asset for one period
  • @CalcMgrExcelSYD – Returns the sum-of-years’ digits depreciation of an asset for a specified period
  • @CalcMgrExcelTBILLEQ – Returns the bond-equivalent yield for a Treasury bill
  • @CalcMgrExcelTBILLPRICE – Returns the price per $100 face value for a Treasury bill
  • @CalcMgrExcelTBILLYIELD – Returns the yield for a Treasury bill
  • @CalcMgrExcelXIRR – Returns the internal rate of return for a schedule of cash flows that is not necessarily periodic
  • @CalcMgrExcelXNPV – Returns the net present value for a schedule of cash flows that is not necessarily periodic
  • @CalcMgrExcelYIELD – Returns the yield on a security that pays periodic interest
  • @CalcMgrExcelYIELDDISC – Returns the annual yield for a discounted security; for example, a Treasury bill
  • @CalcMgrExcelYIELDMAT – Returns the annual yield of a security that pays interest at maturity
  • @CalcMgrExcelCEILING – Rounds a number up (away from zero) to the nearest integer or to the nearest multiple of significance
  • @CalcMgrExcelCOMBIN – Returns the number of combinations for a given number of objects
  • @CalcMgrExcelEVEN – Rounds a number up to the nearest even integer
  • @CalcMgrExcelFACT – Returns the factorial of a number
  • @CalcMgrExcelFACTDOUBLE – Returns the double factorial of a number
  • @CalcMgrExcelFLOOR – Rounds a number down, toward zero
  • @CalcMgrExcelGCD – Returns the greatest common divisor
  • @CalcMgrExcelLCM – Returns the least common multiple
  • @CalcMgrExcelMROUND – Rounds a number to a specified number of digits
  • @CalcMgrExcelMULTINOMIAL – Returns the multi-nominal of a set of numbers
  • @CalcMgrExcelODD – Rounds a number up to the nearest odd integer
  • @CalcMgrExcelPOWER – Returns the result of a number raised to a power
  • @CalcMgrExcelPRODUCT – Multiplies its arguments
  • @CalcMgrExcelROUNDDOWN – Rounds a number down, towards zero
  • @CalcMgrExcelROUNDUP – Rounds a number up, away from zero
  • @CalcMgrExcelSQRT – Returns a positive square root
  • @CalcMgrExcelSQRTPI – Returns the square root of (number * pi)
  • @CalcMgrExcelSUMSQ – Returns the sum of the squares of the arguments
  • @CalcMgrExcelSUMPRODUCT – Returns the sum of the products of corresponding array components
  • @CalcMgrExcelAVEDEV – Returns the average of the absolute deviations of data points from their mean
  • @CalcMgrExcelDEVSQ – Returns the sum of squares of deviations
  • @CalcMgrExcelLARGE – Returns the nth highest number
  • @CalcMgrExcelMEDIAN – Returns the median of the given numbers
  • @CalcMgrExcelSMALL – Returns the nth smallest number
  • @CalcMgrExcelSTDEV- Estimates standard deviation based on a sample
  • @CalcMgrExcelVAR – Estimates variance based on a sample
  • @CalcMgrExcelVARP – Estimates variance based on the entire population
  • @CalcMgrFindFirst – Find the first substring of this string that matches the given regular expression.
  • @CalcMgrFindLast – Find the last substring of this string that matches the given regular expression.
  • @CalcMgrMatches – Returns true, if the first substring of this string that matches the given regular expression. For regular expression, see ”java.util.regex.Pattern” in the Java docs.
  • @CalcMgrMessageFormat – Creates a string with the given pattern and uses it to format the given arguments.
  • @CalcMgrStartsWith – Tests if this string starts with the specified prefix.

Security

  • While the overall access rights granted to a user are controlled by the assigned identity domain role, Service Administrators can use the Access Control feature from the Console to assign additional application-level access by provisioning users and Native Directory groups with application-specific roles. For instance, a Planner in the service can now be assigned the Approvals Administrator role to enable the user to perform approvals-related activities.


Adding a New Custom Dimension to HFM

Unlike a Planning application, adding a new custom dimension to an HFM application (after it has been deployed) requires a few extra steps to ensure a successful deployment. This post will provide step by step instructions on how to successfully complete the process.

Initially, I attempted to deploy my HFM application without following the steps that have been outlined in the post below. I received 8 warnings upon validation of the application prior to deployment:

In order to deploy the HFM application, we will need to log on to the server and stop some processes and services. Once you’re logged onto the HFM server, open up the task manager to begin shutting down a few key processes. You will need to right click and stop CASSecurity.exe, HsxServer.exe, & all of the HsvDataSource.exe processes:

Next, open up Services on the HFM server:

Right click and select to stop Oracle Hyperion Financial Management – Management Service (EPMA):

Return to the Task Manager and stop DMElistener.exe & HsxService.exe:

Now you can deploy the HFM application with the new custom dimension included. Check the job console to see that the deployment was successful:

Once deployment is complete, head back to the HFM server to start the Oracle Hyperion Financial Management – Management Service (EPMA) service to ensure that everything is back up & running.


Essbase Security: Setting Filters to Groups

For most Essbase applications, user and group security will be a necessity. Here are the steps to set up individual filters and then apply them to a group in Shared Services.

First, create a security filter in Essbase:

Then click on “New” and add read/write access for the filter:

Here is an example of the member specification for filter access:

Next, click Verify and then Save at the bottom of the page.

The next step is to login to Shared Services and create a new group:

The group name should match the filter name to reduce opportunities for confusion. While creating the group, add group/user members:

Next, the group will need to be provisioned for access to the desired application:

For Read/Write access only, assign “Filter” to the group:

For access to run calc scripts on the application along with Read/Write access, assign “Calc” to the group:

The next step is the part that has always been the trickiest piece for me. Right click on the application under Application Groups and select Access Control:

Search for the desired group and move it to the selection window on the right:

Select the desired group and then use the filter & calc dropdowns to select the required filters and/or calc scripts to assign to the group:

Click save after the desired access control for the group has been set. Remember, calc’s can only be assigned if the group was given “Calc” provisioning for the application.

Now the security filter has been successfully assigned to a group in Shared Services.


Automating SQLCMD Statements

Recently, I wanted to automate the process of loading monthly csv data files into a SQL table. I spent some time researching the syntax of SQLCMD as well as reading multiple different posts on the subject. After some trial and error, I was able to get the automation functioning properly. Here’s a quick summary.

SQL Statement

Here’s the syntax for the SQL query I was using to upload the monthly files:

csv_input.txt

DATABASE NAME, TABLE, & DATA_FILE_LOCATION.csv are query specific. For my instance I used the following:

  • DATABASE NAME: HYP_TEST
  • TABLE: HYP_STG_AP_DATA
  • DATA_FILE_LOCATION.csv: ‘G:\Data\AP\AP Aging FY14\ AP Aging Jan FY14.csv’

Open notepad and paste the query into the blank sheet. Next, save this file as a Microsoft SQL Server Query (.sql) file:

SQLCMD Batch File

To automate this process, a batch file will need to be created that calls the L_AP.sql file. Here’s the syntax to be used in the batch file:

SQLCMD -S server -U login_id –P passwordi input_file -o output_file

Notes on the syntax:

For more detailed information on the SQLCMD syntax – https://msdn.microsoft.com/en-us/library/ms162773.aspx

Once you have tested SQLCMD in the command prompt to verify that it runs, paste it into notepad and save the file as a Windows Batch (.bat) file:

I also created the ‘Logs’ folder, which is where SQLCMD will write the output file (as specified after –o in the SQLCMD command line). The output file will be created as .txt:

At this point, the process should be good to go and you can replicate this setup for other SQL queries using sqlcmd.

As a result of this exercise, a years’ worth of data can be loaded all at once rather than having to upload the monthly data files one at a time. This saved a good amount of time that had previously been spent manually uploading monthly files during the incremental process of data validation.


One at a time, please

Introduction

One of the problems with giving users of Hyperion Planning the ability to run calculations is opening up the possibility for all of them to run the same calculation at the same time.  This can cause a range of issues, from slower performance, to calculations never finishing due to locked blocks, to crashing the server.

Prior to Planning, I created VB applications to monitor what was calculated to make sure multiple calculations were not executed at the same time.  Initiating a calculation through a web portal allowed us to notify the user that the calculation request was ignored because a calculation was already running.

Both Essbase and Planning have come a long way since the 90s.  With the introduction of the @RETURN function, developers can interact with users and create a break in a calculation (business rule) so it doesn’t proceed.  The message is still reactive, but with some creativity, there are some really awesome things you can achieve.  Controlling what calculations are executed simultaneously is one of those things.

The Goal

Assume an application has a global consolidation calculation that is required to be executed for reporting requirements.  Since the administrators don’t want to be bothered at all hours of day and night, they want to enable the users to run the calculation and ensure it isn’t run more than one time during the calculation window.

This assumes the 6 required dimensions in Planning, plus a Department dimension.

The Method


Make a predefined placeholder where an indicator can be saved – a 1 or a 2.  When the calculation is executed, the value will be set to a 1.  When the calculation is finished, the value will be set to 2.  When the calculation is initiated, it will check that value.  If it is a 2, the calculation will execute.  If it is a 1, it assumes a calculations is already running so it will abort and notify the users.  This ensures that the calculation will never run twice at the same time.

Note:  I prefer the use of 1 and 2 over 0 and 1.  Many times a process is implemented to eliminate zeros and restructure the application periodically.  Not using a zero can eliminate errors in some situations.

Example

FIX("No Entity","No_Dept","No Account","Budget","FY15","BegBalance")    SET CREATEBLOCKONEQ ON;    "Working"(      /* Check to see if a calculation is running         If the flat is a 1, return a message and stop the calculation         If the flag is a 2, continue */      IF("Working" == 1)        @RETURN ("This calculation is already running.  Please come back at a
                       later time and try again.", ERROR);      ELSE        "Working" = 1;      ENDIF)    SET CREATEBLOCKONEQ OFF;  ENDFIX     /* Aggregate the database */  FIX("Working","Budget","FY15")    AGG("Entity","Department");  ENDFIX     /* Set the flag back to 2 */  FIX("No Entity","No_Dept","No Account","Budget","FY15","BegBalance")    "Working" = 2;   ENDFIX

Summary

This method could be used in a variety of situations, not just a global calculation.  If this inspires you to use the @RETURN in other ways, please share them with the In2Hyperion and we can make your solution available to everybody.


Recommended Settings for Oracle Hyperion Products

Problem

Oracle has recommended settings for Internet Explorer (IE7, IE8, IE9, IE10 and IE11) when using Hyperion products.  I get this question a lot from my clients, so I thought I would share Oracles suggested settings.  Without changing these, there will be intermittent problems, and frustration points.

Solution

Configure browser to check for new version every time user visits a page

  • Open Internet Explorer
  • Go to Tools > Internet options > General
  • In “Browsing history” section click on “Settings” button and then select “Every time I visit the webpage” option
  • Click OK, then Apply.

Disable default pop-up blocking

  • Open Internet Explorer
  • Go to Tools > Internet options > Privacy tab
  • Uncheck “Turn on Pop-up Blocker”

Add Workspace URL to trusted sites

  • Open Internet Explorer
  • Go to Tools > Internet options > Security tab
  • Select “Trusted sites” from “Select a zone to view or change security settings” window, then click on “Sites” button.
  • Type your workspace URL in form http://workspaceserver:portnumber in “Add this website to the zone”
  • Uncheck “Require server verification (https:) for all sites in this zone”
  • Click Add, then Close.
  • Click OK and Apply.

Customize security settings

  • Open Internet Explorer
  • Go to Tools > Internet options > Security tab
  • Select “Trusted sites” from “Select a zone to view or change security settings” window
  • Select zone containing your Oracle Hyperion servers and click on “Custom level…” button
  • In “Miscellaneous” section enable options “Access data sources across domains” and “Allow script-initiated windows without size or position constraints”
  • In “ActiveX controls and plug-ins” section enable “Run ActiveX controls and plug-ins” and “Script ActiveX controls marked safe for scripting”.
  • Click OK
  • Click Apply, then OK

Enable option “Always allow session cookies”.

  • Open Internet Explorer
  • Go to Tools > Internet options > Privacy Tab > Advanced. Check the “Override automatic cookie handling”, accept the first and third party cookies and check the “Always allow session cookies” option.

Only for SSL enabled environments: Disable option “Do not save Encrypted Pages to Disk”.

  • Open Internet Explorer
  • Go to Tools > Internet options > Advanced Tab. In “Security” section uncheck the option “Do not save Encrypted Pages to Disk”.

Disable option “Enable Native XMLHTTP”. This setting is recommended only for customers using HFM 9.3.1 or older with IE 7. If you are using version 11.1.1.x of EPM products or newer, this option should be enabled.

  • Open Internet Explorer
  • Go to Tools > Internet options > Advanced Tab. In “Security” section uncheck the option “Enable Native XMLHTTP”.

Using Internet Explorer 9 Compatibility View option.

  • Open Internet Explorer
  • For 11.1.2.1.600 Planning and EPMA: Compatibility View should be enabled in Tools > Compatibility View Settings
  • For EPM 11.1.2.2 products: Go to Tools > Compatibility View Settings. Make sure EPM Workspace URL is not enabled for Compatibility View and uncheck all available options at the bottom of the pop-up window.

For products using JRE Plugin (Web Analysis, Performance Scorecard, Administration Services) make sure that a compatible version of plugin is installed on the client machine.

  • Check JRE Plugin certification for your EPM product in support matrix
  • Check installed Java version in Control Panel > Java > General > About. If required update Java version to a supported release.
  • Enable option “Always Auto-Download” in Control Panel > Java > Advanced > JRE Auto-Download=

Using Internet Explorer 11 Enterprise Mode. Limited support with EPM 11.1.2.2.500 and 11.1.2.3.500. For more information see Document 1920566.1.


Essbase (ASO): Clearing Data Using CrossJoin

Having been working on an ASO project for the last couple of months, I have learned a lot about Essbase and its related software. One of the things that gave me trouble at first was the syntax of CrossJoin in ASO’s MDX language. More specifically, I was having trouble trying to nest multiple CrossJoin’s together when I was trying to clear out a certain portion of data that included more than two dimensions. A CrossJoin is simple; it returns the cross-product of two sets from two different dimensions. But what if I want to return the cross product of four different dimensions? That one proved to be a little trickier

Before tackling a CrossJoin of four dimensions, let’s look at a the basic syntax of the function. Below is an example from Oracle’s documentation of a simple CrossJoin (it is using members from the Year & Market dimensions in the Sample Basic outline):

Notice that all 4 possible combinations of the members are returned by the CrossJoin. This is straightforward enough. The part I had the most trouble with occurred when I started trying to include multiple CrossJoin’s in the statements. All of the statements & brackets seemed to jumble together. I figured it would be most helpful to provide examples of what I ended up using so that you can see the syntax:

Note: Since these CrossJoin’s were used to delete data, all of the members being selected are Level 0. I’m also using the ASOsamp Sample ASO outline to demonstrate the functionality.

Simple CrossJoin:

  • CrossJoin({[Original Price]},{[Curr Year]})

Double CrossJoin:

  • CrossJoin(CrossJoin({[Original Price]},{[Curr Year]}),{[Jan]})

Triple CrossJoin:

  • CrossJoin(CrossJoin(CrossJoin({[Original Price]},{[Curr Year]}),{[Jan]}),{[Sale]})

Above demonstrates a sample syntax that will use CrossJoin to bring together four different dimensions. However, it is only grabbing one member from each dimension. To grab multiple members from a dimension, there are family functions that can be used (.Parent, .Children, Ancestor(), Cousin(), .FirstChild, .LastChild, .FirstSibling, and .LastSibling). For this example, I’m using the .Children function.

Triple CrossJoin Using Children Function:

  • CrossJoin(CrossJoin(CrossJoin({[Measures].Children},{[Curr Year]}),{[Jan]}),{[Sale]})

Notice how [Original Price] was replaced with [Measures].Children. Rather than returning one member, this will return the following children from the “Measures” dimension:

Utilize these family functions to increase the CrossJoin function’s returned set.

One more thing to note. Substitution variables can be included within a CrossJoin. For example, let’s say I created the subvar &CurrMonth. I can replace Jan in the code, thus making the month variable.

Triple CrossJoin Using Substitution Variable:

  • CrossJoin(CrossJoin(CrossJoin({[Measures].Children},{[Curr Year]}),{[&CurrMonth]}),{[Sale]})

MaxL Syntax to Clear Data from a Region:

Next, let’s cover the MaxL syntax to clear data in the region specified by the CrossJoin. From the Essbase technical reference 11.1.2.3 pg. 894:

The entire CUBE-AREA portion must be enclosed in single quotes i.e.CUBE-AREA, which will define what portion of the database is going to be cleared.

And here are some more detailed notes on the syntax (also from the Essbase technical reference 11.1.2.3 pg. 897):

Based on the information laid out above, the line that I used in my MaxL statement turned out to look like this:

  • alter database ASOsamp.Sample clear data in region ‘CrossJoin(CrossJoin(CrossJoin({[Measures].children},{[Curr Year]}),{[&CurrMonth]}),{[Sale]})’ physical;

Prior to reloading data, I use this command line to clear the database in this region. This is to make sure that there is no stray data leftover in the cube that might cause discrepancies later on.

Feel free to leave any tips/advice on a more efficient method of utilizing CrossJoin!


Using MaxL Scripts to Create, Alter, & Grant Filters

Creating security filters and assigning them to different users/groups can be a time consuming process, especially if it is done manually. Luckily, there are some simple MaxL statements that can be used to significantly expedite the process. Here are the 3 that I’ve found to be most useful:

  • Create Filter
  • Alter Filter
  • Grant Filter

Create Filter:

The MEMBER-EXPRESSION must be enclosed in single quotation marks. It can be a comma-separated list as well (this also pertains to the Alter Filter syntax). Notice in the example below how commas are used to separate 3 different dimensions (Year, Measures, & Product) in the create filter syntax:

  • create filter Sample.Basic.filter1 read on ‘@IDescendants(“Year”), @IDescendants(“Measures”), @IDescendants(Product”)’;

For the FILTER-NAME portion, the application and database must be included preceding the filter name. This syntax will be used for Create, Alter, & Grant.

After running the batch, open EAS to verify that the filter was created correctly (I’ve included a generic version of my batch & MaxL files at the end of this post in case they may be helpful). Right click on the database and select Edit->Filters:

A list of all filters in the database will appear:

Select edit and the member specification assigned to the filter will pop up. All 3 dimensions that are outlined in the MaxL command should be accounted for:

Many times, the filter will need to be updated after it has been created. There is also a command line function for that…

Alter Filter:

For this example, we’ll add another dimension into the filter. Let’s add read access for @IDescendants(“East”). Here’s an example of the Alter Filter syntax:

  • alter filter Sample.Basic.filter1 add read on ‘@IDescendants(“East”)’;

After running the batch file, the filter now reflects the change that was made:

Now that the filter is built, it can be assigned to a user, group, or multiples of both using the Grant Filter command line function. However, prior to assigning a filter to a user/group, the user/group must be provisioned to have filter access to the application. This is done through Shared Services. We’ll use “Test_User1” as a sample user. Right click on “Test_User1” and select Provision:

Expand down on the Sample application until Filter appears. Highlight “Filter” and bring it across to the right side of the screen:

The selected roles should display “Filter” under Sample:

Click Save. Now, “Test_User1” is provisioned for the Sample application and the filter can be applied using the Grant Filter MaxL command.

Grant Filter:

Example of the Grant Filter syntax:

  • grant filter Sample.Basic.filter1 to Test_User1;

To verify that “filter1” has been granted to “Test_User1”, head back to Shared Services and right click on Sample->Assign Access Control:

Select “User Name” from the dropdown menu in the top left and click search. Highlight “Test_User1” and click the right arrow to bring the user to the Selected box on the right. Click Next:

“Test_User1” has been granted “filter1” and the user’s access should reflect this change:


Batch File:

call MaxlPath “MaxL File Path” Sample Basic userID password ServerId filter_log

MaxL File:

login $3 $4 on $5;

spool on to “Log File Path”;

create filter Sample.Basic.filter1 read on ‘@IDescendants(“Year”), @IDescendants(“Measures”), @IDescendants(“Product”)’;

alter filter sample.basic.filter1 add read on ‘@IDescendants(“East”)’;

grant filter Sample.Basic.filter1 to Test_User1;

logout;

spool off;

exit;


To take a deeper dive into the filter functionality, or to clarify any issues, check out the Essbase Technical Reference:

https://docs.oracle.com/cd/E40248_01/epm.1112/essbase_tech_ref.pdf