Adventures in Groovy – Part 43: Sending Proactive Emails In A Calculation

If you haven’t heard, we now have the ability to execute REST API within a calculation script.  Not only does that mean we can interact with other environments and do things in calculations we couldn’t do before, we also have the ability to interact with any provider that has REST.  You could pull current prices for products from Amazon.  You could see how many open box items there are at area Best Buy stores.  You could pull in currency rates.  That doesn’t even touch on the things like DM processes, metadata updates, and application refreshes. You can even send emails!

First, what is REST API?

A RESTful API is an application program interface (API) that uses HTTP requests to GET, PUT, POST and DELETE data.  A RESTful API — also referred to as a RESTful web service — is based on representational state transfer (REST) technology, an architectural style and approach to communications often used in web services development.

What this means is you can interact with services through web URLs.  When you send an email or purchase a product, you are using HTML Post and Get requests.

How does it work?

REST is basically a way to post (do something) and get(receive something) through website URL calls.  There is more to it than that, but that is the basic concept.  There are all kinds of services, free and paid, that provide services through REST API.

Since I am all about automation and communication, one thing I thought would be great is if a user runs a calculation and it fails, to proactively notify an admin.  Prior to this month, you would have to write something outside of the UI for Planning to do this.  This would be reactive.  Wouldn’t it be better to get an email or text immediately so you can act quickly and diagnose the problem?  Heck yeah it would.

The REST API Provider

There are a number of providers that give you the ability to send emails via REST API.  A few are free for a limited number of emails per day/month.  Mailjet is one of them.  I went out and signed up for a free account.  It allows you to send up to 6k emails a month, with a maximum of 200 per day.  That is cool for my purposes of demoing functionality.

There are a few things you need.  First is an encrypted key and private key.  That you will get when you create our account.  Next, the documentation lays out what needs included in a post (do something) to send an email.

To send an email through mailjet, you post to a url of https://api.mailjet.com/v3/send and pass a body that has the typical information to send an email, like from, to, and subject.  The body is formatted as a json object.  Json is not super complicated, as it is basically the same as a Groovy map, or an xml format.  To focus on the API, I will explain json at a later time.

Send An Email

The first thing that needs built is a connection to the REST API provider.  You can create a connection to be reused in Planning (epbcs), but for this example, I am just going to keep it simple and use a connection object with the appropriate parameters.  To keep my account private, I remove my keys and replaced them with PublicKey and PrivateKey.  Just remember these both need replaced with the actual keys.  The status should return 200 if the request is successful.

Connection connection = connection("https://api.mailjet.com","PuclicKey","PrivateKey")
println  connection.get().asString().status

Next, I am going to walk through the body that needs passed.  Again, this is basic info that is not surprising.  Each element has a property and value.  To avoid any more spam in my email account, I replaced the from and to email with invalid emails.  These should be changes to include valid from and to emails.

def bodyMap = new JSONObject()
bodyMap.put("FromEmail","xxx@in2hyperion.com")
bodyMap.put("FromName","Kyle Goodfriend")
bodyMap.put("Subject","My first email from a Groovy Calculation!")
bodyMap.put("Text-part","This is an email from a calculation")
bodyMap.put("Html-part","<h3>Dear Admin,</H3><br />This is an email from a calculation")
bodyMap.put("To","xxx@in2hyperion.com")

Next is the actual request to post (or do something).  The path to send emails in the URL is https://api.mailjet.com/v3/send.  The only thing we need to add to the post here is the path since the URL is in our connection.  The post requires two parameters.  First, the request requires one header identifying the content as json.  The second parameter is the body that includes the email information, which we have in the bodyMap, which we simply convert to a string.

HttpResponse response = connection.post("/v3/send")
.header("content-type","application/json")
.body(bodyMap.toString()).asString()
println response.status
println response.body
println response.statusText

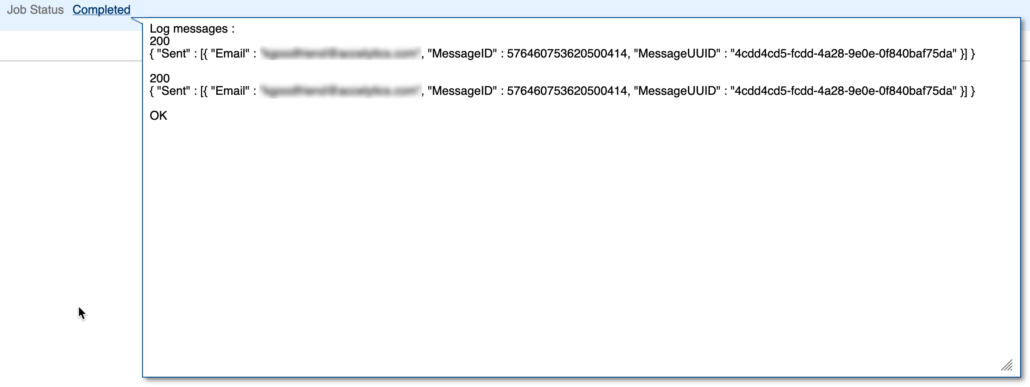
This all said, the result is an email to your inbox and a log in the job console that looks like this.

Last Call

Well boys and girls, that is all she wrote.  That is it.  If your calc throws an error, use try/catch/finally and send the appropriate people an email.  If the calc is a long running calc, user operation.user to send the person that executed it an email when it finishes.  The possibilities are endless but you now have a mechanism to have proactive communication, not reactive and time-consuming effort.

One note about mailjet.  I have no affiliation to this service.  I have not used it other than to demonstrate this functionality.  A FREE account does allow you to send 6k emails a month with 200 at most every day.  If you want to use this in a production situation, you likely will need to pay for basic account, which is less than 9 bucks a month.


Adventures in Groovy – Part 42: Using Scenario Start and End Periods Through Metadata Queries Provides Awesome Functionality

Identifying the months to calculate plan and forecast has always been a delicate balance between performance and maintenance.  Having a calculation for each required duplication of forms or calculating more than what was required.  Calculations required more complicated if logic than what it should have or (I hate when I see this) a calculation that just does both forecast and plan regardless of what needs calculated.

Groovy has opened up a lot of options.  We can identify if plan or forecast is in the form and dynamically build the Essbase calculation, which is what I have started doing.  This, combined with only calculating on the edited cells, gets you part of the way there.  It doesn’t help with global calculations or calculations when a single month will impact all months, like when there are balance walk forwards.

Groovy provides us the ability to get member properties, which I have discussed before.  The Scenario dimension has unique properties, like the start month, start year, end month, and end year, which is what creates the security on the periods and years for each scenario.  Once these are identified, the possibilities are endless.  They can be used to create gridbuilders, they can be used to dynamically fix on the correct periods in Essbase calculations, or they can be used to do other date specific things.

Groovy Calculation and API

At this point, you are probably very well aware of the operation class, which has an application sub class.  The application subclass has many functions within it that are useful.  One, is the ability to create a dimension object.  From there, a member object can be created.  The following is a very simple example to hold a scenario member in a member object that can be used in many ways.

Member mbrScenario = operation.application.getDimension('Scenario').getMember('Plan')

If the scenario is a run time prompt, it would look like this.  Assume the RTP is named rtpScenario.

Member mbrScenario = rtps.rtpScenario.getMember()

When the member object is initiated, all the properties of the specific member are available.  You may want to review Adventures In Groovy – Part 11: Accessing Metadata Properties before continuing.  The same concept is used here, but the properties returned are slightly different.  The four we want to access are

  • Start Period
  • End Period
  • Start Year
  • End Year

These can be stored in variables or used within calculations or other logic.  There may be a need to convert the month member to a long month or a number.  The year may also be converted to remove the FY and prepend 20 so it can be used in date manipulation.  println mbrScenario.toMap() produces the following, so the full list of properties is a little different than what was produced in Part 11.

Log messages : 
{Parent=Scenario, Two Pass Calculation=false, Process Management Enabled=true, Old Name=Plan, Formula=<none>, End Year=FY20, UDA=, Aggregation (GTech)=+, Solve Order (GTech)=0, Essbase Name=Plan, UUID=91f18d30-fc37-4e0b-bc9a-99668194e793, Member=Plan, Data Storage=never share, Hierarchy Type=none, Allow Upper Level Entity Input=false, End Period=Dec, Start Period=Jul, Aggregation (ProdRev)=+, Include BegBal=true, Data Storage (GTech)=never share, Formula Description=<none>, Data Id=2573227211374885, Data Storage (ProdRev)=never share, Start Year=FY18, Data Type=unspecified, Formula (GTech)=<none>, Old Unique Name=<none>, Formula (ProdRev)=<none>}

Since this is a Groovy map, a type of Groovy collection, any of the elements can be accessed by referencing the element key.

println mbrScenario.toMap()["Start Year"].toString()

Multi Year Example

Since many applications will span over multiple years, there is some additional logic that has to be built to loop through the months.  If the user is prompted for a start period/year and end period/year, you may need to validate that the date range is within the start/stop periods on the scenario, which also is easier to evaluate if these are converted to dates.

[membership level=”0″]


In2Hyperion has premium content that is only available to those who make a small annual donation.

 Already have an account with
in2Hyperion?

Login

 Want to purchase a subscription to
the premium content?

Purchase Today


[/membership]
[membership]

Building The Date Range

Creating a map with the year and the list of months is a great way to store the date range.  It can be used to build lists for gridbuilders that read data (parameters are multiple rows/columns by year with periods as a list object), creating Essbase calculations by year, and headers for grids that are submitting data (which are string arrays).

Expanding on what was previously discussed, this will convert the year to a valid year by removing FY and create a date object that stores the start and end dates in variables.  Notice the start date uses a day of 1 and the end date uses a day of 2.  This is important later on.

Member mbrScenario = operation.application.getDimension('Scenario').getMember('Plan')
Date scenarioStart = Date.parse("yyyy-MMM-dd", "20${mbrScenario.toMap()["Start Year"].toString().substring(2)}-${mbrScenario.toMap()["Start Period"].toString()}-01")
Date scenarioEnd = Date.parse("yyyy-MMM-dd", "20${mbrScenario.toMap()["End Year"].toString().substring(2)}-${mbrScenario.toMap()["End Period"].toString()}-02")

Now that we have two dates, the next step is to create the map to hold the results.  This map will look like similar to this for a date range when Jul,19 through Dec, 20 is selected.

['FY19',['Jul','Aug','Sep','Oct','Nov','Dec'] , ['FY20',['Jan','Feb','Mar','Apr','May','Jun','Jul','Aug','Sep','Oct','Nov','Dec']

This is created by looping through the two dates by month.  This example uses a while loop and will iterate through each month WHILE the iteration date (current) is before the end date.  If the scenarioStart and scenarioEnd dates had the say day, this would exclude the last month because they would be the same.  This also uses the calendar class to increase the date by month, which isn’t available in the date class.

// Create the variables needed
// PeriodRangeMap holds the years/months
// calendar and current are used in the iteration process
Map<String, List<String>> periodRangeMap = [:]
Calendar calendar = Calendar.getInstance()
Date current = scenarioStart

while (current.before(scenarioEnd)) {
  // Set the calendar variable to the date of the current variable 
  calendar.setTime(current)
  // If this is a new month, create a null map element to hold the new year and months
  if(periodRangeMap["FY${current.format("YY")}".toString()] == null){
    periodRangeMap["FY${current.format("YY")}".toString()] = []
  }
  // Append the month to the appropriate year
  periodRangeMap["FY${current.format("YY")}".toString()] << current.format("MMM").toString()

  // Increase the calendar variable by one month
  calendar.add(Calendar.MONTH, 1);
  // set the current variable to the next month's date
  current = calendar.getTime();
}

If we print the periodRangeMap to the job console using a println, assuming the start month is Jul of 18 and the end month is Dec of 20, this will be displayed with the exception that line returns are added to make it readable.

Log messages : 
{
FY18=[Jul, Aug, Sep, Oct, Nov, Dec], 
FY19=[Jan, Feb, Mar, Apr, May, Jun, Jul, Aug, Sep, Oct, Nov, Dec], 
FY20=[Jan, Feb, Mar, Apr, May, Jun, Jul, Aug, Sep, Oct, Nov, Dec]
}

The periodRangeMap can then be used to loop through and create the lists and maps used in gridbuilders and datamaps.

[/membership]

Last Call

The ability to directly access the start and stop period/year really gives partners a new thought process to implementation options where these periods are critical.  It is very easy to access, very easy to implement, and extremely useful.  If you have an idea of how to use these dates, share them with the community so we can all benefit.  Hope to see an idea soon!


Adventures in Groovy – Part 41: RTP Interpretation Modes

Have you ever used a variable and received this error? Error: Unable to retrieve variable [variable name] deployed in the application [app name] Rule [app name].[plan type name].[rule name]. You likely saw this when a Groovy variable was used inside of {}. I finally had the issue explained to me working with the Oracle PBCS development group today. God bless them for being so gracious to help me through some of these issues! You know who you are, and I can’t thank you enough for your time!

ePBCS interprets Groovy before the Groovy compiler is engaged. There are multiple interpretation modes (my words) and varies based on whether run time prompts are initiated by including /*RTPS:*/ in the calculation.

WHAT YOU NEED TO KNOW

Long story short is this, but I encourage you to read on for a deeper dive into what is happening.

EPBCS parses all Groovy scripts before executing it to identify the run time prompts used by the script. The way it identifies the run time prompts is by looking for explicit declaration of the run time prompts in a comment in the following format:

/*RTPS: {rtpName}*/

The reason for this is because there are many expressions (closures, string interpolation etc) in Groovy that use curly braces so the old way of defining run time prompts in curly braces {rtpName} is no longer recommended. Instead, the use of rtps.rtpName is recommended to reference run rime prompts inside a Groovy script.

Without the explicit declaration in the /*RTPS */ comment, the parser will try to interpret Groovy expressions inside {} as run time prompts causing the following error:

Error: Unable to retrieve variable [variable name] deployed in the application [app name] Rule [app name].[plan type name].[rule name].

If you are using RTPs without defining them in the comment, I recommend that the script be updated to add the RTPS comment.  The interpretation method of assuming everything in {} is an RTP will be deprecated in future releases.  To conclude, if no RTPs are used, add /*RTPS:*/ to the script so that variables inside the {} are interpreted as Groovy variables.

Example: Interpretation Without RTPS Comment

If you have worked with run time prompts, you know (or thought you knew) that they had to be defined in what looks like a comment.

/*RTPS: {rtp_Period} {rtp_Year}*/

This is not true, however.  Theoretically, the /*RTPS:*/ doesn’t have to be added to use run time prompts, which was news to me.  When /*RTPS:*/ is EXCLUDED from a calculation, the interpreter will replace anything identified with {} as a run time prompt. If like me, I had never used a variable with the same name as a valid RTP, you would simply get an error and likely not understand why you can’t reference the variable.

If by chance you actually used a variable with the same name as an existing RTP, you might have figured this out on your own because you would be prompted for the RTP. Notice that no header was added to include RTPs in this calculation (void of any /*RTPS:*/) but still get a prompt.

You would also notice that the RTP is identified in the Variables tab!

Now that you know this, forget that you do and don’t every use RTPs without the /*RTPS:*/. This was something that was missed in initial releases and will be deprecated.  So, if you don’t add your RTPs in a /*RTPS:*/ and use the RTPs, this will not work in the future.

Example: Interpretation With RTPs

When /*RTPS:*/ is used anywhere in the calculation, the variables in a conventional Groovy way.  In this example, sScenario is actually referencing the Groovy variable.

The same script with the RTPS inclusion header now works as expected!  sScenario is no longer interpreted as an RTP.  If the variable was named the same as a valid RTP, it would also be handled as expected.  Or, it is handled as I would expect it not knowing {} meant RTP without the RTPS header.  rtp_Period is a valid run time prompt.  Now that /*:RTPS*/ is added to the script, the same line of code is looking for a Groovy variable, not a RTP.  Because the RTP is not defined, the compiler returns an error.

What I Learned Today

Talking to the dev group today was awesome because I learned a number of things.

  1. There are two interpretation modes laid out above.
  2. Calculations can have /*RTPS:*/ with no variables. I never really thought about doing this.  Now that I understand the multiple modes, I am going to add this to every Groovy calculation to avoid any issues like this.
  3. /*RTPS:*/ can be anywhere in the calculation. I don’t know why it would benefit somebody to have it at the end, but it would work the same way as if it was the first line.  The reason it does this is because the modules will add RTPs for certain situation and not others.  For this to be possible, the need to add multiple RTPS comments with the appropriate RTPs through the calculation was required.
  4. /*RTPS:*/ can exist on multiple lines. If you wanted to have each variable referenced on different lines, /*RTPS:*/ can be repeated as many times as needed.

There are a couple wins for me now that I know this.

  1. I use common code and functions in scripts that I embed in groovy calculations to eliminate repetitive functionality. If these functions require an RTP (even a hidden one with an override that is a subvar), it can be referenced inside the script rather than putting them in the rules that reference the script.
  2. The rule using the script can also have its own RTPs that are not needed for the common code. So, I can have common RTPs in the script and also have RTPs needed for each specific rule in that rule and not have any conflicts.

Does This Seem Irrelevant?

If you are asking yourself why this would ever come up and why any variable would be referenced inside squiggly brackets, this might help.  The example above is simple and the println could have been written without the quotes and squiggly brackets.

println sScenario

You are correct, this would have worked.  But, let’s say you need the current month and year together.  Yes, there are other ways to accomplish this, but it emphasizes the need.  Let’s say I need the current month concatenated with the current year formatted as FYyy.

def Year = (new Date()).format('yy') // produces 19
def Month  = (new Date()).format(‘MMM’) // produces Apr
println "${Month}FY${Year}" // produces AprFY19

A second example would be referencing variables in a dynamic FIX statement

if (uniquePeriodNames.size() == 0){
  println("No cells were edited")
}
else{
  operation.grid.dataCellIterator({DataCell cell -> cell.edited}).each{
    lstProduct.add(it.getMemberName("Product"))
    lstPeriod.add(it.getMemberName("Period"))
    lstYears.add(it.getMemberName("Years"))
    }

  List povmbrs = operation.grid.pov

  StringBuilder strEssCalc = StringBuilder.newInstance()
  strEssCalc <<"""
    FIX("${lstPeriod.unique().join('","')}", 
        "${lstYears.unique().join('","')}", 
        "${lstProducts.unique().join('","')}", 
        "${povmbrs*.essbaseMbrName.join('","')}")

        "Revenue" = "REV_BASE_PRICE" * "REV_SALES_QUANTITY";
      ENDFIX
    ENDFIX
  """
}

Another example would be concatenating member names and country codes from an attribute dim.  Suppose you want to concatenate an _USD to a country code to reference an FX rate.

$CountryCode_USD tries to reference a variable named CountryCode_USD.  Using the squiggly brackets will enable this to happen without confusion. ${CountryCode}_USD would concatenate the value of CountryCode with _USD.

You can use additions and do $CountryCode + “_USD”, but it is terribly inefficient.  Once is not an issue but if it is used inside of loops, it can cause performance issues.

Last Call

I don’t think it is fair to call this a bug.  I do think there is a lack of clarity.  The dev group is actually looking at addressing this in a future release.  Again, my worlds, but changing this to always referencing things inside of brackets as a Groovy variable would make it a bit less confusing.  Basically, nothing inside of {} would be interpreted as an RTP unless it is defined in the header definition.  So, something in brackets that is defined as an RTP would be an RTP.  Anything else would be assumed a variable.


Adventures in Groovy – Part 40: Eliminating Data Sources With The Groovy Calendar Class

I am currently working on a migration of on-premise to cloud project (going GREAT by the way).  One of the things we are working on is the change with the data integration.  One of the processes loads the number of working days to the application from a source that provides it.  “Why not use Groovy,” I ask?  It turns out to be a great question.

There are two concepts to cover.  A few lines of Groovy using a calendar class and the gridbuilder to save the data.  This could also be a dynamically generated calculation that updates the data.  Since this is used on an ASO cube, the example below uses the gridbuilder option.

The Code Explained

This example will have a run time prompt for year, will calculate the values for each month in the year selected and store them to the appropriate account.  The prompt and the variables required are declared here.

/*RTPS {rtpYear} */
int iYear = rtps.rtpYear.getEnteredValue().toString().substring(2).toInteger() + 2000
def sYear = rtps.rtpYear.getEnteredValue().toString()
Def values = []
Calendar calendar = GregorianCalendar.instance

Once this is setup, the calendar class will be used to identify the working days.  Working days here is defined as any weekday in the month.  These days are used to calculate payroll accruals and monthly averages.  Holidays are not considered in the calculations that use this.

The following uses the calendar class to create a list variable that will be passed to the gridbuilder later in the script.

for (int currentMonth = 1; currentMonth <= 12; currentMonth++) {
  Calendar startCal = new GregorianCalendar(iYear, currentMonth, calendar.getActualMinimum(GregorianCalendar.DAY_OF_MONTH))
  Calendar endCal = new GregorianCalendar(iYear, currentMonth, calendar.getActualMaximum(GregorianCalendar.DAY_OF_MONTH))
  int workDays = 0
  startCal.upto(endCal) {Calendar it ->
    if( (it[Calendar.DAY_OF_WEEK]).toString().toInteger() > 1 && it[Calendar.DAY_OF_WEEK].toString().toInteger() <7 )
       workDays += 1
     }
    def sMonth = Date.parse( 'MM', "$currentMonth" ).format( 'MMMM' )
   values << workDays
   println "for the month of $sMonth we have $workDays working days."
}

At this point, a list object has 12 values, one for each month.  This will be loaded to a specific POV that won’t change.  If the requirement was more dynamic, this example could certainly be expanded to account for it.  The last step is to store the data back to the database.  There are many examples on the gribuilder in previous articles, so it won’t be explained in detail.

Cube cube = operation.application.getCube("Plan1")
DataGridBuilder builder = cube.getDataGridBuilder("MM/DD/YYYY")
builder.addPov($sYear, 'Local', 'Working', 'Plan', 'No Entity')
builder.addColumn('Jan', 'Feb', 'Mar', 'Apr', 'May', 'Jun', 'Jul', 'Aug’, 'Sep', 'Oct', 'Nov', 'Dec’ )
builder.addRow(['Working Days'], values )
DataGridBuilder.Status status = new DataGridBuilder.Status()
builder.build(status).withCloseable { grid ->
  println("Total number of cells accepted: $status.numAcceptedCells")
  println("Total number of cells rejected: $status.numRejectedCells")
  println("First 100 rejected cells: $status.cellsRejected")
  // Save the data to the cube
  cube.saveGrid(grid)
 }

The Results

The log will provide some descent information.  This can be expanded for POV, user info, the time it took to process, but as it is, this is what the log would produce.  Remember, the security of the user that runs this is used.  If this is for a forecast, for example, and the start month is April, the accepted cells would only be nine.  3 cells would be rejected because they are not writable.

for the month of January we have 21 working days.
for the month of February we have 21 working days.
for the month of March we have 22 working days.
for the month of April we have 22 working days.
for the month of May we have 20 working days.
for the month of June we have 22 working days.
for the month of July we have 22 working days.
for the month of August we have 21 working days.
for the month of September we have 22 working days.
for the month of October we have 21 working days.
for the month of November we have 21 working days.
for the month of December we have 22 working days.

Total number of cells accepted: 12
Total number of cells rejected: 0

The Calendar Class

Although not required in this example, there are all kinds of things that this can be used for.  Have you ever needed to calculate the week of the year?  The day of the week?  How about the days between two dates?  You likely have come across these things for WFP or CapEx at least.  The calendar object itself has a ton of useful cases and the object that is returned is basically an array of information.  If the object is sent to the log with a println, all the values are exposed.  Of course, you can always google it, but it looks like this.

java.util.GregorianCalendar[time=-62130585600000,areFieldsSet=true,areAllFieldsSet=true,lenient=true,zone=sun.util.calendar.ZoneInfo[id="UTC",offset=0,dstSavings=0,useDaylight=false,transitions=0,lastRule=null],firstDayOfWeek=1,minimalDaysInFirstWeek=1,ERA=1,YEAR=1,MONTH=2,WEEK_OF_YEAR=10,WEEK_OF_MONTH=1,DAY_OF_MONTH=2,DAY_OF_YEAR=61,DAY_OF_WEEK=4,DAY_OF_WEEK_IN_MONTH=1,AM_PM=0,HOUR=0,HOUR_OF_DAY=0,MINUTE=0,SECOND=0,MILLISECOND=0,ZONE_OFFSET=0,DST_OFFSET=0]

It would take pages to explain and provide examples of all that can be done, which won’t be in this post.  Here are some ideas of uses.

  • use copyWith to duplicate an instance
  • use the format method to format the date as a month, year, long date, etc.
  • use minus to subract two calendar dates from each other (datediff)
  • use next and previous to increment days, months, or years
  • use set to set a specific date

Last Call

Will this change the world?  No.  Is it useful?  To some, absolutely.  The goal here is to just provide some information on how to use the calendar class and give you some ideas of what it could be used for.  Manipulating dates and time has always been a challenge in Essbase.   It is better now with some of the custom functions that have been exposed (and thank goodness they did this on the cloud or we wouldn’t be able to register custom functions).  But, performance, complexity, rolling through the same blocks multiple times, all can be minimized with the ability to calculate this outside of Essbase, pass it to a calculation, let Groovy do what it is good at, and let Essbase handle what its strengths are.

To read about more uses, Google “Groovy Calendar” and take a look at all the methods it has – pretty useful stuff.

You have any other thoughts?  Post a comment.  You know  we would love to hear from you.


Adventures in Groovy – Part 39: First Common Parent

I can’t tell you how many times I have been at a client and they wanted to replicate eliminations at the first common parent like HFM, or some other consolidations system.  Maybe there is a good way to do this, but I could never find an efficient and effective way to accomplish it with Essbase calculations.  Well, that is history.  This is yet another example of how to solve an historically complex problem very simply.

What Is The First Common Parent

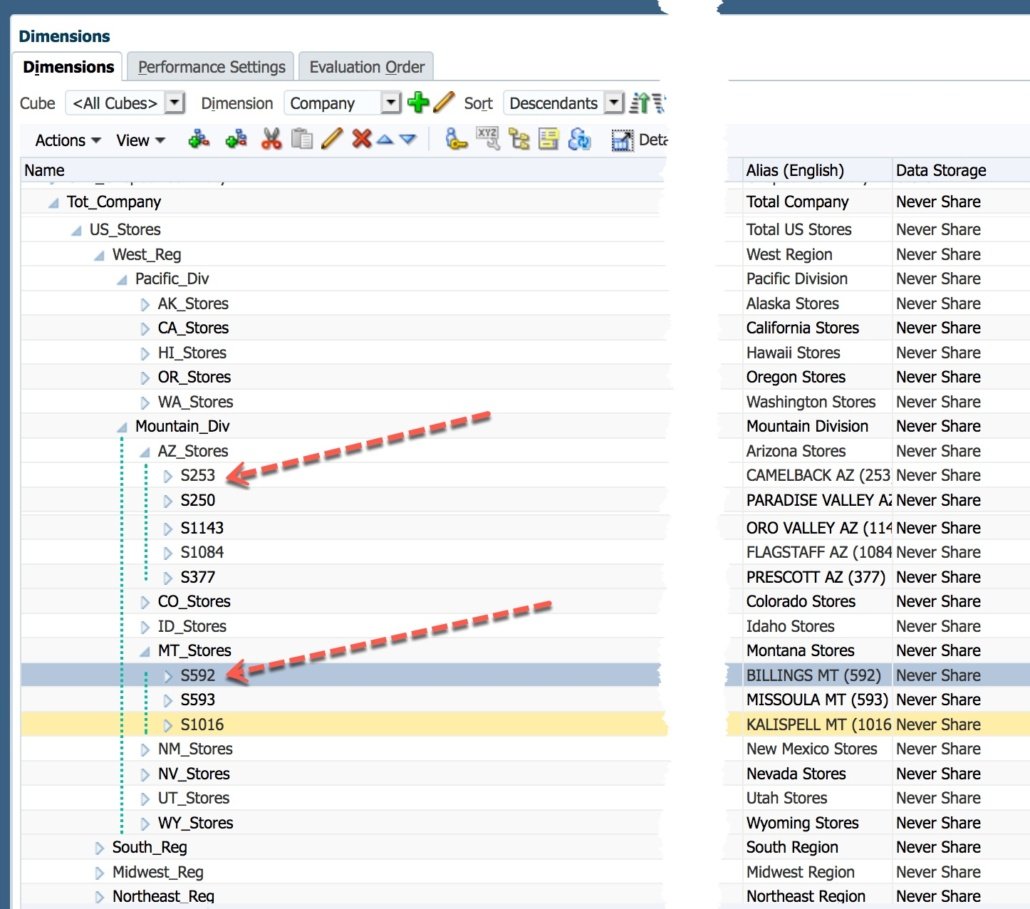
Eliminations functionality addresses the posting of inter-company eliminations in scenarios where a full legal consolidation model is not required, such as within a standard financial model.  An example would be eliminating sales to another entity inside the organization so the total sales of the organization is not inflating the real sales of the organization.  This is typically done at the first node that consolidates the two entities, or first common parent.  In the example below, which will be used in the code below, we need to find the first common parent to do the eliminations for entity S253 and S592.  The hierarchy below shows that the first parent of these two members is Mountain Division.  This is the entity that will calculate and hold the eliminated sales.

Surprisingly Easy With Groovy

The Groovy classes available to us have the ability to query metadata.  This allows a calculation to return all kind of things, like the ancestors of members.  Groovy takes over the rest by comparing the arrays returned.

For this example, the calculation prompts for two members.  In an real-world example, these would likely be defined in the calculation, or maybe with UDAs or attributes.  The prompts in this example, C1 and C2, are run time prompts connected to the hierarchy above.  Once the members are defined, the next step is to query the ancestors of each of the two members.

First, a connection to the application that has the dimension and members is defined.  Once that is done, a dimension object is created that is used to execute the queries.  Since we need ancestors, we use IAncestors.

/*RTPS:{C1} {C2}*/
Cube cube = operation.application.getCube("Fin")
Dimension companyDim = operation.application.getDimension("Company")
List companyOne = companyDim.getEvaluatedMembers("IAncestors(${rtps.C1.toString()})", cube) 
List companyTwo = companyDim.getEvaluatedMembers("IAncestors(${rtps.C2.toString()})", cube)

companyOne returns an array with the following values.

[S253, AZ_Stores, Mountain_Div, West_Reg, US_Stores, Tot_Company]

companyTwo returns an array with these values.

[S592, MT_Stores, Mountain_Div, West_Reg, US_Stores, Tot_Company]

The hard part, if you consider that hard, is over.  Now that the two arrays are defined, a snazzy Groovy method are used.  The intersect method will return the common elements of two lists.

The order of the elements returned by the PBCS classes is ordered from the bottom of the hierarchy to the top.  The first element would be the first common parent!  This example doesn’t illustrate it but this would work for staggered hierarchies just the same.

List commonParents = companyOne.intersect(companyTwo)
println "First common parent for ${rtps.C1.toString()} and ${rtps.C2.toString()} is ${commonParents[0]}"

The println results in the following message to the job console.

First common parent for "S253" and "S592" is Mountain_Div

That is it boys and girls.  In 6 lines of scripting (and it could be less as some variables are introduced to clearly articulate the process and methods), the first common parent is identified.  The most difficult part would be the business logic to accomplish the actual business requirement.

All Done

Now that you know how to get the first common parent, this can be used to dynamically create the appropriate Essbase calculations to provide all the functionality that is needed.  If you like this, share it with the community.  Post comments if you have any questions.  I love getting feedback.


Adventures in Groovy – Part 38: Challenge Accepted (Exporting Data With The System Date In The Filename)

I had a great question today so challenge accepted!  A reader asked if it was possible to run a data export and have the system date in the file name.  The answer is very simply, yes.  I don’t have any content around the question, so I will answer it in two ways.

Option One – Groovy

If you have read any of the pieces of this series, you know how excited I am about Groovy.  Yeah, I know, Groovy can do everything.  You are tired of hearing me say that.  I know it can’t do everything, but it comes close!  In Exporting Data in PBCS With Business Rules, I talk about exporting data with a business rule.  In Part 1 of my Groovy Series, I lay out how to execute a business rule with Groovy and how you can alter the Essbase calculation at run time.  If we put these two concepts together, we can set the name of the export to anything we want, even a system date.

The Date() method will return a date in a default format and inside a Groovy calculation it uses GMT time.  Since I am in EST, it is always 5 hours ahead.  So, if the date is printed at 5PM EST, the results is Wed Jan 16 22:00:00 GMT 2019.  This can be altered by formatting it to just about anything your heart desires.  I am sure you see where I am going.  If you google “format date Groovy” it will list nearly 50 options for date and time, AM/PM or military time, month as a number, 3 digit abbreviation, or the whole month, as examples.  For this example, the file to be just the system date.

Def currentDate =  new Date().format("MM_dd_yyyy")
// this returns the a two digit month, two digit day, and four digit year, separated by underscores

If you don’t want GMT, there is a trick.  The date method accepts a date.  It can be a fully qualified date like “1/15/19 22:00:00” or you can enter the seconds from January 1, 1970, 00:00:00 GMT.  This might sound crazy but in a Groovy calculation you can use currentTimeMillis() to get exactly that.  Again, since this is GMT, and EST is the want, add 3,600,000 milliseconds for each hour you want to change from GMT.  If these two methods are combined, the appropriate time can be obtained.

def adjEST = currentTimeMillis() + (3600000 * -5)
def currentDate =  new Date(adjEST).format("MM_dd_yyyy")
// This would give me the date 5 hours behind GMT

Now that we have the system date (and this is obviously my interpretation because I want it represented in my home time zone), we can combine this with the examples referenced above to export the data to a file with a name that includes the “system date.”

If you don’t know, the last string in a Groovy calculation is actually submitted to the calculation engine.  A stringbuilder is not required as noted in the examples.  The drawback of this is that we don’t have the option to log the actual calculation script.  This is more helpful when debugging and isn’t always critical to have documented in a production application via a log.  So, here goes!  The only change from the example is that we define a date variable as mm_dd_yyyy and pass that to the calculation.

// Get the date in EST and format as needed
def adjEST = currentTimeMillis() + (3600000 * -5)
def currentDate = new Date(adjEST).format("MM_dd_yyyy")

// Pass the calculation with the currentDate variable as the file name
"""
 SET DATAEXPORTOPTIONS
 {
 DataExportLevel LEVEL0;
 DataExportDynamicCalc OFF;
 DataExportNonExistingBlocks OFF;
 DataExportDecimal 4;
 DataExportPrecision 16;
 DataExportColFormat ON;
 DataExportColHeader Period;
 DataExportDimHeader ON;
 DataExportRelationalFile ON;
 DataExportOverwriteFile ON;
 DataExportDryRun OFF;
 }

 FIX(@Relative("Account", 0),
     @Relative("Years", 0),
     @Relative("Scenario", 0),
     @Relative("Version", 0),
     @Relative("Entity", 0),
     @Relative("Period", 0),
     @Relative("<em>custom_dim_name_1</em>", 0),
     @Relative("<em>custom_dim_name_1</em>", 0),
     @Relative("<em>custom_dim_name_1</em>", 0))
  DATAEXPORT "File" "," "/u03/lcm/${currentDate}.txt" "";
 ENDFIX
"""

This would produce a file in the inbox named 01_16_2019.txt.  By adding a parameter and formatting it to the date we want the file to be named, we have our solution.  Two additional lines and adding the parameter to the Essbase calculation is all that is required.

Part Two – Without Groovy

This is a little more difficult without Groovy.  I have not found a way to use something like the following as the file name.  If a reader sees this and knows of a way a way to do this, please share it and post a comment.

@CONCATENATE (@CONCATENATE ("/u03/lcm/", @FORMATDATE(@TODAY(),"mm_dd_yyyy")),".txt")

I assume in the original question that the ask is really not to have a file in the inbox with a specific name.  By using EPMAutomate and execute the calculation with a static name, the file can be download and renamed.  A simple PowerShell script could be used to rename the file.  If there really is a need to have this in the inbox, it can be uploaded.  I don’t know of any method that exists to rename an existing file with EPMAutomate.

$localFile = "c:\PBCS_Downloads\"
$exportFileName = "DataExport.txt"
Start-Process "epmautomate downloadfile ""$exportFileName"""
# Assume the script is executed from c:\PBCS_Downloads\ or the file is moved to this folder
$fileObj = get-item "c:\PBCS_Downloads\dataexport.txt"
rename-item "$($fileObj.FullName)" "$(Get-Date -Format "MM_dd_yyyy")$($fileObj.Extension)"
Start-Process "epmautomate uploadfile ""$($fileObj.DirectoryName)\$(Get-Date -Format ""MM_dd_yyyy"")$($fileObj.Extension)"""

Challenge Completed

Another challenge accepted has been easily completed.  Keep them coming!


Adventures in Groovy – Part 37: Improving The User Experience With AutoFill

To date, we have talked about the performance improvements Groovy introduces, as well as the creative validation we can add.  One thing that hasn’t been covered yet is the ability to add functionality to make the input easier for a planner.  Replicating changes through the months, resetting the values back to the defaults, and many other concepts can be developed to make the user’s lives easier.

Use Case / Example

The following example is something most applications will encounter, especially in workforce planning and capex.  This form has the level of an employee.  This functionality would be the same for things like title and employment status.  Basically, the user would typically change a month and simulate that change to all remaining months.  Or, they might change the status to Maternity Leave for 3 months and then back to Active.

What this functionality will do is allow the planner to change the month from active to Maternity Leave, assume every month after that will be updated for them, until a month is changed/edited.  If this is still not clear, I think the following 3 steps will clear it up.

  1. The planner opens the form and the employee is set to a Trainee for all months.  The level progression is Trainee, Associate, Consultant.
  2. The planner changes the person’s level from Trainee to Associate in March, and to Consultant in July.
  3. The planner saves the form and the result is that the employee is promoted to Associate in March.  The calculation automatically changes April, May, and June to Associate – basically it copies the change to the next month unless the next month is edited.  It continues that pattern through the 12 months, so the employee is promoted to a Consultant in July and that is copied through December.

This may not seem life changing, but it does reduce the effort for a planner and reduce the possibility that they don’t know they have to change all the months manually and cause inconsistencies in the budget.

The Code

The following calculation assumes only one employee is on the form.  This would need slightly updated to reset when the employee changed, or when the iteration went to the next line in the form.  This also needs to be executed before save.  Let’s jump in.

The first thing we are going to do is set some parameters.

def update = false
def runTotal = 0
def change = false
def Months = ["Jan","Feb","Mar","Apr","May","Jun","Jul","Aug","Sep","Oct","Nov","Dec"]

Next, we will loop through the cells.  We are only looping through the rows where the account is equal to “Level.”  As this goes from January to December, it keeps track of the value the cell should be changed to, or the last edited cell’s value.  If it gets to a cell that is edited, it resets the variable so that any cell after that will be updated to the most recent change.

operation.grid.dataCellIterator('Level').each { cell -> 
  // If the cell is edited, change the variable so it knows that the remaining
  // months need to be changed
  if(cell.isEdited()){
   change = true
  }
  // If the month is not edited and a prior month has been changed, update the 
  // value to the prior month's value
  else if(change == true){
    def lastMonth = Months.findIndexOf{it == cell.getPeriodName()} - 1
    cell.setFormattedValue(cell.crossDimCell(Months[lastMonth]).formattedValue)
  }
}

Not Rocket Science

Like I previous stated, this isn’t going to be the difference between a project success and failure like the performance improvements that have been discussed, but it is a very simple thing that can be added to give your application some polish.  Also, I can’t say it enough, little things like this give users confidence and also reduce the possibility of human error, giving the budget more validity and trust.


Adventures in Groovy – Part 36: Manipulating Dates

Manipulating dates is not something you may think is that useful, but there are a number of things that we have done in the past that are slow performing in Essbase, and others that were not possible or you may not have ever thought of.  This is going to walk visitors through ways to manipulate dates for all kinds of uses.  Hopefully it inspires some ideas for you to make your application a little more polished.

This Is Nice, But When Would It Be Used?

First, if logic is done in Groovy for things like WFP, comparing dates is frequently used to calculate benefits.  How many months has the person been employed?  Did they get a promotion in the last 12 months?  Calculating differences in dates is extremely simple in Groovy and applying more logic around it is often quicker to write and faster to process in Groovy than it is in Essbase.

Capex is also a place that is date dependent to calculate depreciation and other asset related accounts.  There are also some things we can do to make the user experience better, like giving the option to just enter a number of months rather than get the end date based on the start date.

I can’t say you will use it in every build you are involved in, but when it is required, these techniques will undoubtedly make your life a little easier.

Creating And Formatting Dates

Most of the methods require a date object.  It can be created by getting the current date and time or setting the date and time from a string or concatenation of variables.

// This will create a date object with the current time
def date = new Date()
// To create the object with a specific date/time, follow this logic
def date = new Date().parse('yyyy/MM/dd', '1973/07/09')

A real-world example might be using the members in the POV to create a date.  Since getting the member values from RTPs or looping through cells has already been covered, this will assume the method you use returns the following values.  The parse method can hold just a year, month, or year and month, or year and moth and day, for example.  The two parameters must match.

// drop the first two characters
def sYear = "FY18".drop(2)
def sMonth = "Jan"
def sDay = "1" // The day is likely irrelevant, so 1 will be used as a default
def date = new Date().parse('yyyy/MM/dd', "$sYear/$sMonth/$sDay")
// we are using yy because the date is only two years
// we are using MMM because we have a month abbreviation.  If we had a number, it would be MM
println date
def date1 = new Date().parse('yy/MMM', "$sYear/$sMonth")
println date1

// Both return 'Mon Jan 01 00:00:00 EST 2018'

println date1.format('M/d/yy')
// Returns 1/1/18

Here are some more formatting examples.  Depending on the need, some of these may be useful.  There are more, but I think these are the formats you might use most often.

Pattern Output
dd.MM.yy 30.06.09
yyyy.MM.dd G ‘at’ hh:mm:ss z 2009.06.30 AD at 08:29:36 PDT
EEE, MMM d,yy Tue, Jun 30, ’09
h:mm a 8:29 PM
H:mm 8:29
H:mm:ss:SSS 8:28:36:249
K:mm a,z 8:29 AM,PDT
yyyy.MMMMM.dd GGG hh:mm aaa 2009.June.30 AD 08:29 AM

Often times we need the month, day, or year of a date object.  This is another simple thing to do.

date = new Date().parse('yyyy/MM/dd', '1973/07/09')
println date[Calendar.YEAR]
// Returns 1973
println date[Calendar.MONTH]
// Returns 7 
println date.getAt(Calendar.DATE)
// Returns 9

Manipulating Dates

The first thing that is very common is the need to do is some basic changes to the year and month.

Often time the year we have in Planning is prefixed with FY.  A simple thing to remove the FY is to drop the first two characters.

def sYear = "FY18"
println sYear.drop(2)
// Returns 18

Next is months.  There are a couple of things that are typical requests.  One is to pad the number with a 0.  The other is to convert numbers to the month name, and visa versa

date = new Date()
println.date[Calendar.MONTH].padLeft(2,'0')
println date1.format('MM')
// These will return the numeric month
// It will also pad it with zeros and return 2 characters
// Often times we need a two digit string rather than an integer

//If we have the number and need the name
$sMonth = 1
def date = new Date().parse('M', $sMonth)
println date.format('MMM')
// Returns Jan
println date.format('MMMM')
// Returns January

Increasing or decreasing a date by a predefined number of days is also simple and often used.

date = new Date()
date.plus(1)  // Returns tomorrow
date.minus(1)  // Returns yesterday

Increasing months and years is a little more complicated, but still easy to accomplish.

d = new GregorianCalendar() 
d.setTime(new Date().parse('yyyy/MM/dd', '2018/07/09'))  // sets to the current date/time
d.add(Calendar.MONTH,5)  // Increases the date by 5 months
println d.getTime().format('MM/dd/yyyy')
// Returns 12/9/2018

Lastly, getting the difference between two days might be something required.

In days

date = new Date().parse('yyyy/MM', '2018/07')
date1 = new Date().parse('yyyy/MM', '2019/08')
println (date..<date1).size()  // Returns 31

In Months

date = new Date().parse('yyyy/MM', '2018/07')
date1 = new Date().parse('yyyy/MM', '2019/08')
println ((date1[Calendar.MONTH] - date[Calendar.MONTH]) + ((date1[Calendar.YEAR] - date[Calendar.YEAR])*12))
// Returns 13

Calling It A Day

I can see prompting a user when adding a new asset to just request a start date and how many months the useful life would be, rather than asking for two dates.  When adding seasonal resources, it would be nice to ask for a start date and the number of days they will be needed, in some cases.

The date manipulation is something we all do, and I can tell you, doing it in Groovy is way simpler than doing in in Essbase with all the concatenations required.

If you have a good example of use case, please share!


Adventures in Groovy – Part 35: Error Trapping Groovy Calculations

There has not been alot of troubleshooting discussed in the adventures series.  Just like with most coding languages, you can gracefully handle errors resulting from actions (like divide by 0) and return descriptive information to the users and administrators in the job console.  There are several benefits that I see.

  • As previously stated, since the error is accounted for, the user doesn’t get a message that shows a failure with no context.
  • The error object will provide more information about what happened and what should be done to fix it in the future.
  • Predefined actions can take place since the error doesn’t interrupt the script, like returning an error message that tells the user to contact the administrator with an action

Error Handling Introduction

Try / catch / finally is a concept most development languages have.  Conceptually, you “try” some group of commands and “catch” any errors that might happen.  If you “catch” an error, you account for it by doing something.  “Finally,” you perform any closing actions.

try {
  def arr = 1/0
} catch(Exception ex) {
  println ex.toString()
  println ex.getMessage()
  println ex.getStackTrace()
}finally {
   println "The final block"
}

In this case, ex.toString() prints

java.lang.ArithmeticException: Division by zero

ex.getMessage() prints

Division by zero

and ex.getStackTrace()

[java.math.BigDecimal.divide(Unknown Source), org.codehaus.groovy.runtime.typehandling.BigDecimalMath.divideImpl(BigDecimalMath.java:68), org.codehaus.groovy.runtime.typehandling.IntegerMath.divideImpl(IntegerMath.java:49), org.codehaus.groovy.runtime.dgmimpl.NumberNumberDiv$NumberNumber.invoke(NumberNumberDiv.java:323), org.codehaus.groovy.runtime.callsite.PojoMetaMethodSite.call(PojoMetaMethodSite.java:56), org.codehaus.groovy.runtime.callsite.CallSiteArray.defaultCall(CallSiteArray.java:48), org.codehaus.groovy.runtime.callsite.AbstractCallSite.call(AbstractCallSite.java:113), org.codehaus.groovy.runtime.callsite.AbstractCallSite.call(AbstractCallSite.java:125), ConsoleScript11.run(ConsoleScript11:2), groovy.lang.GroovyShell.runScriptOrMainOrTestOrRunnable(GroovyShell.java:263), groovy.lang.GroovyShell.run(GroovyShell.java:387), groovy.lang.GroovyShell.run(GroovyShell.java:366), groovy.lang.GroovyShell.run(GroovyShell.java:170), groovy.lang.GroovyShell$run$0.call(Unknown Source), groovy.ui.Console$_runScriptImpl_closure18.doCall(Console.groovy:1123), groovy.ui.Console$_runScriptImpl_closure18.doCall(Console.groovy), sun.reflect.NativeMethodAccessorImpl.invoke0(Native Method), sun.reflect.NativeMethodAccessorImpl.invoke(Unknown Source), sun.reflect.DelegatingMethodAccessorImpl.invoke(Unknown Source), java.lang.reflect.Method.invoke(Unknown Source), org.codehaus.groovy.reflection.CachedMethod.invoke(CachedMethod.java:98), groovy.lang.MetaMethod.doMethodInvoke(MetaMethod.java:325), org.codehaus.groovy.runtime.metaclass.ClosureMetaClass.invokeMethod(ClosureMetaClass.java:294), groovy.lang.MetaClassImpl.invokeMethod(MetaClassImpl.java:989), groovy.lang.Closure.call(Closure.java:415), groovy.lang.Closure.call(Closure.java:409), groovy.lang.Closure.run(Closure.java:496), java.lang.Thread.run(Unknown Source)]

The script in the final block is also written out.  It is intended for cleanup and tasks that run at the end of a script regardless of whether there is an error or not.

Handling Errors Uniquely

The catch command can be replicated to handle errors uniquely.  Let’s expand on the example above.  Assume the variable is coming from an RTP or cell value.  The following has a catch for a specific error.  The java.lang.ArithmeticException is equal to the output of ex.toString().  There are probably thousands of errors, if not more.  The easiest way for me to grab these is to use the ex.toString() and see what it produces.  I have no desire to remember or learn them all!

The following will do something different for the divide by zero error than all other errors.

try 
  {
  def denominator = 0
  println 1/denominator
  } 
catch(java.lang.ArithmeticException ex) 
  {
  println ex.getMessage()
  println "an action should be taken to account for the error"
  }
catch(Exception ex) 
  {
  println ex.toString()
  println ex.getMessage()
  println ex.getStackTrace()
  }
finally 
  {
  println "The final block"
  }

Finishing Up

This requires a little more effort, but once you get used to doing this, it can be reused.  I hear the argument that if you account for every possible situation, you don’t need to error trap.  That is true, and if you are smart enough to account for everything that can go wrong, don’t include this in your Groovy calculation.  I would argue that simple calculations probably don’t need this level of error handling, but more complex logic might be a candidate.  The example above could obviously be handled with an if statement, but put it in context.  It is used to illustrate the concept of try / catch / finally.


Adventures in Groovy – Part 34: Getting Started With Groovy in ePBCS, Implementation Methods, an ODTUG Webinar

I was fortunate enough to speak for ODTUG a few weeks ago and really excited that my discussions around Groovy are getting some of the most attended and most interactive ODTUG webinars.  If you have put any of these presentations together, you know how much time it takes to do the research, consolidate the information, make it presentable, and spend the time to hopefully make it fluid.  So, when you provide feedback, I really appreciate it.

The Webinar

There were some questions I wasn’t able to answer, so here goes.

Can the dataCellIterator take functions like @IDESC, @CHLIDREN, etc?

The iterator iterates through the grid, so it doesn’t have the ability to do this directly.  I am not sure of the question, but you could iterate through the grid and for each cell use these functions in other classes/methods to do things like see if it has children, or check to see if it is a child of something.

Is there a way to have a groovy business rule to call a non-groovy business rule – for example if cells were edited then run BR1 else return?

Yes and no.  There is no way to execute another rule.  But, you can embed it into the script like you can in any other rule or script.  You can neither write the string or drag and drop the rule into the Groovy rule.  It doesn’t always put it where the cursor is, but you can cut and paste it to wherever you need it.  It basically is like an include and just embeds the script text, so it would need to be in a string builder.

Can We improve the Aggregations with Groovy?

Yes and no.  If you dynamically create an aggregation script that is the exact same as a normal rule, the same time would result.  Where you do get a benefit is that you can only consolidate the impacted members and dimensions based on what has been edited.  You can also move the data from the BSO to the ASO cube and eliminate the need to aggregate, which would obviously improve the perception of speed.

Does groovy interact with workflow, valid intersection, copying attached documents / supporting detail?

Workflow is in the roadmap.  I confirmed last week with development, so it is coming.  Attachments and supporting detail can be copied by executing smart pushes.

Can grids be generated on the fly using groovy?

They sure can, but they aren’t visible to the user.  There are two grid builders for retrieving and submitting data.

Is there any documentation available to give performance comparisons between business rule/calc and groovy?

Not that I know of, but as previously stated, Groovy doesn’t make Essbase faster.  The perception to users will be that it does, but it is only because we have the ability to isolate what we calculate more than we did before.  That said, if you use the grid builders to do the calculations and submit the results rather than use BSO calculations, you might see different results.  There are some things (allocations) that I think is faster in BSO.  I think using the grid builders on ASO – I do see improvements in performance using Groovy over procedural calculations.  But, I want to emphasize that the majority of the time the speed is improved because of the ability to calculate only what we need to.