PBCS/EPBCS Data Import Options

Importing data directly into PBCS can be done in two ways.  There is a planning format and an Essbase format.  Yes, it can be loaded through Data Management, but this is focused on explaining the direct import process, the formats, and the benefits to each.

Planning File Format

What Is The Planning File Format

Per Oracle, if data is exported to a file in the Planning format, you can use Notepad to change the database name in the file; for example, ASOCube, and then import the data file into the aggregate storage outline provided all dimensions exist.

This is fine and dandy if you are importing data exported from Planning.  Normally, there is a source that is giving the data to PBCS and a format has to be provided to that source.  The format is basically a delimited file with some quotes around a group of the fields.  Technically, there are 3 pieces of the file.

  1. One dimension has to be in the rows.
  2. One dimension has to be in the columns.
  3. The third section is the POV, or the remaining dimensions.

It looks like this.

Account,Jan,Feb,Mar,"POV",Plan Type Name
10020,40.10,50.60, 70.20,"Actual,Final,Company_10,FY18",Finance

Why Use The Planning Format?

There are some benefits and drawbacks of using this format.

  • Data loaded to smart list accounts can be loaded as the actual smart list label. This is great for applications where the data is provided in that format.  WFP data often provides data in the smart list value, like Part Time/Full Time.
  • When there are errors, the load continues through the end of the file.
  • The job console shows the number of records processed, the number of records that couldn’t be loaded, and the first x lines of errors with line numbers.  I will warn you that I have seen the console show all records loaded and nothing loaded.  I have also seen no rejected records when the file didn’t load completely.  So, when you are developing loads, I would recommend validating carefully and looking at the block counts to ensure the messaging in the console is correct.
  • The biggest drawback to loading the planning format is that it loads through Planning and because of some of the benefits, it is slower to load. This normally isn’t a huge issue because the loads are finished within a few minutes.
  • The format is a little odd and can sometimes be problematic to produce.  Certain dimensions are required in the row and column headers.  This is often challenging.  For instance, most applications require the months to be in the row or column areas.  Since they can’t be put in the POV, more than two months have to have multiple columns.  If the source can’t produce this easily, a file for each month has to be created.

Essbase File Format

Why Use The Essbase Format?

Loading directly to Essbase is faster and often times easier to produce the needed format.  It loads directly to Essbase so none of the mapping done when loaded through Planning (like smart lists) happens.  This is often a huge headache because the mapping has to be done in the source or in some middle ETL layer (assuming DM is not being used).  Another issue with using this method is that when a record rejects, nothing more is loaded.  The job console also does not show the records processed.

What Is The Essbase File Format

Per Oracle, (exported by an on-premises product). These files can be formatted in either Cell list or Column list format. Cell list format specifies a single cell value for each record, whereas Column list format specifies multiple cell values for each record. For example, if you specify Time on the column, you might have the values Jan, Feb, Mar, and so forth on the column, with 12 values for each record (that is, one for each month). Conversely, the Cell list equivalent would contain 12 records, one for each month. For information on exporting files from Essbase, see the on-premises Oracle Essbase Administration Services Online Help.

That doesn’t tell us much.  The format of this loading methodology is almost identical with the Planning format.  The thought process is a little different.  This file will hold a column for every dimension but has no header line.  Each dimension is preceded and terminated by quotes and delimited by a tab.  All the dimensions are listed first, followed by the value of that intersection.  The planning format shown above will look like this

"10020"       "Actual"      "Final"       "Company_10" "FY18" "Jan"  40.10
"10020"       "Actual"      "Final"       "Company_10" "FY18" "Feb"  50.60
"10020"       "Actual"      "Final"       "Company_10" "FY18" "Mar"  70.20

Last Call

Neither of these formats/methods are complicated, but the documentation is lacking when explaining exactly what they are.  There is little mention to the pros/cons.  Hopefully sharing this will fill in the gaps that exist in the documentation.


Adventures in Groovy – Part 42: Using Scenario Start and End Periods Through Metadata Queries Provides Awesome Functionality

Identifying the months to calculate plan and forecast has always been a delicate balance between performance and maintenance.  Having a calculation for each required duplication of forms or calculating more than what was required.  Calculations required more complicated if logic than what it should have or (I hate when I see this) a calculation that just does both forecast and plan regardless of what needs calculated.

Groovy has opened up a lot of options.  We can identify if plan or forecast is in the form and dynamically build the Essbase calculation, which is what I have started doing.  This, combined with only calculating on the edited cells, gets you part of the way there.  It doesn’t help with global calculations or calculations when a single month will impact all months, like when there are balance walk forwards.

Groovy provides us the ability to get member properties, which I have discussed before.  The Scenario dimension has unique properties, like the start month, start year, end month, and end year, which is what creates the security on the periods and years for each scenario.  Once these are identified, the possibilities are endless.  They can be used to create gridbuilders, they can be used to dynamically fix on the correct periods in Essbase calculations, or they can be used to do other date specific things.

Groovy Calculation and API

At this point, you are probably very well aware of the operation class, which has an application sub class.  The application subclass has many functions within it that are useful.  One, is the ability to create a dimension object.  From there, a member object can be created.  The following is a very simple example to hold a scenario member in a member object that can be used in many ways.

Member mbrScenario = operation.application.getDimension('Scenario').getMember('Plan')

If the scenario is a run time prompt, it would look like this.  Assume the RTP is named rtpScenario.

Member mbrScenario = rtps.rtpScenario.getMember()

When the member object is initiated, all the properties of the specific member are available.  You may want to review Adventures In Groovy – Part 11: Accessing Metadata Properties before continuing.  The same concept is used here, but the properties returned are slightly different.  The four we want to access are

  • Start Period
  • End Period
  • Start Year
  • End Year

These can be stored in variables or used within calculations or other logic.  There may be a need to convert the month member to a long month or a number.  The year may also be converted to remove the FY and prepend 20 so it can be used in date manipulation.  println mbrScenario.toMap() produces the following, so the full list of properties is a little different than what was produced in Part 11.

Log messages : 
{Parent=Scenario, Two Pass Calculation=false, Process Management Enabled=true, Old Name=Plan, Formula=<none>, End Year=FY20, UDA=, Aggregation (GTech)=+, Solve Order (GTech)=0, Essbase Name=Plan, UUID=91f18d30-fc37-4e0b-bc9a-99668194e793, Member=Plan, Data Storage=never share, Hierarchy Type=none, Allow Upper Level Entity Input=false, End Period=Dec, Start Period=Jul, Aggregation (ProdRev)=+, Include BegBal=true, Data Storage (GTech)=never share, Formula Description=<none>, Data Id=2573227211374885, Data Storage (ProdRev)=never share, Start Year=FY18, Data Type=unspecified, Formula (GTech)=<none>, Old Unique Name=<none>, Formula (ProdRev)=<none>}

Since this is a Groovy map, a type of Groovy collection, any of the elements can be accessed by referencing the element key.

println mbrScenario.toMap()["Start Year"].toString()

Multi Year Example

Since many applications will span over multiple years, there is some additional logic that has to be built to loop through the months.  If the user is prompted for a start period/year and end period/year, you may need to validate that the date range is within the start/stop periods on the scenario, which also is easier to evaluate if these are converted to dates.

[membership level=”0″]


In2Hyperion has premium content that is only available to those who make a small annual donation.

 Already have an account with
in2Hyperion?

Login

 Want to purchase a subscription to
the premium content?

Purchase Today


[/membership]
[membership]

Building The Date Range

Creating a map with the year and the list of months is a great way to store the date range.  It can be used to build lists for gridbuilders that read data (parameters are multiple rows/columns by year with periods as a list object), creating Essbase calculations by year, and headers for grids that are submitting data (which are string arrays).

Expanding on what was previously discussed, this will convert the year to a valid year by removing FY and create a date object that stores the start and end dates in variables.  Notice the start date uses a day of 1 and the end date uses a day of 2.  This is important later on.

Member mbrScenario = operation.application.getDimension('Scenario').getMember('Plan')
Date scenarioStart = Date.parse("yyyy-MMM-dd", "20${mbrScenario.toMap()["Start Year"].toString().substring(2)}-${mbrScenario.toMap()["Start Period"].toString()}-01")
Date scenarioEnd = Date.parse("yyyy-MMM-dd", "20${mbrScenario.toMap()["End Year"].toString().substring(2)}-${mbrScenario.toMap()["End Period"].toString()}-02")

Now that we have two dates, the next step is to create the map to hold the results.  This map will look like similar to this for a date range when Jul,19 through Dec, 20 is selected.

['FY19',['Jul','Aug','Sep','Oct','Nov','Dec'] , ['FY20',['Jan','Feb','Mar','Apr','May','Jun','Jul','Aug','Sep','Oct','Nov','Dec']

This is created by looping through the two dates by month.  This example uses a while loop and will iterate through each month WHILE the iteration date (current) is before the end date.  If the scenarioStart and scenarioEnd dates had the say day, this would exclude the last month because they would be the same.  This also uses the calendar class to increase the date by month, which isn’t available in the date class.

// Create the variables needed
// PeriodRangeMap holds the years/months
// calendar and current are used in the iteration process
Map<String, List<String>> periodRangeMap = [:]
Calendar calendar = Calendar.getInstance()
Date current = scenarioStart

while (current.before(scenarioEnd)) {
  // Set the calendar variable to the date of the current variable 
  calendar.setTime(current)
  // If this is a new month, create a null map element to hold the new year and months
  if(periodRangeMap["FY${current.format("YY")}".toString()] == null){
    periodRangeMap["FY${current.format("YY")}".toString()] = []
  }
  // Append the month to the appropriate year
  periodRangeMap["FY${current.format("YY")}".toString()] << current.format("MMM").toString()

  // Increase the calendar variable by one month
  calendar.add(Calendar.MONTH, 1);
  // set the current variable to the next month's date
  current = calendar.getTime();
}

If we print the periodRangeMap to the job console using a println, assuming the start month is Jul of 18 and the end month is Dec of 20, this will be displayed with the exception that line returns are added to make it readable.

Log messages : 
{
FY18=[Jul, Aug, Sep, Oct, Nov, Dec], 
FY19=[Jan, Feb, Mar, Apr, May, Jun, Jul, Aug, Sep, Oct, Nov, Dec], 
FY20=[Jan, Feb, Mar, Apr, May, Jun, Jul, Aug, Sep, Oct, Nov, Dec]
}

The periodRangeMap can then be used to loop through and create the lists and maps used in gridbuilders and datamaps.

[/membership]

Last Call

The ability to directly access the start and stop period/year really gives partners a new thought process to implementation options where these periods are critical.  It is very easy to access, very easy to implement, and extremely useful.  If you have an idea of how to use these dates, share them with the community so we can all benefit.  Hope to see an idea soon!


Oracle EPBCS/PBCS May Updates – Big Changes!

I don’t normally write up monthly updated, but this month there are a number of intriguing changes/updates/enhancements that are important to know.  Some may change existing processes.  This is not an exhaustive list, but these are things I think all of us should take note of.

The changes that you will see in the UI may not be visible unless you clear your cache.

EPMAutomate

  • You MAC users are going to like this, it can now be installed and work on a MAC. By the way, I am one of them.  I can’t wait until the beta is finished for the Smart View to work with office360, meaning MAC, Ipad, etc.
  • You can now run multiple instances of EPMAutomate. So, logging out of one will not log you out of the other.  This will help those that want to run test and prod on one VM.  It will also remove any issue of one process stepping on another.
  • Admin mode can be enabled with EPMAutomate, which was a huge missing piece, in my opinion.
  • A sortMember command to order members in dimensions is now available.

Forms

  • No more composite forms, sorry guys!

Smart Push

  • There is a new Smart Push option called Use Database Suppression that enables you to apply row suppression at the database level instead of at the application level, thus eliminating the impact on query thresholds and improving Smart Push wait times.

Settings

  • There is a new setting to set the accounts that are linked between plan types to false. This will use the  a new attribute of HSP_LINK (not HSP_NOLINK).

Groovy

  • We now have the ability to use the new suppression option on the data map / smart push. This will improve performance and reduce the need to break up pushes in groups of members.
  • Groovy can now run jobs. This means a rule can execute other jobs within that rule.  They show as tasks in the job console.  This is limited to the execution of rules, rulesets, and templates.
  • All RTPs are now supported in ASO.

Smart View (AMEN on some of these as us old timers will love) – You will want to download the updated version to take advantage of these.

  • In-grid, cell-based POV—POV members are placed on the grid instead of in the POV toolbar.
  • Submit without refresh—Using the default Submit Data button in the Smart View ribbon, all data cells in a single grid (modified cells and unchanged cells) are marked dirty and submitted. Once the submit operation is complete, the entire grid will be refreshed.
  • Enhanced free-form—Users can insert empty columns and rows anywhere in a grid and change the alias table. Additionally, supports member auto-refresh where deleted members are returned to the grid upon refresh.
  • Multiple-grid ad hoc—Multiple ad hoc grids can be placed on the same Excel worksheet. With multiple-grid ad hoc, users can submit data from any grid on the sheet. Grids based on aggregate storage cubes and block storage cubes are supported on the same sheet. Each grid is independent; for example, if required, you can change the alias table for only one grid on the sheet.
  • Users will now get a warning when the version installed is out of date. Hopefully this can be turned off!

General

  • Jobs can now have a new return, success with warnings. An example of this might be loading data.  The job finished successfully but there were rejected records.  Make sure your automation accounts for this!

DM

  • There is now an option to not run the validation when data is loaded. For those of you that despise the performance challenges of using DM, this might be a game changer.  The longest part of the process is the actual validation, not the import or export to Planning.

Modules in ePBCS

  • Rolling forecast can now be configured for length.
  • There were some critical bugs that were fixed in WFP (I know first-hand).
  • Some CapX forms were improved as well.


Adventures in Groovy – Part 41: RTP Interpretation Modes

Have you ever used a variable and received this error? Error: Unable to retrieve variable [variable name] deployed in the application [app name] Rule [app name].[plan type name].[rule name]. You likely saw this when a Groovy variable was used inside of {}. I finally had the issue explained to me working with the Oracle PBCS development group today. God bless them for being so gracious to help me through some of these issues! You know who you are, and I can’t thank you enough for your time!

ePBCS interprets Groovy before the Groovy compiler is engaged. There are multiple interpretation modes (my words) and varies based on whether run time prompts are initiated by including /*RTPS:*/ in the calculation.

WHAT YOU NEED TO KNOW

Long story short is this, but I encourage you to read on for a deeper dive into what is happening.

EPBCS parses all Groovy scripts before executing it to identify the run time prompts used by the script. The way it identifies the run time prompts is by looking for explicit declaration of the run time prompts in a comment in the following format:

/*RTPS: {rtpName}*/

The reason for this is because there are many expressions (closures, string interpolation etc) in Groovy that use curly braces so the old way of defining run time prompts in curly braces {rtpName} is no longer recommended. Instead, the use of rtps.rtpName is recommended to reference run rime prompts inside a Groovy script.

Without the explicit declaration in the /*RTPS */ comment, the parser will try to interpret Groovy expressions inside {} as run time prompts causing the following error:

Error: Unable to retrieve variable [variable name] deployed in the application [app name] Rule [app name].[plan type name].[rule name].

If you are using RTPs without defining them in the comment, I recommend that the script be updated to add the RTPS comment.  The interpretation method of assuming everything in {} is an RTP will be deprecated in future releases.  To conclude, if no RTPs are used, add /*RTPS:*/ to the script so that variables inside the {} are interpreted as Groovy variables.

Example: Interpretation Without RTPS Comment

If you have worked with run time prompts, you know (or thought you knew) that they had to be defined in what looks like a comment.

/*RTPS: {rtp_Period} {rtp_Year}*/

This is not true, however.  Theoretically, the /*RTPS:*/ doesn’t have to be added to use run time prompts, which was news to me.  When /*RTPS:*/ is EXCLUDED from a calculation, the interpreter will replace anything identified with {} as a run time prompt. If like me, I had never used a variable with the same name as a valid RTP, you would simply get an error and likely not understand why you can’t reference the variable.

If by chance you actually used a variable with the same name as an existing RTP, you might have figured this out on your own because you would be prompted for the RTP. Notice that no header was added to include RTPs in this calculation (void of any /*RTPS:*/) but still get a prompt.

You would also notice that the RTP is identified in the Variables tab!

Now that you know this, forget that you do and don’t every use RTPs without the /*RTPS:*/. This was something that was missed in initial releases and will be deprecated.  So, if you don’t add your RTPs in a /*RTPS:*/ and use the RTPs, this will not work in the future.

Example: Interpretation With RTPs

When /*RTPS:*/ is used anywhere in the calculation, the variables in a conventional Groovy way.  In this example, sScenario is actually referencing the Groovy variable.

The same script with the RTPS inclusion header now works as expected!  sScenario is no longer interpreted as an RTP.  If the variable was named the same as a valid RTP, it would also be handled as expected.  Or, it is handled as I would expect it not knowing {} meant RTP without the RTPS header.  rtp_Period is a valid run time prompt.  Now that /*:RTPS*/ is added to the script, the same line of code is looking for a Groovy variable, not a RTP.  Because the RTP is not defined, the compiler returns an error.

What I Learned Today

Talking to the dev group today was awesome because I learned a number of things.

  1. There are two interpretation modes laid out above.
  2. Calculations can have /*RTPS:*/ with no variables. I never really thought about doing this.  Now that I understand the multiple modes, I am going to add this to every Groovy calculation to avoid any issues like this.
  3. /*RTPS:*/ can be anywhere in the calculation. I don’t know why it would benefit somebody to have it at the end, but it would work the same way as if it was the first line.  The reason it does this is because the modules will add RTPs for certain situation and not others.  For this to be possible, the need to add multiple RTPS comments with the appropriate RTPs through the calculation was required.
  4. /*RTPS:*/ can exist on multiple lines. If you wanted to have each variable referenced on different lines, /*RTPS:*/ can be repeated as many times as needed.

There are a couple wins for me now that I know this.

  1. I use common code and functions in scripts that I embed in groovy calculations to eliminate repetitive functionality. If these functions require an RTP (even a hidden one with an override that is a subvar), it can be referenced inside the script rather than putting them in the rules that reference the script.
  2. The rule using the script can also have its own RTPs that are not needed for the common code. So, I can have common RTPs in the script and also have RTPs needed for each specific rule in that rule and not have any conflicts.

Does This Seem Irrelevant?

If you are asking yourself why this would ever come up and why any variable would be referenced inside squiggly brackets, this might help.  The example above is simple and the println could have been written without the quotes and squiggly brackets.

println sScenario

You are correct, this would have worked.  But, let’s say you need the current month and year together.  Yes, there are other ways to accomplish this, but it emphasizes the need.  Let’s say I need the current month concatenated with the current year formatted as FYyy.

def Year = (new Date()).format('yy') // produces 19
def Month  = (new Date()).format(‘MMM’) // produces Apr
println "${Month}FY${Year}" // produces AprFY19

A second example would be referencing variables in a dynamic FIX statement

if (uniquePeriodNames.size() == 0){
  println("No cells were edited")
}
else{
  operation.grid.dataCellIterator({DataCell cell -> cell.edited}).each{
    lstProduct.add(it.getMemberName("Product"))
    lstPeriod.add(it.getMemberName("Period"))
    lstYears.add(it.getMemberName("Years"))
    }

  List povmbrs = operation.grid.pov

  StringBuilder strEssCalc = StringBuilder.newInstance()
  strEssCalc <<"""
    FIX("${lstPeriod.unique().join('","')}", 
        "${lstYears.unique().join('","')}", 
        "${lstProducts.unique().join('","')}", 
        "${povmbrs*.essbaseMbrName.join('","')}")

        "Revenue" = "REV_BASE_PRICE" * "REV_SALES_QUANTITY";
      ENDFIX
    ENDFIX
  """
}

Another example would be concatenating member names and country codes from an attribute dim.  Suppose you want to concatenate an _USD to a country code to reference an FX rate.

$CountryCode_USD tries to reference a variable named CountryCode_USD.  Using the squiggly brackets will enable this to happen without confusion. ${CountryCode}_USD would concatenate the value of CountryCode with _USD.

You can use additions and do $CountryCode + “_USD”, but it is terribly inefficient.  Once is not an issue but if it is used inside of loops, it can cause performance issues.

Last Call

I don’t think it is fair to call this a bug.  I do think there is a lack of clarity.  The dev group is actually looking at addressing this in a future release.  Again, my worlds, but changing this to always referencing things inside of brackets as a Groovy variable would make it a bit less confusing.  Basically, nothing inside of {} would be interpreted as an RTP unless it is defined in the header definition.  So, something in brackets that is defined as an RTP would be an RTP.  Anything else would be assumed a variable.


Adventures in Groovy – Part 40: Eliminating Data Sources With The Groovy Calendar Class

I am currently working on a migration of on-premise to cloud project (going GREAT by the way).  One of the things we are working on is the change with the data integration.  One of the processes loads the number of working days to the application from a source that provides it.  “Why not use Groovy,” I ask?  It turns out to be a great question.

There are two concepts to cover.  A few lines of Groovy using a calendar class and the gridbuilder to save the data.  This could also be a dynamically generated calculation that updates the data.  Since this is used on an ASO cube, the example below uses the gridbuilder option.

The Code Explained

This example will have a run time prompt for year, will calculate the values for each month in the year selected and store them to the appropriate account.  The prompt and the variables required are declared here.

/*RTPS {rtpYear} */
int iYear = rtps.rtpYear.getEnteredValue().toString().substring(2).toInteger() + 2000
def sYear = rtps.rtpYear.getEnteredValue().toString()
Def values = []
Calendar calendar = GregorianCalendar.instance

Once this is setup, the calendar class will be used to identify the working days.  Working days here is defined as any weekday in the month.  These days are used to calculate payroll accruals and monthly averages.  Holidays are not considered in the calculations that use this.

The following uses the calendar class to create a list variable that will be passed to the gridbuilder later in the script.

for (int currentMonth = 1; currentMonth <= 12; currentMonth++) {
  Calendar startCal = new GregorianCalendar(iYear, currentMonth, calendar.getActualMinimum(GregorianCalendar.DAY_OF_MONTH))
  Calendar endCal = new GregorianCalendar(iYear, currentMonth, calendar.getActualMaximum(GregorianCalendar.DAY_OF_MONTH))
  int workDays = 0
  startCal.upto(endCal) {Calendar it ->
    if( (it[Calendar.DAY_OF_WEEK]).toString().toInteger() > 1 && it[Calendar.DAY_OF_WEEK].toString().toInteger() <7 )
       workDays += 1
     }
    def sMonth = Date.parse( 'MM', "$currentMonth" ).format( 'MMMM' )
   values << workDays
   println "for the month of $sMonth we have $workDays working days."
}

At this point, a list object has 12 values, one for each month.  This will be loaded to a specific POV that won’t change.  If the requirement was more dynamic, this example could certainly be expanded to account for it.  The last step is to store the data back to the database.  There are many examples on the gribuilder in previous articles, so it won’t be explained in detail.

Cube cube = operation.application.getCube("Plan1")
DataGridBuilder builder = cube.getDataGridBuilder("MM/DD/YYYY")
builder.addPov($sYear, 'Local', 'Working', 'Plan', 'No Entity')
builder.addColumn('Jan', 'Feb', 'Mar', 'Apr', 'May', 'Jun', 'Jul', 'Aug’, 'Sep', 'Oct', 'Nov', 'Dec’ )
builder.addRow(['Working Days'], values )
DataGridBuilder.Status status = new DataGridBuilder.Status()
builder.build(status).withCloseable { grid ->
  println("Total number of cells accepted: $status.numAcceptedCells")
  println("Total number of cells rejected: $status.numRejectedCells")
  println("First 100 rejected cells: $status.cellsRejected")
  // Save the data to the cube
  cube.saveGrid(grid)
 }

The Results

The log will provide some descent information.  This can be expanded for POV, user info, the time it took to process, but as it is, this is what the log would produce.  Remember, the security of the user that runs this is used.  If this is for a forecast, for example, and the start month is April, the accepted cells would only be nine.  3 cells would be rejected because they are not writable.

for the month of January we have 21 working days.
for the month of February we have 21 working days.
for the month of March we have 22 working days.
for the month of April we have 22 working days.
for the month of May we have 20 working days.
for the month of June we have 22 working days.
for the month of July we have 22 working days.
for the month of August we have 21 working days.
for the month of September we have 22 working days.
for the month of October we have 21 working days.
for the month of November we have 21 working days.
for the month of December we have 22 working days.

Total number of cells accepted: 12
Total number of cells rejected: 0

The Calendar Class

Although not required in this example, there are all kinds of things that this can be used for.  Have you ever needed to calculate the week of the year?  The day of the week?  How about the days between two dates?  You likely have come across these things for WFP or CapEx at least.  The calendar object itself has a ton of useful cases and the object that is returned is basically an array of information.  If the object is sent to the log with a println, all the values are exposed.  Of course, you can always google it, but it looks like this.

java.util.GregorianCalendar[time=-62130585600000,areFieldsSet=true,areAllFieldsSet=true,lenient=true,zone=sun.util.calendar.ZoneInfo[id="UTC",offset=0,dstSavings=0,useDaylight=false,transitions=0,lastRule=null],firstDayOfWeek=1,minimalDaysInFirstWeek=1,ERA=1,YEAR=1,MONTH=2,WEEK_OF_YEAR=10,WEEK_OF_MONTH=1,DAY_OF_MONTH=2,DAY_OF_YEAR=61,DAY_OF_WEEK=4,DAY_OF_WEEK_IN_MONTH=1,AM_PM=0,HOUR=0,HOUR_OF_DAY=0,MINUTE=0,SECOND=0,MILLISECOND=0,ZONE_OFFSET=0,DST_OFFSET=0]

It would take pages to explain and provide examples of all that can be done, which won’t be in this post.  Here are some ideas of uses.

  • use copyWith to duplicate an instance
  • use the format method to format the date as a month, year, long date, etc.
  • use minus to subract two calendar dates from each other (datediff)
  • use next and previous to increment days, months, or years
  • use set to set a specific date

Last Call

Will this change the world?  No.  Is it useful?  To some, absolutely.  The goal here is to just provide some information on how to use the calendar class and give you some ideas of what it could be used for.  Manipulating dates and time has always been a challenge in Essbase.   It is better now with some of the custom functions that have been exposed (and thank goodness they did this on the cloud or we wouldn’t be able to register custom functions).  But, performance, complexity, rolling through the same blocks multiple times, all can be minimized with the ability to calculate this outside of Essbase, pass it to a calculation, let Groovy do what it is good at, and let Essbase handle what its strengths are.

To read about more uses, Google “Groovy Calendar” and take a look at all the methods it has – pretty useful stuff.

You have any other thoughts?  Post a comment.  You know  we would love to hear from you.


Change The Spread Method In An Existing PBCS Application

Changing application settings was always a little bit of a pain with an on-premise Planning application.  It was a time intensive task of recreating the application, artifact groups at a time.  If you were a little bit of a risk taker, you might have figured out that there were fields in the relational repository that could be updated.  Is there an easy way to do this with PBCS?  Since the repository is not accessible in the cloud, legacy methods are not available.  That said, I think it is easier and seemingly less risky with a PBCS application.

How To Perform Configuration Changes

The basic steps are very simple.  If migrations are new to you, take caution and make sure the application backup is readily available.  Always try this in the test environment first.

  1. Run a migration backup by going to the navigation menu and selecting Migration under the Tools header and clicking the Backup button.
  2. Download the backup by changing the view to Snapshots and selecting the ellipse to the right of the created migration and select download.
  3. Unzip the downloaded file to a new folder.
  4. Edit the appropriate file / change the settings (see below).
  5. Zip the files previously unzipped to a new zip file.  Make sure the parent folder is not included.  The folder and files unzipped should be the root of the new zip file.
  6. Upload to zip file created above by going back to Migration under the Tools header in PBCS.  Change the view to Snapshots and click the upload button.  If the backup is too large, you may need to use EPM Automate.
  7. Delete the existing application by moving to the Overview area which can be found in the navigation menu under the Application header, select the Action button and click Remove Application.
  8. After the application is deleted, log back in to PBCS and choose the Migration option in the navigation menu.  Create a new application with the updated zip file by clicking the ellipse and choosing Import.

Updating The Configuration

Before proceeding, I have tried this by only migrating the configuration (not recreating the application) and it didn’t work.  The application had to be recreated so the entire backup was required.  So, although only one file is updated, it is still important to take a full backup.

The migration files hold everything you need to update pieces and parts of an application.  In this situation, the focus will be on the configuration options, specifically the spread method.  Since this is needed to create an application, the spread method is often not decided on and may need to be changed later.  To change it after the fact is pretty easy.  Navigate to and open the Application Definition.xpad file.  This is inside the HP-xxx folder.  The xxx represents the name of the application.  This is a text file so it can be opened in any text editor.  If notepad is used, the line feeds won’t be visible and all the lines will be smashed together.  Notepad++ is a recommended alternative.  See below for the full path of the xpad file.

The Application Definition.xpad file, when opened, should look similar to the following.  This is not a full representation of the file so expect it to be larger when opened.

Scroll down a short way and find the WeeksDistribution property.  It will likely have a 445 pattern or will read Even.  Change this option to the preferred method and save the file.  The options are 445, 454, 544, and Even.

There are, as you see, other options that can changed.  Although I have only changed the spread method, I am moderately confident that the others, if changed here, would be reflected when the zip file is imported.

 <Calendar>
  <BaseTimePeriod>12 Months</BaseTimePeriod>
  <WeeksDistribution>Even</WeeksDistribution>
  <AppStartYear>2015</AppStartYear>
  <FiscalYearStartDate>SameCalendarYear</FiscalYearStartDate>
  <StartMonth>Jan</StartMonth>
  <NumberOfYear>15</NumberOfYear>
  <AllYearsParent>Y</AllYearsParent>
</Calendar>

Note that some of these are not options when the application is created, like whether the application has a parent for years.  I have not tinkered with this for that reason, but it is there if you want try.

Importing A File Too Large For The UI

As stated above, large files cannot be loaded through the PBCS UI.  I have run into this before and believe the maximum size of the file that can be uploaded is less than 2GB.  EPM Automate has an upload file command that overcomes this.

epmautomate login username userpassword https://planning-domain.pbcs.datacenter.oraclecloud.com domain
epmautomate uploadfile "[path]\[filename].zip"

example:  
epmautomate login kgoodfriend GoJackets https://planning-A123345.pbcs.us6.oraclecloud.com A12345
epmautomate uploadfile "c:\backups\PBCS_In2Hyperion.zip"

Finishing Up

There are a lot of useful things you can do with the migration files.  Making changes is sometimes easier in bulk than one artifact at a time.  Many free tools are available to find and replace text in multiple files, and even use patterns.  Some changes require a bit of hunt and peck if they are common and may occur in more places than you want to change.  If you have an application name that is similar to a database name it gets a little more tedious.  Obviously replacing a database name called plan would likely be more work because plan exists in many places, not just a database name.  Here are some thoughts and uses.

  • Changing the application name
  • Changing database names
  • Updating member names in all forms and rules
  • Finding forms and rules that use members to be removed


Oracle ePBCS – Client Success Story

Add complex calculations in ASO without changing or adding to the existing architecture. Groovy calculations enable improved performance and reduce complexity of calculation logic by bypassing Essbase. Taking advantage of new technology and adding creativity reduced the development timeline significantly.

Check out this success story.  Download the printable version.

Success Story - HFM Adjustments - web


Adventures in Groovy – Part 39: First Common Parent

I can’t tell you how many times I have been at a client and they wanted to replicate eliminations at the first common parent like HFM, or some other consolidations system.  Maybe there is a good way to do this, but I could never find an efficient and effective way to accomplish it with Essbase calculations.  Well, that is history.  This is yet another example of how to solve an historically complex problem very simply.

What Is The First Common Parent

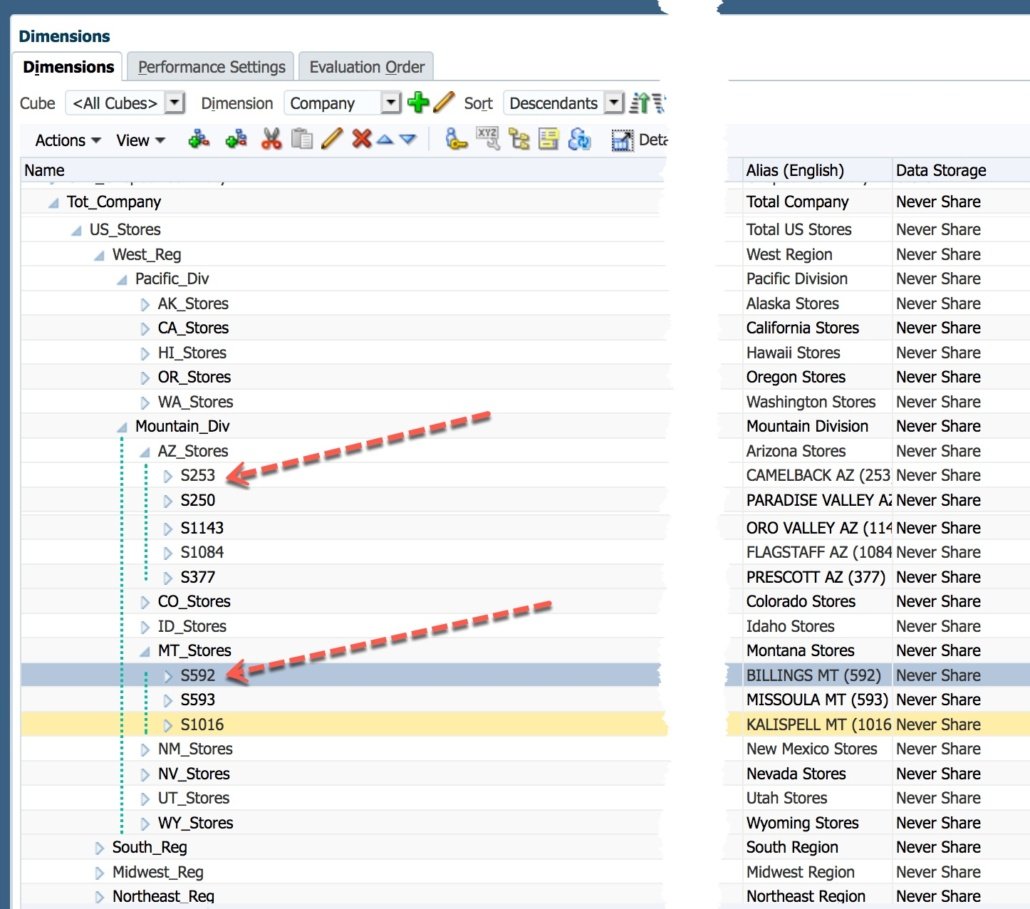
Eliminations functionality addresses the posting of inter-company eliminations in scenarios where a full legal consolidation model is not required, such as within a standard financial model.  An example would be eliminating sales to another entity inside the organization so the total sales of the organization is not inflating the real sales of the organization.  This is typically done at the first node that consolidates the two entities, or first common parent.  In the example below, which will be used in the code below, we need to find the first common parent to do the eliminations for entity S253 and S592.  The hierarchy below shows that the first parent of these two members is Mountain Division.  This is the entity that will calculate and hold the eliminated sales.

Surprisingly Easy With Groovy

The Groovy classes available to us have the ability to query metadata.  This allows a calculation to return all kind of things, like the ancestors of members.  Groovy takes over the rest by comparing the arrays returned.

For this example, the calculation prompts for two members.  In an real-world example, these would likely be defined in the calculation, or maybe with UDAs or attributes.  The prompts in this example, C1 and C2, are run time prompts connected to the hierarchy above.  Once the members are defined, the next step is to query the ancestors of each of the two members.

First, a connection to the application that has the dimension and members is defined.  Once that is done, a dimension object is created that is used to execute the queries.  Since we need ancestors, we use IAncestors.

/*RTPS:{C1} {C2}*/
Cube cube = operation.application.getCube("Fin")
Dimension companyDim = operation.application.getDimension("Company")
List companyOne = companyDim.getEvaluatedMembers("IAncestors(${rtps.C1.toString()})", cube) 
List companyTwo = companyDim.getEvaluatedMembers("IAncestors(${rtps.C2.toString()})", cube)

companyOne returns an array with the following values.

[S253, AZ_Stores, Mountain_Div, West_Reg, US_Stores, Tot_Company]

companyTwo returns an array with these values.

[S592, MT_Stores, Mountain_Div, West_Reg, US_Stores, Tot_Company]

The hard part, if you consider that hard, is over.  Now that the two arrays are defined, a snazzy Groovy method are used.  The intersect method will return the common elements of two lists.

The order of the elements returned by the PBCS classes is ordered from the bottom of the hierarchy to the top.  The first element would be the first common parent!  This example doesn’t illustrate it but this would work for staggered hierarchies just the same.

List commonParents = companyOne.intersect(companyTwo)
println "First common parent for ${rtps.C1.toString()} and ${rtps.C2.toString()} is ${commonParents[0]}"

The println results in the following message to the job console.

First common parent for "S253" and "S592" is Mountain_Div

That is it boys and girls.  In 6 lines of scripting (and it could be less as some variables are introduced to clearly articulate the process and methods), the first common parent is identified.  The most difficult part would be the business logic to accomplish the actual business requirement.

All Done

Now that you know how to get the first common parent, this can be used to dynamically create the appropriate Essbase calculations to provide all the functionality that is needed.  If you like this, share it with the community.  Post comments if you have any questions.  I love getting feedback.


Adventures in Groovy – Part 38: Challenge Accepted (Exporting Data With The System Date In The Filename)

I had a great question today so challenge accepted!  A reader asked if it was possible to run a data export and have the system date in the file name.  The answer is very simply, yes.  I don’t have any content around the question, so I will answer it in two ways.

Option One – Groovy

If you have read any of the pieces of this series, you know how excited I am about Groovy.  Yeah, I know, Groovy can do everything.  You are tired of hearing me say that.  I know it can’t do everything, but it comes close!  In Exporting Data in PBCS With Business Rules, I talk about exporting data with a business rule.  In Part 1 of my Groovy Series, I lay out how to execute a business rule with Groovy and how you can alter the Essbase calculation at run time.  If we put these two concepts together, we can set the name of the export to anything we want, even a system date.

The Date() method will return a date in a default format and inside a Groovy calculation it uses GMT time.  Since I am in EST, it is always 5 hours ahead.  So, if the date is printed at 5PM EST, the results is Wed Jan 16 22:00:00 GMT 2019.  This can be altered by formatting it to just about anything your heart desires.  I am sure you see where I am going.  If you google “format date Groovy” it will list nearly 50 options for date and time, AM/PM or military time, month as a number, 3 digit abbreviation, or the whole month, as examples.  For this example, the file to be just the system date.

Def currentDate =  new Date().format("MM_dd_yyyy")
// this returns the a two digit month, two digit day, and four digit year, separated by underscores

If you don’t want GMT, there is a trick.  The date method accepts a date.  It can be a fully qualified date like “1/15/19 22:00:00” or you can enter the seconds from January 1, 1970, 00:00:00 GMT.  This might sound crazy but in a Groovy calculation you can use currentTimeMillis() to get exactly that.  Again, since this is GMT, and EST is the want, add 3,600,000 milliseconds for each hour you want to change from GMT.  If these two methods are combined, the appropriate time can be obtained.

def adjEST = currentTimeMillis() + (3600000 * -5)
def currentDate =  new Date(adjEST).format("MM_dd_yyyy")
// This would give me the date 5 hours behind GMT

Now that we have the system date (and this is obviously my interpretation because I want it represented in my home time zone), we can combine this with the examples referenced above to export the data to a file with a name that includes the “system date.”

If you don’t know, the last string in a Groovy calculation is actually submitted to the calculation engine.  A stringbuilder is not required as noted in the examples.  The drawback of this is that we don’t have the option to log the actual calculation script.  This is more helpful when debugging and isn’t always critical to have documented in a production application via a log.  So, here goes!  The only change from the example is that we define a date variable as mm_dd_yyyy and pass that to the calculation.

// Get the date in EST and format as needed
def adjEST = currentTimeMillis() + (3600000 * -5)
def currentDate = new Date(adjEST).format("MM_dd_yyyy")

// Pass the calculation with the currentDate variable as the file name
"""
 SET DATAEXPORTOPTIONS
 {
 DataExportLevel LEVEL0;
 DataExportDynamicCalc OFF;
 DataExportNonExistingBlocks OFF;
 DataExportDecimal 4;
 DataExportPrecision 16;
 DataExportColFormat ON;
 DataExportColHeader Period;
 DataExportDimHeader ON;
 DataExportRelationalFile ON;
 DataExportOverwriteFile ON;
 DataExportDryRun OFF;
 }

 FIX(@Relative("Account", 0),
     @Relative("Years", 0),
     @Relative("Scenario", 0),
     @Relative("Version", 0),
     @Relative("Entity", 0),
     @Relative("Period", 0),
     @Relative("<em>custom_dim_name_1</em>", 0),
     @Relative("<em>custom_dim_name_1</em>", 0),
     @Relative("<em>custom_dim_name_1</em>", 0))
  DATAEXPORT "File" "," "/u03/lcm/${currentDate}.txt" "";
 ENDFIX
"""

This would produce a file in the inbox named 01_16_2019.txt.  By adding a parameter and formatting it to the date we want the file to be named, we have our solution.  Two additional lines and adding the parameter to the Essbase calculation is all that is required.

Part Two – Without Groovy

This is a little more difficult without Groovy.  I have not found a way to use something like the following as the file name.  If a reader sees this and knows of a way a way to do this, please share it and post a comment.

@CONCATENATE (@CONCATENATE ("/u03/lcm/", @FORMATDATE(@TODAY(),"mm_dd_yyyy")),".txt")

I assume in the original question that the ask is really not to have a file in the inbox with a specific name.  By using EPMAutomate and execute the calculation with a static name, the file can be download and renamed.  A simple PowerShell script could be used to rename the file.  If there really is a need to have this in the inbox, it can be uploaded.  I don’t know of any method that exists to rename an existing file with EPMAutomate.

$localFile = "c:\PBCS_Downloads\"
$exportFileName = "DataExport.txt"
Start-Process "epmautomate downloadfile ""$exportFileName"""
# Assume the script is executed from c:\PBCS_Downloads\ or the file is moved to this folder
$fileObj = get-item "c:\PBCS_Downloads\dataexport.txt"
rename-item "$($fileObj.FullName)" "$(Get-Date -Format "MM_dd_yyyy")$($fileObj.Extension)"
Start-Process "epmautomate uploadfile ""$($fileObj.DirectoryName)\$(Get-Date -Format ""MM_dd_yyyy"")$($fileObj.Extension)"""

Challenge Completed

Another challenge accepted has been easily completed.  Keep them coming!


Adventures in Groovy – Part 37: Improving The User Experience With AutoFill

To date, we have talked about the performance improvements Groovy introduces, as well as the creative validation we can add.  One thing that hasn’t been covered yet is the ability to add functionality to make the input easier for a planner.  Replicating changes through the months, resetting the values back to the defaults, and many other concepts can be developed to make the user’s lives easier.

Use Case / Example

The following example is something most applications will encounter, especially in workforce planning and capex.  This form has the level of an employee.  This functionality would be the same for things like title and employment status.  Basically, the user would typically change a month and simulate that change to all remaining months.  Or, they might change the status to Maternity Leave for 3 months and then back to Active.

What this functionality will do is allow the planner to change the month from active to Maternity Leave, assume every month after that will be updated for them, until a month is changed/edited.  If this is still not clear, I think the following 3 steps will clear it up.

  1. The planner opens the form and the employee is set to a Trainee for all months.  The level progression is Trainee, Associate, Consultant.
  2. The planner changes the person’s level from Trainee to Associate in March, and to Consultant in July.
  3. The planner saves the form and the result is that the employee is promoted to Associate in March.  The calculation automatically changes April, May, and June to Associate – basically it copies the change to the next month unless the next month is edited.  It continues that pattern through the 12 months, so the employee is promoted to a Consultant in July and that is copied through December.

This may not seem life changing, but it does reduce the effort for a planner and reduce the possibility that they don’t know they have to change all the months manually and cause inconsistencies in the budget.

The Code

The following calculation assumes only one employee is on the form.  This would need slightly updated to reset when the employee changed, or when the iteration went to the next line in the form.  This also needs to be executed before save.  Let’s jump in.

The first thing we are going to do is set some parameters.

def update = false
def runTotal = 0
def change = false
def Months = ["Jan","Feb","Mar","Apr","May","Jun","Jul","Aug","Sep","Oct","Nov","Dec"]

Next, we will loop through the cells.  We are only looping through the rows where the account is equal to “Level.”  As this goes from January to December, it keeps track of the value the cell should be changed to, or the last edited cell’s value.  If it gets to a cell that is edited, it resets the variable so that any cell after that will be updated to the most recent change.

operation.grid.dataCellIterator('Level').each { cell -> 
  // If the cell is edited, change the variable so it knows that the remaining
  // months need to be changed
  if(cell.isEdited()){
   change = true
  }
  // If the month is not edited and a prior month has been changed, update the 
  // value to the prior month's value
  else if(change == true){
    def lastMonth = Months.findIndexOf{it == cell.getPeriodName()} - 1
    cell.setFormattedValue(cell.crossDimCell(Months[lastMonth]).formattedValue)
  }
}

Not Rocket Science

Like I previous stated, this isn’t going to be the difference between a project success and failure like the performance improvements that have been discussed, but it is a very simple thing that can be added to give your application some polish.  Also, I can’t say it enough, little things like this give users confidence and also reduce the possibility of human error, giving the budget more validity and trust.