Adventures in Groovy – Part 35: Error Trapping Groovy Calculations

There has not been alot of troubleshooting discussed in the adventures series.  Just like with most coding languages, you can gracefully handle errors resulting from actions (like divide by 0) and return descriptive information to the users and administrators in the job console.  There are several benefits that I see.

  • As previously stated, since the error is accounted for, the user doesn’t get a message that shows a failure with no context.
  • The error object will provide more information about what happened and what should be done to fix it in the future.
  • Predefined actions can take place since the error doesn’t interrupt the script, like returning an error message that tells the user to contact the administrator with an action

Error Handling Introduction

Try / catch / finally is a concept most development languages have.  Conceptually, you “try” some group of commands and “catch” any errors that might happen.  If you “catch” an error, you account for it by doing something.  “Finally,” you perform any closing actions.

try {
  def arr = 1/0
} catch(Exception ex) {
  println ex.toString()
  println ex.getMessage()
  println ex.getStackTrace()
}finally {
   println "The final block"
}

In this case, ex.toString() prints

java.lang.ArithmeticException: Division by zero

ex.getMessage() prints

Division by zero

and ex.getStackTrace()

[java.math.BigDecimal.divide(Unknown Source), org.codehaus.groovy.runtime.typehandling.BigDecimalMath.divideImpl(BigDecimalMath.java:68), org.codehaus.groovy.runtime.typehandling.IntegerMath.divideImpl(IntegerMath.java:49), org.codehaus.groovy.runtime.dgmimpl.NumberNumberDiv$NumberNumber.invoke(NumberNumberDiv.java:323), org.codehaus.groovy.runtime.callsite.PojoMetaMethodSite.call(PojoMetaMethodSite.java:56), org.codehaus.groovy.runtime.callsite.CallSiteArray.defaultCall(CallSiteArray.java:48), org.codehaus.groovy.runtime.callsite.AbstractCallSite.call(AbstractCallSite.java:113), org.codehaus.groovy.runtime.callsite.AbstractCallSite.call(AbstractCallSite.java:125), ConsoleScript11.run(ConsoleScript11:2), groovy.lang.GroovyShell.runScriptOrMainOrTestOrRunnable(GroovyShell.java:263), groovy.lang.GroovyShell.run(GroovyShell.java:387), groovy.lang.GroovyShell.run(GroovyShell.java:366), groovy.lang.GroovyShell.run(GroovyShell.java:170), groovy.lang.GroovyShell$run$0.call(Unknown Source), groovy.ui.Console$_runScriptImpl_closure18.doCall(Console.groovy:1123), groovy.ui.Console$_runScriptImpl_closure18.doCall(Console.groovy), sun.reflect.NativeMethodAccessorImpl.invoke0(Native Method), sun.reflect.NativeMethodAccessorImpl.invoke(Unknown Source), sun.reflect.DelegatingMethodAccessorImpl.invoke(Unknown Source), java.lang.reflect.Method.invoke(Unknown Source), org.codehaus.groovy.reflection.CachedMethod.invoke(CachedMethod.java:98), groovy.lang.MetaMethod.doMethodInvoke(MetaMethod.java:325), org.codehaus.groovy.runtime.metaclass.ClosureMetaClass.invokeMethod(ClosureMetaClass.java:294), groovy.lang.MetaClassImpl.invokeMethod(MetaClassImpl.java:989), groovy.lang.Closure.call(Closure.java:415), groovy.lang.Closure.call(Closure.java:409), groovy.lang.Closure.run(Closure.java:496), java.lang.Thread.run(Unknown Source)]

The script in the final block is also written out.  It is intended for cleanup and tasks that run at the end of a script regardless of whether there is an error or not.

Handling Errors Uniquely

The catch command can be replicated to handle errors uniquely.  Let’s expand on the example above.  Assume the variable is coming from an RTP or cell value.  The following has a catch for a specific error.  The java.lang.ArithmeticException is equal to the output of ex.toString().  There are probably thousands of errors, if not more.  The easiest way for me to grab these is to use the ex.toString() and see what it produces.  I have no desire to remember or learn them all!

The following will do something different for the divide by zero error than all other errors.

try 
  {
  def denominator = 0
  println 1/denominator
  } 
catch(java.lang.ArithmeticException ex) 
  {
  println ex.getMessage()
  println "an action should be taken to account for the error"
  }
catch(Exception ex) 
  {
  println ex.toString()
  println ex.getMessage()
  println ex.getStackTrace()
  }
finally 
  {
  println "The final block"
  }

Finishing Up

This requires a little more effort, but once you get used to doing this, it can be reused.  I hear the argument that if you account for every possible situation, you don’t need to error trap.  That is true, and if you are smart enough to account for everything that can go wrong, don’t include this in your Groovy calculation.  I would argue that simple calculations probably don’t need this level of error handling, but more complex logic might be a candidate.  The example above could obviously be handled with an if statement, but put it in context.  It is used to illustrate the concept of try / catch / finally.


Planning Data Loads: com.hyperion.planning.InvalidMemberException vs. java.lang.RuntimeException

I had a very interesting thing happen today that tripped me up.  When loading data to a PBCS database through Planning (not as an Essbase file), I had two types of errors.  I have never seen this before and this could cause some serious heartburn for administrators and possibly waste a ton of time trying to resolve.  So, I am sharing for the sake of saving somebody some effort.

One Error, Two Messages

The error first is the typical error due to a member not being in the application.  com.hyperion.planning.InvalidMemberException: The member CTR_123 does not exist for the specified cube or you do not have access to it.  We have all seen this.  CTR_123 was not in the hierarchy.  Once it was added and the data was reloaded the issue was resolved.

The second issue was another error I have seen before, but I haven’t seen this in PBCS.  java.lang.RuntimeException: Not all dimensions were specified.  Normally, this is related to having a file correctly formatted in but having a member from one dimension in the wrong column, or having a column that is null.

As I often do, I created a Smart View retrieve and added the members in the load file one at a time.  When I found the member that caused a retrieve error, I went into the dimension editor to search for it.  To my surprise, it was there!  What?  But, when I looked at the properties, it was not valid for the application I was trying to load the data to.  This might have been overlooked by mere mortal (wink), but once enabled for the application in question, the load error was resolved.

Conclusion

So, why the two error types?  Why do we get two error types for the same error (the member doesn’t exist in the database)?  I can only assume since I loaded this through Planning, it tripped up on the fact that the member was in Planning, but not in the specific database I was trying to load.  If I loaded this as an Essbase file, as expected, I got the same error for both lines, member not found.

Hopefully this saves you some time.  If you have ever come across something similar, please share with the community.  These things are normally the things you find after a 12 hour day and you spend another 4 trying to figure it out.

Lastly, please enjoy a safe holiday and remind yourself how lucky you are and try to be thankful for the things you have and not be frustrated about the things you don’t.  Gobble Gobble!


Drill Through to Data Management and Stay In Excel

There is a new, and often requested, option added to Smart View.  If you use drill through to Data Management (PBCS) or FDMEE (On Prem), download the most recent release of Smart View.  We, as users, now have the option to change where the result of our drill through queries is returned.  Users can either be asked where the result should be displayed, have it displayed in your browser, or (drum roll) have another tab created that holds the results in Excel.

Change Your Option

This isn’t a complicated or drawn out explanation, but it is sexy!  To change where the results are displayed, go to your Smart View ribbon and click Options to open the dialogue.  Select the Advanced tab on the left and scroll down just a tad.  You will see an option for Drill-Through Launch.  The 3 options previously mentioned are available.  This removes one of the biggest user frustrations regarding drill-through reporting and will surely make a lot of people happy.

The Proof Is In The Pudding

It works just as you would expect, but here is the proof.  When you open a retrieve and connect to the application, right click on a cell.  Click on Drill-through as you always have.

If the data has more detailed data available, a new worksheet will be created in your workbook with the results if you have chosen the In New Sheet option.

Not Much Else To Cover

That is it.  There isn’t much else to say, but this is a great and frequently requested feature.  We can finally provide a good answer.

Absolutely you can drill through to the detail and have it returned in Excel.

As always, post a comment if you have something to share with the community or have additional questions about this topic.


Adventures in Groovy – Part 34: Getting Started With Groovy in ePBCS, Implementation Methods, an ODTUG Webinar

I was fortunate enough to speak for ODTUG a few weeks ago and really excited that my discussions around Groovy are getting some of the most attended and most interactive ODTUG webinars.  If you have put any of these presentations together, you know how much time it takes to do the research, consolidate the information, make it presentable, and spend the time to hopefully make it fluid.  So, when you provide feedback, I really appreciate it.

The Webinar

There were some questions I wasn’t able to answer, so here goes.

Can the dataCellIterator take functions like @IDESC, @CHLIDREN, etc?

The iterator iterates through the grid, so it doesn’t have the ability to do this directly.  I am not sure of the question, but you could iterate through the grid and for each cell use these functions in other classes/methods to do things like see if it has children, or check to see if it is a child of something.

Is there a way to have a groovy business rule to call a non-groovy business rule – for example if cells were edited then run BR1 else return?

Yes and no.  There is no way to execute another rule.  But, you can embed it into the script like you can in any other rule or script.  You can neither write the string or drag and drop the rule into the Groovy rule.  It doesn’t always put it where the cursor is, but you can cut and paste it to wherever you need it.  It basically is like an include and just embeds the script text, so it would need to be in a string builder.

Can We improve the Aggregations with Groovy?

Yes and no.  If you dynamically create an aggregation script that is the exact same as a normal rule, the same time would result.  Where you do get a benefit is that you can only consolidate the impacted members and dimensions based on what has been edited.  You can also move the data from the BSO to the ASO cube and eliminate the need to aggregate, which would obviously improve the perception of speed.

Does groovy interact with workflow, valid intersection, copying attached documents / supporting detail?

Workflow is in the roadmap.  I confirmed last week with development, so it is coming.  Attachments and supporting detail can be copied by executing smart pushes.

Can grids be generated on the fly using groovy?

They sure can, but they aren’t visible to the user.  There are two grid builders for retrieving and submitting data.

Is there any documentation available to give performance comparisons between business rule/calc and groovy?

Not that I know of, but as previously stated, Groovy doesn’t make Essbase faster.  The perception to users will be that it does, but it is only because we have the ability to isolate what we calculate more than we did before.  That said, if you use the grid builders to do the calculations and submit the results rather than use BSO calculations, you might see different results.  There are some things (allocations) that I think is faster in BSO.  I think using the grid builders on ASO – I do see improvements in performance using Groovy over procedural calculations.  But, I want to emphasize that the majority of the time the speed is improved because of the ability to calculate only what we need to.


Adventures in Groovy – Part 33: Mapping Members Between Plan Types

Groovy collections are used all throughout the ePBCS API.  If you are not familiar with collections, you may want to take a look at Adventures in Groovy – Part 27: Understanding Collections before you continue.  Maps, which are a type of collection, are very useful when moving data between different applications that have different member names representing the same data.  In a the example below, data is moving from a product revenue cube to a financial cube.  In the detailed cube, the member names are more descriptive, like Net Sales.  In the financial application, the same data is a true account number from the GL, and names 42001.  Mapping data between these two can easily be done with Groovy maps.

Introduction

There are two components to understanding the use of these maps.  First, the map must be defined for use.  The construction of the map is a delimited list of items.  Each of the items is made up of an key and a value.  These are separated by a colon.

//set account map
def acctMap = ['Units':'Units',
               '42001-Product Sales':'Net Sales',
               '50001-Cost of Sales':'COGS',
               '50015-Write-offs':'Write-offs',
               '56010-Chargebacks':'Customer Satisfaction Discount',
               '50010-Sales and Discounts':'Sales and Discounts',
               '56055-Overstock Discount':'Overstock Discount',
               '56300-Customer Satisfaction Discount':'Customer Satisfaction Discount',
               '56092-Multi-Purchase Discount':'Multi-Purchase Discount',
               '56230-Open Box Discount':'Open Box Discount',
               '56200-Damage Container Discount':'Damage Container Discount',
               '56205-Damaged Box Discount':'Damaged Box Discount',
               '56090-Group Purchase Discount':'Group Purchase Discount']

The second piece is retrieving the mapped value.  The value on the left of the colon is referenced and the value on the right will be returned.  The following would return 56230.

[acctMap.get("56230-Open Box Discount")]

A fully vetted example follows of moving data from one database to several others.  The function’s use is embedded in a loop, so rather than a hard coded value, the member of the account dimension is used as the accounts (rows in the form) are being iterated.  It looks like this.

[acctMap.get(it.getMemberName('Account'))]

Working Use Case

The map above is used in several places for several reasons.  First, the map is created.  Second, the map is iterated and the key is used to create a data grid for all the values that will be copied, or synchronized, to the destination cube.  Third, the map is used to lookup the converted value to create the grid connected to the destination.  this is a complete working example.  The items in red are specific to the map and its use.

//Dimension employeeDim = operation.application.getDimension("Account")

//****************************************************************************
// Data Movement between Apps
//****************************************************************************

// Get POV
String sCompany = operation.grid.getCellWithMembers().getMemberName("Company")
def sMaterialGroup = operation.grid.getCellWithMembers().getMemberName("Material_Group")
String sChannel = operation.grid.getCellWithMembers().getMemberName("Channel")

def lstProducts = []
operation.grid.dataCellIterator({DataCell cell -> cell.edited}).each{ 
 lstProducts.add(it.getMemberName("Product"))
}

String strProducts = """\"${lstProducts.unique().join('","')}\""""
println "data push running for " + strProducts

if(operation.grid.hasSmartPush("Prod_SmartPush") && lstProducts)
 operation.grid.getSmartPush("Prod_SmartPush").execute(["Product":strProducts,"Currency":'"USD","Local"'])

//set account map
def acctMap = ['Units':'Units',
               '42001-Product Sales':'Net Sales',
               '50001-Cost of Sales':'COGS',
               '50015-Write-offs':'Write-offs',
               '56010-Chargebacks':'Customer Satisfaction Discount',
               '50010-Sales and Discounts':'Sales and Discounts',
               '56055-Overstock Discount':'Overstock Discount',
               '56300-Customer Satisfaction Discount':'Customer Satisfaction Discount',
               '56092-Multi-Purchase Discount':'Multi-Purchase Discount',
               '56230-Open Box Discount':'Open Box Discount',
               '56200-Damage Container Discount':'Damage Container Discount',
               '56205-Damaged Box Discount':'Damaged Box Discount',
               '56090-Group Purchase Discount':'Group Purchase Discount']


Cube lookupCube = operation.application.getCube("rProd")
DataGridDefinitionBuilder builder = lookupCube.dataGridDefinitionBuilder()
builder.addPov(['Years', 'Scenario', 'Currency', 'Version', 'Company','Store_Type','Department','Source','Product','View'], [['&v_PlanYear'], ['OEP_Plan'], ['Local'], ['OEP_Working'], [sCompany],['Store_Type'],['Total_Department'],['Tot_Source'],['Tot_Product'],['MTD']])
builder.addColumn(['Period'], [ ['ILvl0Descendants("YearTotal")'] ])
for ( e in acctMap ) {
 builder.addRow(['Account'], [ [e.key] ]) 
}
DataGridDefinition gridDefinition = builder.build()

// Load the data grid from the lookup cube 
DataGrid dataGrid = lookupCube.loadGrid(gridDefinition, false) 
def povmbrs = dataGrid.pov
def rowmbrs = dataGrid.rows
def colmbrs = dataGrid.columns
def tmpColMbrs = []

//Fin Grid Setup
Cube finCube = operation.application.getCube("Fin")
Cube rfinCube = operation.application.getCube("rFin")
DataGridBuilder finGrid = finCube.dataGridBuilder("MM/DD/YYYY")
DataGridBuilder rfinGrid = rfinCube.dataGridBuilder("MM/DD/YYYY")
finGrid.addPov('&v_PlanYear','OEP_Plan','Local','OEP_Working',sCompany,'Prod_Model')
rfinGrid.addPov('&v_PlanYear','OEP_Plan','Local','OEP_Working',sCompany,'Prod_Model','MTD')
def colnames = colmbrs[0]*.essbaseMbrName

String scolmbrs = "'" + colnames.join("', '") + "'"
finGrid.addColumn(colmbrs[0]*.essbaseMbrName as String[])
rfinGrid.addColumn(colmbrs[0]*.essbaseMbrName as String[])

dataGrid.dataCellIterator('Jan').each{ it ->

def sAcct = "${acctMap.get(it.getMemberName('Account'))}"
 def sValues = []
 List addcells = new ArrayList()
 colmbrs[0].each{cName -> 
 sValues.add(it.crossDimCell(cName.essbaseMbrName).data) 
 addcells << it.crossDimCell(cName.essbaseMbrName).data
 }

finGrid.addRow([acctMap.get(it.getMemberName('Account'))],addcells)
 rfinGrid.addRow([acctMap.get(it.getMemberName('Account'))],addcells)
}
DataGridBuilder.Status status = new DataGridBuilder.Status()
DataGridBuilder.Status rstatus = new DataGridBuilder.Status()
DataGrid grid = finGrid.build(status)
DataGrid rgrid = rfinGrid.build(rstatus)

finCube.saveGrid(grid)
rfinCube.saveGrid(rgrid)

Finishing Up

This is a relatively simple concept and not terribly difficult to implement.  It is also something most will benefit from when synchronizing data with the dataGridBuilder.  Have something to add?  Post a comment and I will get back to you promptly.


Adventures in Groovy – Part 32: Require Explanations When Data Is Outside Acceptable Ranges

Groovy offers creative ways to force data into acceptable ranges.  But, what happens when there is an acceptable reason for abnormal trends, or drivers?  With Groovy, you can not only add limits to data cells, but you can also allow entry outside of those ranges if the user enters an explanation.  With Groovy, you get the best of both worlds!

Use Case

Requiring data within limits is a huge improvement to your application.  It improves the accuracy and ownership of the budget, and reduces fire-drills at the end of your budget cycle.  In this example, we will require a rate to be between -10 and 30 percent.  If a user enters data outside that range, the form will not be able to be saved.

However, if a user enters a comment, Groovy will then allow the form to be saved.  Is this perfect?  Of course not.  A user can still go in and enter a poor explanation, or just enter a space to bypass the validation rule.  I have always felt that no system can make people be responsible, so we will assume that your users are doing what they are instructed and your leadership will hold them accountable.  To show this functionality, view this short video.

The Code

This validation is actually quite simple.  This follows the same rules as other validations and must be “Run Before Save.”  Use Members on Form and Hide Prompts is also suggested.

// Define cell colors for errors
def BackErrColor = 16755370  
// Iterate through the row with the rate and only the months - exclude quarters and totals
operation.grid.dataCellIterator('ProdRev_2_%_Inp','Jan','Feb','Mar','Apr','May','Jun’,'Jul','Aug','Sep','Oct','Nov','Dec').each { 
  // If data is above .3 or lower than -.1 and does NOT have a cell note, throw the error
  if( (it.data > 0.3 || it.data < -0.1) && !it.hasCellNote() ) {
    it.addValidationError(BackErrColor,"Your Margin has to be between -10% and 30%.  If you want enter something outside that range, an explanation is required", false) 
  }
}

Finishing Up

I really hope this inspires you to be creative about using Groovy to add useful user functionality.  As you can see, you can add awesome functionality relatively easily.  If you have any creative solutions you would like to share, please add a comment.


Adventures in Groovy – Part 31: Benefits of Running Logic in Groovy (Bypass Essbase)

Say what? An application where no calculations are performed with the Essbase calculation engine?

Business logic, currency, and every other calculation can be performed within Groovy outside of Essbase. I don’t know how I feel about this yet, but the thought of building this in calculations on an ASO cube is intriguing. The elimination of consolidating BSO cubes and data movements with Smart Pushes is also interesting. Some of my coworkers have built entire applications this way with great success and speed. I wanted to replicate this on a small scale to identify the pros and cons of this methodology, and here is what I found.

In my adventures, I found that performance was similar. Sometimes it was quicker, sometimes a little slower. I did not do large allocations, but I have done account calculations and currency conversion. I have done it on form save as well as globally. Complexity varies. If you are a Groovy expert, it likely seems less complex. If you are an Essbase developer, it might seem more complicated. Code can be reused by developing functions and placing them in scripts, just like Essbase scripts can be embedded into rules.

One thing I did find appealing for a user is that change history is complete! If you have dabbled with this, you will know that the change history only includes edited data by a user. So, calculated accounts don’t show any history. When the calculations are done in Groovy, the results are stored in a grid, and saved to the database. This mimics a user updating the values and reflects in the change history. This, I think, is pretty cool.

Another benefit is that calculated data in a grid is reflective of the inputs. With prompts, or when data isn’t validated, the form shows the results of the calculations before the data is saved in the form. I have been asked by many if it is possible to show the results real time before save (like an adhoc form with formulas built in Excel). This is now possible if you get creative.

Before we jump into the code, it might make sense to understand what dimensions/members are in the POV.

Code Introduction

The following calculation is replicating what an Essbase calculation is performing.

  1. Performs simple math to calculation revenue and costs – mostly simple multiplication and division
  2. Looks up the currency rates for the Entity selected and applies the exchange rate to the account if it is identified as an account that should be converted (ignores statistical accounts, for example)
  3. Converts the account from ProdRev to the representative account in the P&L plan type.
  4. Submits the calculated results to both the ProdRev BSO and ASO (in a real world situation, you may decide to exclude the BSO cube and connect the form and write the data directly to the ASO cube)

As previously mentioned, there are a couple way to do this. This method runs post save and pulls the necessary data from the cube and created two GridBuilders to submit the calculated accounts back to the databases. It would likely be more productive to pull the data from the grid the user entered it, assuming there were no other data points that were needed to calculate all the accounts. This would reduce the performance by one retrieve. This also connects to the BSO cube, and this may not even be in play if all the calculations were executed in Groovy and the forms connected to the ASO cube. So, I welcome all questions and constructive feedback, but understand this is one way to do this and it will be used to demonstrate the functionality. It doesn’t necessarily represent the best way to architect the plan types.

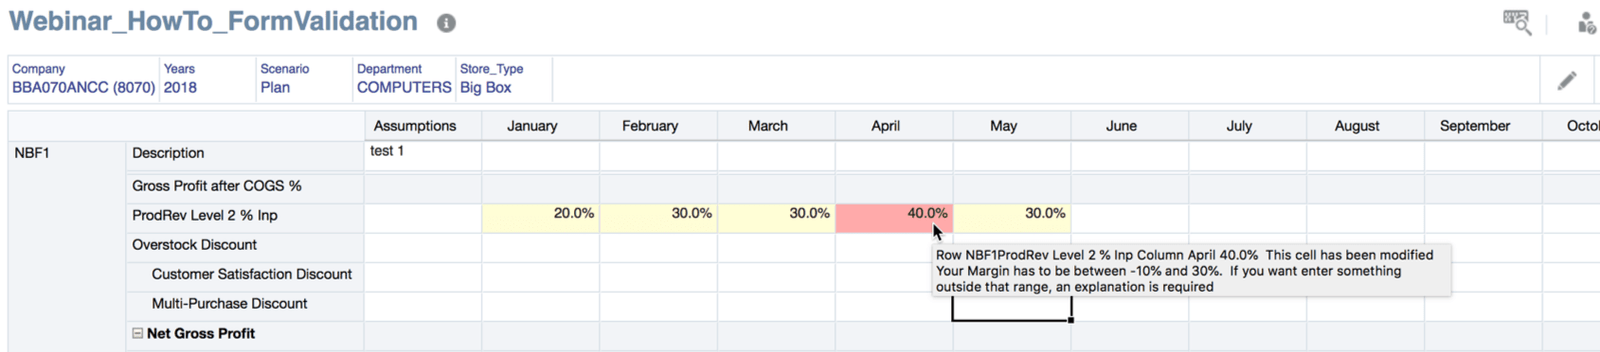
The data entry form is below. Some of the dimensions are hidden in the POV or Page Header. The columns just include the Period dimension. The rows, and this is important to understand because of the way the code loops, contain the vendors and the accounts.

Explaining the Code

On with the show! The first piece includes a couple functions that will be referenced in loops. I find repetitive logic like this placed in function to be more readable, but it certainly isn’t required.

// This function returns the POV member with or without quotes
// This is one operation I want to look into as it may not be required or may be executed better
def getPovMbr(member, boolean quotes = false) {
  if(quotes == true)
    return '"' + operation.grid.pov.find{it.dimName==member}.essbaseMbrName + '"'
  else
    return operation.grid.pov.find{it.dimName==member}.essbaseMbrName
}
// This function returns a 1 if the value is 0.  The primary use of this is currency
// exchange.  In this example, the planners didn't enter 1 for a USD to USD conversion, 
// so somewhere a 1 needed to be assumed.
def checkZero(double dVal=0) {
  if(dVal == 0) {
    return 1
  }
  else {
    return dVal
  }
}
// This returns a true or false as to whether the account has a UDA identifying that 
// account as one that either does or doesn't get converted.
boolean convertCurrency(def account)
{
  Dimension AccountDim = operation.application.getDimension("Account")
  Member AccountMbr = AccountDim.getMember(account)
  def memberProps = AccountMbr.toMap()
  if(memberProps['UDA'].toString().contains('IgnoreCurrencyConversion'))
    return false
  else
    return true
}

The next piece is setting each POV member in a variable. If you have read some of my other posts, there are better ways to do this. For the sake of simplicity and trying to explain other concepts, I have chosen to do it this way.

// Set each POV to its own variable
String sCompany = operation.grid.getCellWithMembers().getMemberName("Company")
String sVersion = operation.grid.getCellWithMembers().getMemberName("Version")
String sScenario = operation.grid.getCellWithMembers().getMemberName("Scenario")
String sYear = operation.grid.getCellWithMembers().getMemberName("Years")
String sMaterialGroup = operation.grid.getCellWithMembers().getMemberName("Material_Group")
String sChannel = operation.grid.getCellWithMembers().getMemberName("Channel")
String sSource = operation.grid.getCellWithMembers().getMemberName("Source")

At this point, the administrative stuff is out of the way. The first thing this example does functional is to get the currency exchange rates for the month of the Entity selected. This would be a little more complex if it were converting income statement and balance sheet accounts because it would need to distinguish the difference so the correct rate (average or ending) was applied.

// Define the map to hold the appropriate rate.  This will be a map that has an entry for each month, with the value equal to 
// the conversion rate - Jan:.878, Feb:.899, ...
def currencyRates = [:]
// Build currency for the company by retrieving the correct POV from the plan type
Cube lookupCube = operation.application.getCube("ProfRev")
DataGridDefinitionBuilder builder = lookupCube.dataGridDefinitionBuilder()
builder.addPov(['Years', 'Scenario', 'Version','Channel','Material_Group','Source','Vendor','Currency','Account'],[[sYear],[sScenario],[sVersion],['No_Channel'],['No_Material_Group'],['Input'],['No_Vendor_Assigned'],['Local'],['End_C_Rate']])
builder.addColumn(['Period'], [ ['ILvl0Descendants("YearTotal")']])
builder.addRow(['Company'], [ [sCompany] ])
DataGridDefinition gridDefinition = builder.build()

// Load the data grid from the lookupCube to the Map
lookupCube.loadGrid(gridDefinition, false).withCloseable { dataGrid ->
  dataGrid.dataCellIterator().each{ rate ->
    currencyRates.put(rate.getMemberName('Period'),checkZero(rate.data))
  }
}

Now that we have a map of the currency rates, the next piece will create the grids that will submit the calculated results back to the cubes. Remember, in this example, the data is being entered to a plan type that is a BSO cube. This will submit the results back to the BSO cube, but also to the corresponding reporting (ASO) cube. Since this is done post save (and we will assume post Smart Push), the data needs to be update in both places. Is this the best and most efficient way to do this? Probably not. Again, take it for what it is – an education on bypassing the Essbase calculations!

// Get list of vendors that are in the rows
def listVendors = operation.grid.rows.headers*.essbaseMbrName.collect {vendor, account -> return vendor}.unique()

// Create a list of calculated members that need to be in the grid
def listAccounts = ["Regular_Cases","Net_Sales","prodRev_Level_1","Cost_of_Sales_without_Samples","prodRev_Level_2","Depletion_Allowance_Manual_Chargeback"]

//prodRev Grid Setup
Cube prodRevCube = operation.application.getCube("prodRev")
Cube rprodRevCube = operation.application.getCube("rprodRev")

DataGridBuilder prodRevGrid = prodRevCube.dataGridBuilder("MM/DD/YYYY")
DataGridBuilder rprodRevGrid = rprodRevCube.dataGridBuilder("MM/DD/YYYY")

prodRevGrid.addPov(sYear,sScenario,sVersion,sChannel,sMaterialGroup,sSource,sCompany)
rprodRevGrid.addPov(sYear,sScenario,sVersion,sChannel,sMaterialGroup,sSource,sCompany,'MTD')
prodRevGrid.addColumn('Jan','Feb','Mar','Apr','May','Jun','Jul','Aug','Sep','Oct','Nov','Dec')
rprodRevGrid.addColumn('Jan','Feb','Mar','Apr','May','Jun','Jul','Aug','Sep','Oct','Nov','Dec')

The next piece is replicating what would be in a typical Essbase calculation. This is the business logic and currency conversion.

// Define the currencies to be updated and sent back to the database
def lstCurrency = ["Local","USD"]
// loop through the grid the user entered their updates.  This will loop through each vendor, then loop
// through each account for each vendor
listVendors.each{ vendor ->
  listAccounts.each{ account ->
    // Create two variables to hold the calculated results for local and USD
    def sValues = []
    def sValuesUSD = []
    // Create two variables to hold all the monthly calculated results to be added to the grid to submit
    List addcells = new ArrayList()
    List addcellsUSD = new ArrayList() 
    // Run for 12 months - this would likely need to be dynamic for a form that included 
    // the option for forecast and plan
    ['Jan','Feb','Mar','Apr','May','Jun','Jul','Aug','Sep','Oct','Nov','Dec'].each{cMonth ->
    // Calculate all the accounts
    double setValue
      switch (account) {
         case "Net_Sales":
           setValue = operation.grid.getCellWithMembers("Avg_Price/Case_Inp",cMonth.toString(),vendor.toString()).data * operation.grid.getCellWithMembers("Regular_Cases",cMonth.toString(),vendor.toString()).data
           break
         case "prodRev_Level_1":
           double netSales = operation.grid.getCellWithMembers("Avg_Price/Case_Inp",cMonth.toString(),vendor.toString()).data * operation.grid.getCellWithMembers("Regular_Cases",cMonth.toString(),vendor.toString()).data
           setValue = netSales * operation.grid.getCellWithMembers("prodRev_1_%_Inp",cMonth.toString(),vendor.toString()).data
           break
         case "Cost_of_Sales_without_Samples":
           double netSales = operation.grid.getCellWithMembers("Avg_Price/Case_Inp",cMonth.toString(),vendor.toString()).data * operation.grid.getCellWithMembers("Regular_Cases",cMonth.toString(),vendor.toString()).data
           double prodRev1 = netSales * operation.grid.getCellWithMembers("prodRev_1_%_Inp",cMonth.toString(),vendor.toString()).data
           setValue = netSales - prodRev1
           break
         case "prodRev_Level_2":
           double netSales = operation.grid.getCellWithMembers("Avg_Price/Case_Inp",cMonth.toString(),vendor.toString()).data * operation.grid.getCellWithMembers("Regular_Cases",cMonth.toString(),vendor.toString()).data
           setValue = netSales * operation.grid.getCellWithMembers("prodRev_2_%_Inp",cMonth.toString(),vendor.toString()).data
           break
         case "Depletion_Allowance_Manual_Chargeback":
           double netSales = operation.grid.getCellWithMembers("Avg_Price/Case_Inp",cMonth.toString(),vendor.toString()).data * operation.grid.getCellWithMembers("Regular_Cases",cMonth.toString(),vendor.toString()).data
           double prodRev1 = netSales * operation.grid.getCellWithMembers("prodRev_1_%_Inp",cMonth.toString(),vendor.toString()).data
           double prodRev2 = netSales * operation.grid.getCellWithMembers("prodRev_2_%_Inp",cMonth.toString(),vendor.toString()).data
           setValue = netSales - prodRev1
           break
         default:
           setValue = operation.grid.getCellWithMembers(account.toString(),cMonth.toString(),vendor.toString()).data
           break
      }
      // Update the variables that will be used to create the grid rows
      sValues.add(setValue)
      addcells << setValue
      // Convert Currency if account should be converted
      if(convertCurrency(account) == true){
        sValuesUSD.add(currencyRates[cMonth].toString().toDouble() * setValue)
        addcellsUSD << currencyRates[cMonth].toString().toDouble() * setValue
      }
      else
      {
        sValuesUSD.add(setValue)
        addcellsUSD << setValue
      }
    }
    // After all 12 months are traversed calculated, add local and USD to the grid
    prodRevGrid.addRow([account.toString(),vendor.toString(),'Local'],addcells)
    prodRevGrid.addRow([account.toString(),vendor.toString(),'USD'],addcellsUSD)
    rprodRevGrid.addRow([account.toString(),vendor.toString(),'Local'],addcells)
    rprodRevGrid.addRow([account.toString(),vendor.toString(),'USD'],addcellsUSD)
  }
}

The last piece is to submit the grids. The following will write to the log the number of cells accepted and rejected.

// After all vendors and account have been calculated, submit the grid to the respective database
DataGridBuilder.Status status = new DataGridBuilder.Status()
DataGridBuilder.Status rstatus = new DataGridBuilder.Status()
DataGrid grid = prodRevGrid.build(status)
DataGrid rgrid = rprodRevGrid.build(rstatus)
println("Total number of cells accepted: $status.numAcceptedCells")
println("Total number of cells rejected: $status.numRejectedCells")
println("First 100 rejected cells: $status.cellsRejected")
prodRevCube.saveGrid(grid) 
println("Total number of cells accepted: $rstatus.numAcceptedCells")
println("Total number of cells rejected: $rstatus.numRejectedCells")
println("First 100 rejected cells: $rstatus.cellsRejected")
rprodRevCube.saveGrid(rgrid)

So…

Why Do this?

This would add complexity for those who don’t know Groovy.  It is a completely different thought process. But there are benefits.

  • Elimination of the BSO application creates a simpler model.
  • There is no requirement of data synchronization between the BSO and ASO cube.
  • Users will see cell history for all data that was changed, not just the data changed by a user directly.

That is not to say there aren’t drawbacks, because there are.  I am sure if you are experienced, you are already asking questions about clearing data, large allocations, and several other necessary components.

Is It Worth It?

Honestly, I don’t know yet. This is a complete paradigm shift in our world. The thought of calculating everything in Groovy and not having a BSO plan type is just completely foreign to me. The exploration of this option and documenting here surely proves my interest is peaked! Large allocations seem to be slower than BSO Essbase calculations. Everything else seems to be as quick or quicker. I think in the short term, having both gives us the best of both worlds, even with the additional need to synchronize the data between the two. Long term? Who knows. I never thought I would even be entertaining it, so I am not closing my mind to the possibility.

What do you think?


Backup Up Essbase Cloud (EssCS) Applications

The good news is migrating to the cloud doesn’t change a lot when it comes to backing up your Essbase applications.  Conceptually, it is the same.  The utilities used are slightly different.

Enter CLI

If you are new to Essbase on the cloud, the CLI, or command line interface, is something you will want to download and configure.  It is a pretty useful utility and easy to use.  I will say that it is new and missing a lot of functionality you may want.  I was just as frustrated using EPMAutomate with PBCS when it came out.  Three years later, however, EPMAutomate is pretty complete.  I am hoping for the same progression with CLI.  For backing up your apps, the CLI will give you everything you need.

Running An LCM Backup

There is really only one command that is a must.  I will get into why I say this in a second.  LcmExport will run an LCM and store it locally, which is a nice bonus.  There is no need for any other commands to download and rename it.

LcmExport has the following parameters.

  • -verbose (or -v) will provide a more complete response description, especially if there is an error
  • -application (or -a) requires an additional parameter that identifies your application name
  • -localdirectory (or -ld) requires an additional parameter that tell the command where to store the backup file
  • -zipfilename (or -z) requires an additional parameter and is the name of the LCM file that everything will be stored locally
  • -threads (or -T) requires an additional parameter equal to the number of threads you want to use to run the backup
  • -skipdata (or -skip) will tell the LCM to ignore the data in the application
  • -overwrite (or -o) is used will tell the process to overwrite the zip file if it exists
  • -password (or -p) requires an additional parameter to send the password to the command

At minimum, the application and zipfilename parameters are required.  The localdirectory and overwrite parameters will likely be used in every call you make as well.

C:\[cli foldername]\esscs.bat lcmExport -a Sample -z Sample.zip -ld c:/temp -o

Why This Isn’t Enough

I have always felt very strongly that data exports should be done because corruption will remain in the pag files until it is fixed, and often times, it isn’t found for days, weeks, or months.  At that point, you can’t export your data and you are in real trouble.  So, I don’t rely solely on the LCM backup strategy.

There are a couple ways to export the data.  With an on-premise implementation you might use Maxl to export the data.  The other option is to write a calculation that does the exports.  The calculations route will provide more option with formatting, the delimiter, and what data is included.  It might be a little slower, but since the inclusion of this option, I have relied on it ever since.

You could integrate Maxl at this point to do the same thing, but the CLI also provides you with the tools to do it if you use a calculation.  At this point, assume a calculation exists named FullExport that exports the data to application and database path on the server with a name of FullExport.txt.

At this point, there are two additional commands that will bulletproof your backup strategy.

C:\[cli foldername]\esscs calc -a Sample -d Basic -s FullExport.csc
C:\[cli foldername]\esscs download -f FullExport.txt -a Sample -d Basic -ld c:/backup -o

Completing The Circle

Normally this would be executed through DOS, or my favorite, PowerShell.  This would allow the dynamic generation of the scripts so they could be reused.  Things like the application name, database name, local path, calc script, and possibly some others, would all be variables.  The result would be something produced similar to this.

C:\cli_utility\esscs login -url https://myEssbase-test-myDomain.analytics.us2.oraclecloud.com/essbase -u kylegoodfriend 
C:\cli_utility\esscs lcmExport  -a Sample -z Sample.zip -ld c:/Backups -o
C:\cli_utility\esscs calc -a Sample -d Basic -s FullExport.csc
C:\cli_utility\esscs download -f FullBackup.txt -a Sample -d Basic -ld c:/Backups -o

I would add a step in my shell to rename this LCM and the data export downloaded with a date and time in the name.

REM Rename the LCM Zip file
ren c:\Backups\Sample.zip Sample_%date:~10,4%%date:~4,2%%date:~7,2%.zip 
REM Rename the data export
ren c:\Backups\FullExport.txt Sample_Backup_%date:~10,4%%date:~4,2%%date:~7,2%.txt 
REM Delete all files older than 30 days
forfiles /p c:\Backups /s /m *.* /D -30 /C "cmd /c del @path"

A Final Note

The calculation script referenced above would look something like this.  There are many options that can be set.  If you aren’t familiar with this, a quick google will get you what you need.

SET DATAEXPORTOPTIONS
{
  DataExportLevel "LEVEL0";
  DataExportDynamicCalc OFF;
  DataExportNonExistingBlocks OFF;
  DataExportRelationalFile ON;
  DataExportOverwriteFile ON;
}
DATAEXPORT "File" "," "/Sample/Basic/FullExport.txt";

As always, post and share. If you have a question, do the same.


Replace Special Characters with PowerShell

I have been swamped with project work and webinars, so I haven’t been able to put a ton of time into finalizing new posts.  I have a lot of thoughts and new topics started.  So, expect some new Groovy examples and possibly some Essbase Cloud content.

Unti9l then, I came across this really nice little tidbit when trying to replace special characters in a file and thought those of you who are using PowerShell would benefit by having it.  The beauty of this is that you don’t need to know which characters need escaped.  For those of you like me that aren’t well versed in this topic, not having to know which characters need escaped to work will speed up the development of similar functions.

The following snippet is a simple function that accepts 3 parameters.

  1. The string to be searched with the characters to replace
  2. The string that will replace the characters
  3. The string of characters that need replaced

This function has defaults.  the first is required, but the second and third are not.  If the second and third parameters are now supplied, the defaults – #, ?, (, ), [, ], {, and }  – will be replaced with a blank string, effectively removing them.  These parameters can be passed, and the defaults will be ignored.

function Replace-SpecialChars {
  param(
    [string]$InputString,
    [string]$Replacement = "",
    [string]$SpecialChars = "#?()[]{}"
  )

  $rePattern = ($SpecialChars.ToCharArray() |ForEach-Object { [regex]::Escape($_) }) -join "|"
  $InputString -replace $rePattern,$Replacement
}

Replace-SpecialChars (Get-Content c:\test\replace.txt) | Set-Content c:\test\replaceNEW.txt

The above will create a new file named replaceNEW.txt with the contents of replace.txt, but will exclude the characters supplied to the function.

If this doesn’t make sense, take a look at this.  Let’s say we want to replace every x with xray.  The following command would accomplish this.

Replace-SpecialChars (Get-Content c:\test\replace.txt) "x" "xray" | Set-Content c:\test\replaceNEW.txt

So, this isn’t just for special characters!

If you have a cool script, share it by commenting!


Adventures in Groovy – Part 30: Dynamically Identify Actionable Months

Almost every ePBCS application will require the need to run business logic and execute data movements on specific months based on a scenario selected.  Almost every Data Form will require action to be taken dynamically based on the selection of the Scenario.  Assuming a fiscal year of Jan to Dec and Actuals being final through Jun,

  • processes on Actuals will run on Jan through Jun
  • processes on Budget/Plan will run on Jan through Dec
  • processes on Forecast will run on Jul through Dec

Prior to Groovy, this was done in an Essbase calculation by writing if statements based on the scenario selected in the POV and checking if the month was part of a variable range.  It might have looked something like this.

IF((@ISMBR("Plan") AND @ISMBR(&v_BudYear) AND @ISMBR(&v_BudMths)) OR
  (@ISMBR("Forecast") AND @ISMBR(&v_FcstYr1) AND @ISMBR(&v_FcstMths1)))
 ...
ENDIF

Groovy provides a much more efficient way to accomplish this.  Although it may be different based on specific needs, the example below will assume that Forecast and Actuals can be identified based on a variable that is updated monthly identifying the last month of Actuals.

Setting Up The Variables and Run Time Prompts

This application has a substitution variable named v_CurMonth used to identify the current reporting month of Actuals, or the last month Actuals are final.  This will be used in the Run Time Prompt as a default value in several places and this is required.

A Run Time Prompt is also required.  There is nothing unique about the RTP for this use and the application may likely already have one.  This will be a member Type, be connected to the Period dimension, and have a default value of the substitution variable above.  It would look similar to this.

Finally, a variable in the Groovy business rule must be created.  This variable will be set as an override value with the default value equal to the substitution variable created above.  In a Groovy business rule, a variable is instantiated by adding the following line at the top of the rule.  It looks like a comment, but it acts differently when it starts with RTPS:.

/*RTPS: {RTP_Month}*/

After this is added, the Variables tab of the business rule will show all the variable defined.  Set the variable so that it is hidden and is used as an override value.

The Code

At this point, all of the required variables are setup.  The first step is to define the months.  This can be hard coded since this is not something that will change frequently.  If this is added to a script and included in all the business rules it is needed, changing it would be easy if the months did change since it is in one place and shared throughout.

// Hard coded months 
def months = ['Jan','Feb','Mar','Apr','May','Jun','Jul','Aug','Sep','Oct','Nov','Dec']

Optionally, this can be set dynamically.  Either option, in my opinion, is acceptable.  The result of the following would produce the exact same value for months.

// Dynamically get the list of months based on the application's fiscal year 
Cube cube = operation.application.getCube("GP") 
Dimension productDim = operation.application.getDimension("Period", cube) 
def months = productDim.getEvaluatedMembers("ILvl0Descendants(YearTotal)", cube)

The next piece of this rule is to get the month from the variable.  This will be the key to identify which months are used in calculations that run on Actuals and Forecast.

// Get the month from the hidden RTP 
def actMonth = rtps.RTP_Month.toString()

The last step is to get the appropriate months based on the Scenario selected.  If Actuals is selected, all the elements in the months list from the first to the index of the month in the RTP are selected.  If Plan is selected, all the months are included.  This can be altered based on needs.  Some companies do mid year plans, for example, and may need to only execute the logic on the last 6 months.  If Forecast is selected, all the elements in the months list AFTER the RTP value to the end of the list are selected.

// Create dynamic list of months based on user selected Scenario
def useMonths = []
if(operation.grid.pov.find{it.dimName =='Scenario'}.essbaseMbrName.toString().toLowerCase().contains('plan')){
  // This will create a list of all months - assuming the the plan is for 12 months
  useMonths = months 
  }
if(operation.grid.pov.find{it.dimName =='Scenario'}.essbaseMbrName.toString().toLowerCase().contains('forecast')){
  // This will create a list all months after the actMonth variable - or the out months
  useMonths = months[months.findIndexOf{it == actMonth}+1..-1] 
  }
else{
  // This will create a list of all actual months
  useMonths = months[0..months.findIndexOf{it == actMonth}] 
  }

// Create delimited list for methods that don't require a List object
def useMonthsString = """\"${useMonths.join('", "')}\""""

Using useMonths and useMonthsString

The hard part is over.  Using the variable is the easy part.  It can be used anywhere the months needs to be change from all months to the identified months.

In a DataMap/SmartPush

operation.grid.getSmartPush("GP_SmartPush").execute(["Period":useMonthsString])

Same concept but overriding the entire POV (something more realistic in a real world example)

// This creates a variable for the povMap that includes all members in the existing POV
// This is used as a possible scenario but is not directly related to the content of this post
def povMap = operation.grid.pov.each{povMbrs["pov$it.dimName"] = "$it.essbaseMbrName"}
// Add the months to a map for the Period dimension
povMap['Period'] = useMonthsString
operation.grid.getSmartPush("GP_SmartPush").execute(povMap)

In a GridBuilder

builder.addColumn(['Period','Currency'], [ useMonths,['Local','USD'] ])

In an Essbase FIX statement

essCalc << """
FIX($useMonthsString)
"""

Finally

This could be added to a script and included in all the Business Rules that require such a variable.  It creates a variable once that can be used in many classes.  It improve maintainability and reduces replicating the same logic for each class.  If you have any suggestions, or have something you would like to share, please post a comment.