Groovy Training Released – $100 Discount

I am really excited to announce that my first training class is released. The first class is called Groovy for EPM Cloud Planning, and it will contain 10 modules.  Module 1 and 2 are complete and 3 will be available by the end of the week.  Each additional module will be available every 7 to 10 days.  I am looking for feedback and am offering a $100 discount to the first 20 people that would like to purchase the class.

Each module will have a presentation, live examples, tutorials, lab exercises to reinforce your learning, and a downloadable PDF that has all the examples discussed in the presentations.

At the end of the course, attendees will be able to:  

  • Use Groovy coding required to interact with the EPBCS API 
  • Create variables and use them to efficiently interact with the EPBCS API 
  • Build the following functionality in EPBCS  
  • Use RTPs 
  • Iterate through grids 
  • Add pre-save validation 
  • Develop custom Essbase calculations 
  • Execute custom data maps 
  • Create smart pushes from data maps 
  • Move data from ASO to BSO 
  • Calculate data in ASO 

If you have completely ignored the last 12 months of posts, Groovy overlays JAVA and provides a vast amount of functionality.  Because there are more than a hundred functions and thousands of use cases, these courses are targeted toward 80-90% of the most relevant functions in the industry.  Attendees will not leave as Groovy experts. However, they will leave with a working knowledge of Groovy calculations.  Additionally, attendees cannot expect to have a working knowledge of all functions at the completion of this course.  


Adventures in Groovy – Part 43: Sending Proactive Emails In A Calculation

If you haven’t heard, we now have the ability to execute REST API within a calculation script.  Not only does that mean we can interact with other environments and do things in calculations we couldn’t do before, we also have the ability to interact with any provider that has REST.  You could pull current prices for products from Amazon.  You could see how many open box items there are at area Best Buy stores.  You could pull in currency rates.  That doesn’t even touch on the things like DM processes, metadata updates, and application refreshes. You can even send emails!

First, what is REST API?

A RESTful API is an application program interface (API) that uses HTTP requests to GET, PUT, POST and DELETE data.  A RESTful API — also referred to as a RESTful web service — is based on representational state transfer (REST) technology, an architectural style and approach to communications often used in web services development.

What this means is you can interact with services through web URLs.  When you send an email or purchase a product, you are using HTML Post and Get requests.

How does it work?

REST is basically a way to post (do something) and get(receive something) through website URL calls.  There is more to it than that, but that is the basic concept.  There are all kinds of services, free and paid, that provide services through REST API.

Since I am all about automation and communication, one thing I thought would be great is if a user runs a calculation and it fails, to proactively notify an admin.  Prior to this month, you would have to write something outside of the UI for Planning to do this.  This would be reactive.  Wouldn’t it be better to get an email or text immediately so you can act quickly and diagnose the problem?  Heck yeah it would.

The REST API Provider

There are a number of providers that give you the ability to send emails via REST API.  A few are free for a limited number of emails per day/month.  Mailjet is one of them.  I went out and signed up for a free account.  It allows you to send up to 6k emails a month, with a maximum of 200 per day.  That is cool for my purposes of demoing functionality.

There are a few things you need.  First is an encrypted key and private key.  That you will get when you create our account.  Next, the documentation lays out what needs included in a post (do something) to send an email.

To send an email through mailjet, you post to a url of https://api.mailjet.com/v3/send and pass a body that has the typical information to send an email, like from, to, and subject.  The body is formatted as a json object.  Json is not super complicated, as it is basically the same as a Groovy map, or an xml format.  To focus on the API, I will explain json at a later time.

Send An Email

The first thing that needs built is a connection to the REST API provider.  You can create a connection to be reused in Planning (epbcs), but for this example, I am just going to keep it simple and use a connection object with the appropriate parameters.  To keep my account private, I remove my keys and replaced them with PublicKey and PrivateKey.  Just remember these both need replaced with the actual keys.  The status should return 200 if the request is successful.

Connection connection = connection("https://api.mailjet.com","PuclicKey","PrivateKey")
println  connection.get().asString().status

Next, I am going to walk through the body that needs passed.  Again, this is basic info that is not surprising.  Each element has a property and value.  To avoid any more spam in my email account, I replaced the from and to email with invalid emails.  These should be changes to include valid from and to emails.

def bodyMap = new JSONObject()
bodyMap.put("FromEmail","xxx@in2hyperion.com")
bodyMap.put("FromName","Kyle Goodfriend")
bodyMap.put("Subject","My first email from a Groovy Calculation!")
bodyMap.put("Text-part","This is an email from a calculation")
bodyMap.put("Html-part","<h3>Dear Admin,</H3><br />This is an email from a calculation")
bodyMap.put("To","xxx@in2hyperion.com")

Next is the actual request to post (or do something).  The path to send emails in the URL is https://api.mailjet.com/v3/send.  The only thing we need to add to the post here is the path since the URL is in our connection.  The post requires two parameters.  First, the request requires one header identifying the content as json.  The second parameter is the body that includes the email information, which we have in the bodyMap, which we simply convert to a string.

HttpResponse response = connection.post("/v3/send")
.header("content-type","application/json")
.body(bodyMap.toString()).asString()
println response.status
println response.body
println response.statusText

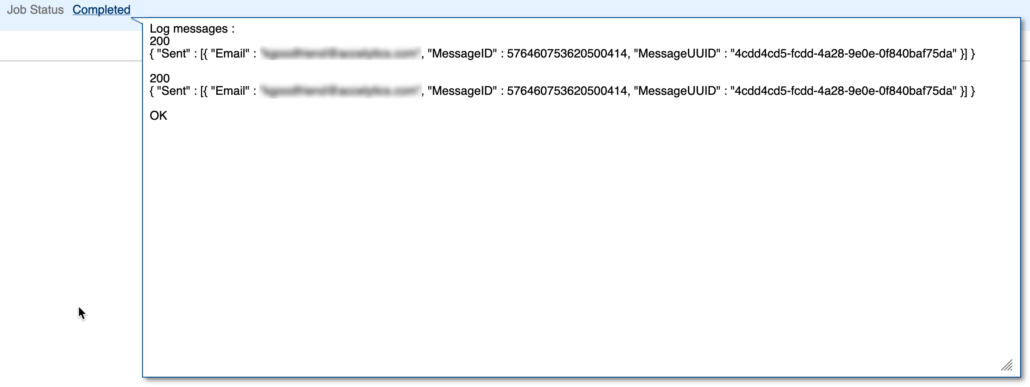
This all said, the result is an email to your inbox and a log in the job console that looks like this.
Last Call

Well boys and girls, that is all she wrote.  That is it.  If your calc throws an error, use try/catch/finally and send the appropriate people an email.  If the calc is a long running calc, user operation.user to send the person that executed it an email when it finishes.  The possibilities are endless but you now have a mechanism to have proactive communication, not reactive and time-consuming effort.

One note about mailjet.  I have no affiliation to this service.  I have not used it other than to demonstrate this functionality.  A FREE account does allow you to send 6k emails a month with 200 at most every day.  If you want to use this in a production situation, you likely will need to pay for basic account, which is less than 9 bucks a month.


PBCS/EPBCS Data Import Options

Importing data directly into PBCS can be done in two ways.  There is a planning format and an Essbase format.  Yes, it can be loaded through Data Management, but this is focused on explaining the direct import process, the formats, and the benefits to each.

Planning File Format

What Is The Planning File Format

Per Oracle, if data is exported to a file in the Planning format, you can use Notepad to change the database name in the file; for example, ASOCube, and then import the data file into the aggregate storage outline provided all dimensions exist.

This is fine and dandy if you are importing data exported from Planning.  Normally, there is a source that is giving the data to PBCS and a format has to be provided to that source.  The format is basically a delimited file with some quotes around a group of the fields.  Technically, there are 3 pieces of the file.

  1. One dimension has to be in the rows.
  2. One dimension has to be in the columns.
  3. The third section is the POV, or the remaining dimensions.

It looks like this.

Account,Jan,Feb,Mar,"POV",Plan Type Name
10020,40.10,50.60, 70.20,"Actual,Final,Company_10,FY18",Finance

Why Use The Planning Format?

There are some benefits and drawbacks of using this format.

  • Data loaded to smart list accounts can be loaded as the actual smart list label. This is great for applications where the data is provided in that format.  WFP data often provides data in the smart list value, like Part Time/Full Time.
  • When there are errors, the load continues through the end of the file.
  • The job console shows the number of records processed, the number of records that couldn’t be loaded, and the first x lines of errors with line numbers.  I will warn you that I have seen the console show all records loaded and nothing loaded.  I have also seen no rejected records when the file didn’t load completely.  So, when you are developing loads, I would recommend validating carefully and looking at the block counts to ensure the messaging in the console is correct.
  • The biggest drawback to loading the planning format is that it loads through Planning and because of some of the benefits, it is slower to load. This normally isn’t a huge issue because the loads are finished within a few minutes.
  • The format is a little odd and can sometimes be problematic to produce.  Certain dimensions are required in the row and column headers.  This is often challenging.  For instance, most applications require the months to be in the row or column areas.  Since they can’t be put in the POV, more than two months have to have multiple columns.  If the source can’t produce this easily, a file for each month has to be created.

Essbase File Format

Why Use The Essbase Format?

Loading directly to Essbase is faster and often times easier to produce the needed format.  It loads directly to Essbase so none of the mapping done when loaded through Planning (like smart lists) happens.  This is often a huge headache because the mapping has to be done in the source or in some middle ETL layer (assuming DM is not being used).  Another issue with using this method is that when a record rejects, nothing more is loaded.  The job console also does not show the records processed.

What Is The Essbase File Format

Per Oracle, (exported by an on-premises product). These files can be formatted in either Cell list or Column list format. Cell list format specifies a single cell value for each record, whereas Column list format specifies multiple cell values for each record. For example, if you specify Time on the column, you might have the values Jan, Feb, Mar, and so forth on the column, with 12 values for each record (that is, one for each month). Conversely, the Cell list equivalent would contain 12 records, one for each month. For information on exporting files from Essbase, see the on-premises Oracle Essbase Administration Services Online Help.

That doesn’t tell us much.  The format of this loading methodology is almost identical with the Planning format.  The thought process is a little different.  This file will hold a column for every dimension but has no header line.  Each dimension is preceded and terminated by quotes and delimited by a tab.  All the dimensions are listed first, followed by the value of that intersection.  The planning format shown above will look like this

"10020"       "Actual"      "Final"       "Company_10" "FY18" "Jan"  40.10
"10020"       "Actual"      "Final"       "Company_10" "FY18" "Feb"  50.60
"10020"       "Actual"      "Final"       "Company_10" "FY18" "Mar"  70.20

Last Call

Neither of these formats/methods are complicated, but the documentation is lacking when explaining exactly what they are.  There is little mention to the pros/cons.  Hopefully sharing this will fill in the gaps that exist in the documentation.